
Hey there! It’s time for a pattern review! Sorry my sewing posts have been so few and far-between lately!
I actually made this project TWO years ago and decided I should do a pattern review on it after I made my first bag. I started on my second bag and took pictures during the sewing process to show you… then life happened and I needed to clean up the dining room so I threw everything in a large basket and it’s been sitting in the attic up until about 4 months ago. When I finally brought it out, I finished the rest of the bag without thinking to take more pictures (oops).
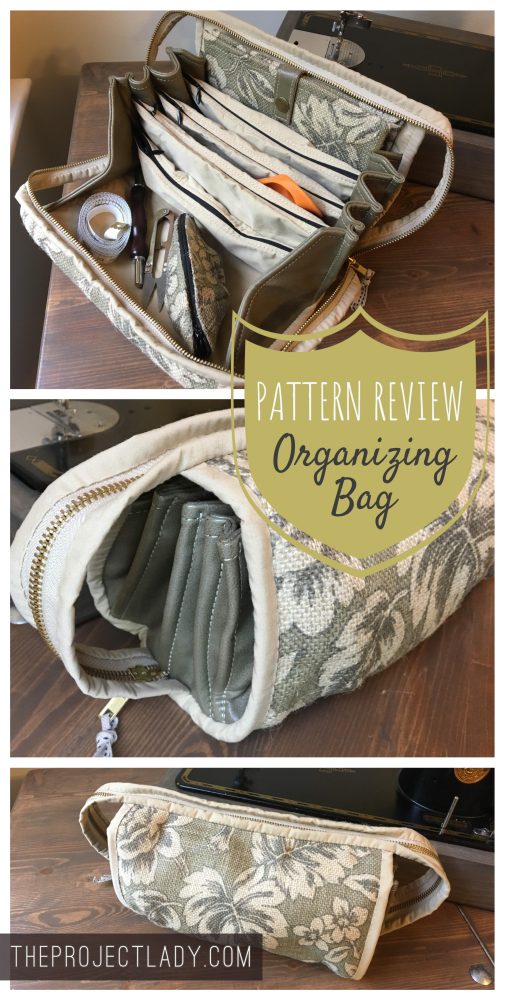
 Anyways, this bag is called the “Bionic Gear Bag” and I found the pattern on Craftsy.
At the time, I didn’t have a proper organizer for my essential sewing tools so it really spoke to me – plus, the design was intriguing. You could use this bag for anything of course – crochet/art/general craft supplies, etc.
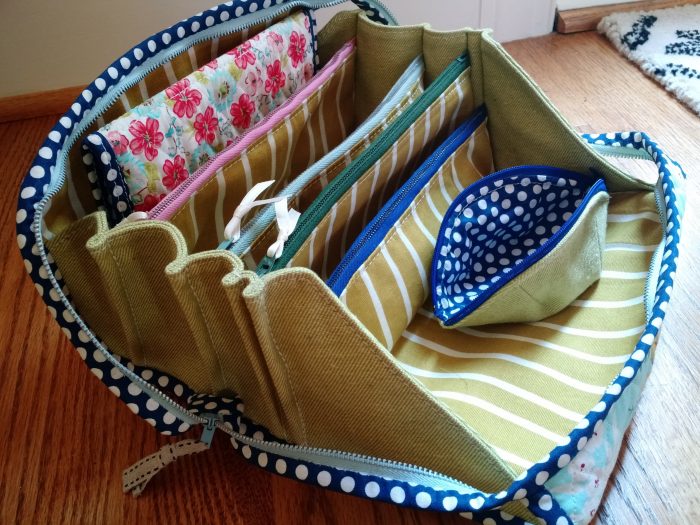
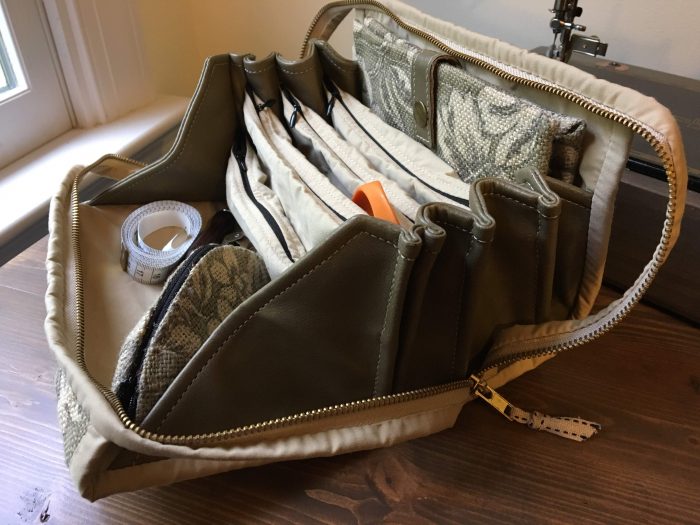
There’s 4 zippered pockets and between each pocket is a space for you to organize other items that you want to have quick access to.
 The pattern includes the little zippered (“dumpling”) dish you see in the front – good for sewing clips, buttons, etc.
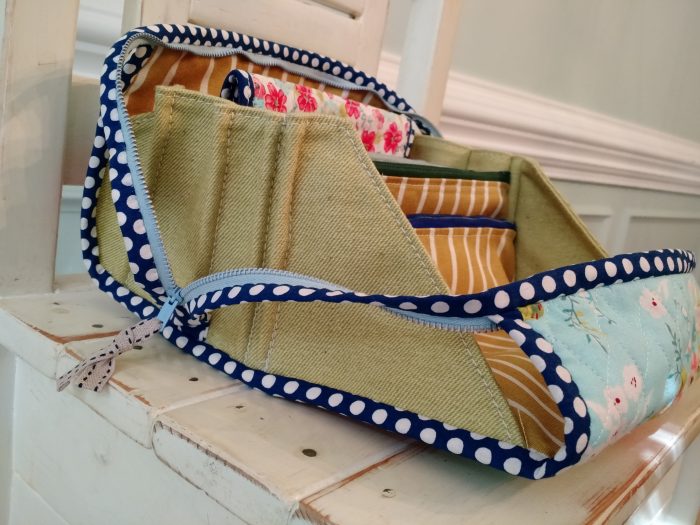 The bag opens like an accordion and the front flap lays flat on the table.
 The bag doesn’t take up very much space when it’s zipped closed.
 The loops of zipper act like carrying handles too.
 I bought the extra needle organizer pattern – I liked the idea of having my needles organized, especially a way to keep track of my used needles. I’ll do a separate review of this later on.
SKILL LEVEL: The patterns states that this is a beginner level, however, I’d say that’s just so people will buy it. I’d rate this as an advanced project because of all the zippers, binding, and side pleats. However, saying all that – beginners really surprise me – if you are patient, detailed and take your time you can do this!
THINGS TO KNOW: Perhaps the biggest draw back about the instructions are how loooong they are – 82 pages worth of instructions!! Not only are the instructions long but most of the length comes from unnecessary chitter-chatter (I ended up highlighting the important parts before sewing so I wouldn’t get frustrated). The included pictures are small and low-quality. The instructions for the “bionic” bag are 35 pages long with very little pictures and the instructions for the “dumpling” bag are 44 pages long with LOTS of pictures – so strange considering the dumping dish is a bonus accessory and much smaller/simpler.
TIPS: Go slow, give yourself lots of time and work in a quiet, clutter-free area.
WHAT I DID DIFFERENTLY: I didn’t change much on the bag – I made the zipper loops (“handles”) as short as possible. I used regular and invisible zippers on the different bags – I don’t recommend invisible zippers because they ended up not laying as nice and were harder to sew.
All things considered, I DO recommend this pattern because of the design and functionality. It’s a fun project that will test you but I can guarantee you will be so pleased with yourself when you finish!
Pictures of the construction process: Here’s what the supplies look like. Stabilizers, zippers, fabrics/lining.
The most stressful part will be sewing the pockets into the sides by making pleats so I’m featuring that process mostly: Here’s the side with marks along the top/bottom showing where to create the pleats. I’d pinch each mark along the bottom edge…
 …and place each side of a pocket into it.
 (top of pleat/pocket)
 ‘Wonder clips’ are essential for this kind of stuff (too thick for pins + pins would leave holes in vinyl). When clipping make sure your lining/pocket edges are pushed into the side pleats as far as possible because your seam to attach everything isn’t very wide.
 I had an industrial machine and it went through the 4 layers of vinyl and 4 layers of lining fabric easily. I used a teflon foot to slide along easily.
 The other part of this bag that may seem intimidating is the binding – but it’s not that bad! At this point I used a needle and thread to stitch the loose edges of binding on each side of the zipper down, then I clipped the excess zipper tab from the seam allowance and hand-stitch the remaining binding that followed the outside of the bag. This is the most rewarding step because it’s when the whole bag comes together and starts looking really nice!
 The stitch for sewing the binding looks like this – the ‘wonder clips’ work wonders for this step too!
FINISHED!


 **the needle organizer is a separate purchase**

 This is what I fit inside my bag and it would easily hold more – I choose to keep only what I routinely use and want on-hand with each project.

8 Comments
Loved your close up pictures and all the comments. I made a similar bag last year (sew together) and has similar construction. I agree, this NOT a beginner pattern. Want to make the needle book but only see that as a “workshop”. Have a feeling the videos would be easier to follow but feel you shouldn’t have to buy the video to put these items together. All in all it is a nice bag!
January 12, 2020 at 7:55 amThank you for the comment!
January 13, 2020 at 6:04 amHi. I bought your latter several years ago and love the bag – I use it every day. I wanted to make another but a little bigger. Is it simple to resize or have you got instructions for a bigger version?
September 12, 2020 at 3:09 amHi Valerie! For this bionic bag, I bought the pattern. I imagine it would be simple to re-size.. just need some time to think through how to adjust the measurements.
September 30, 2020 at 2:06 pmhi, i can not find this patterns anywhere. Do You know where can i find it?
November 8, 2022 at 4:58 amthank you
I’m sorry I don’t know. It’s odd it’s not for sale anymore. The instructions were VERY lengthy/wordy so she may have had a lot of negative feedback and didn’t want to deal with it anymore 🙁
May 19, 2023 at 7:06 amgreat bag, but the pattern is no longer available, do you know where else can i find it?
November 8, 2022 at 5:50 amthank you
Hmm.. that’s odd. I don’t know I’m sorry!
May 19, 2023 at 7:05 am