

This post is part of a series of posts for building a table out of raw lumber. See my original post that introduces the table and all posts for the series – How to Build a Farmhouse Table (Harp Design copycat).
See my previous post about how I turned the legs on a lathe.
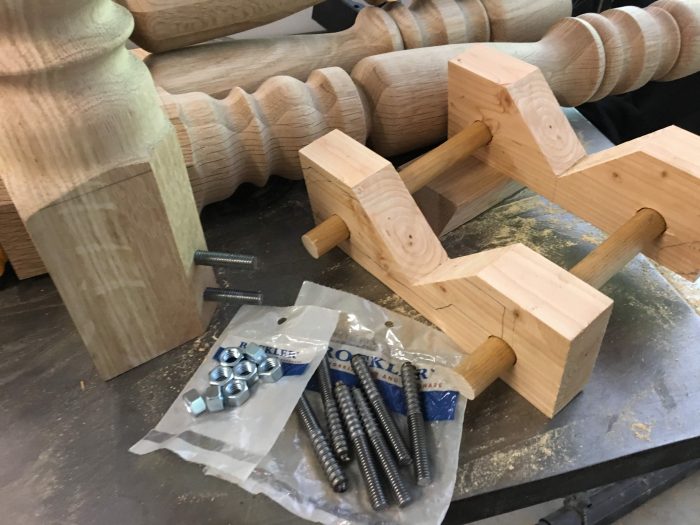
In this post I will be showing how I added bolt hangers to the table legs for allowing them to be removed from the table.
For this project you will need:
-4 table legs
-8 hanger bolts (I used 3/8 x 3″)
-8 hex nuts (I used 3/8″)
-8 large flat washers & 8 lock washers (set aside for when bolting to table)
-wrenches
-jointer (fence adjustment of 45-degrees)
-drill press & 45-degree drilling jig*
*I made the jig EASILY out of squared 2×4 scrap and 1″ dowel pieces (I also used this jig for the corner brackets on the apron).
 This jig was a must for drilling precise holes for the leg hardware. The wood blocks slide over the dowel rods to make it adjustable for whatever you’re working on. I used about 12″-long 2×4 scraps (that were square and flat) and cut out a 45-degree notch in the center with my table saw (blade set at 45-degrees at the height that looked good… pushed it through with my miter gauge, flipped the wood around and pushed it through for the other side). NOTE: be as precise as possible with your 45-degree blade… if your notched area is too wide your leg will wobble in the jig. Cut 12″ long dowel pieces (I preferred the bigger dowels for stability but any size over 3/8″ would work fine). Drill holes through your boards in exactly the same spot so they match up when dowels are in (you can do this by drilling through BOTH pieces at the same time). Slide your dowels in!
 To create a flat spot on the corner of my legs I ran each leg through my jointer with the fence set at 45-degrees.
 It took about 4 passes for each leg – create your flat spot at least 1/2″ wide for easily drilling. TIP: do the same amount of passes for each leg so they fit on the apron the same.
 Mark the spots on your leg where you want the bolts. Consider how tall your apron is for this because the bolts will need to fit within.
 Set-up your drill press for drilling pilot holes for your bolts. Use a bit that is slightly smaller than the screw-side threads on the hanger bolts. Set the depth stop. Drill.
 Put 2 hex nuts on the end of your bolt and tighten together so you can drive it into the wood. Use your handy jig for these next steps to keep your leg stable. Use the top nut for turning the bolt into the wood. Go slow at first and make sure the bolt is going in straight.
 Release the nuts using 2 wrenches.
 So easy! TIP: you can protect the threads of your bolts by keeping the hex nuts on the ends.
– Stay tuned for the next post where I’ll share how I made the table apron pieces –


No Comments