
I’ll have to tell you – this is one of the most exciting projects that I’ve done in a long time!
I got my Kitchenaid Stand Mixer from a pawn shop, and although I didn’t like the color I was more interested in getting a good deal. I’ve had it for about 7 years and it never even occurred to me that I should spray paint it until just the other day when I came across a copper colored version… for $599!! How ridiculous is that!? I loved it but of course I couldn’t justify such a heavy price tag for just a color. Well I’m happy to say that I got my copper mixer for only $8 and a few hours of work! Now I LOVE it! It brightens up my kitchen (and my day).. I find myself peering into my kitchen just to get another glance at it.

Go to Lowe’s and get yourself a can of Rust-oleum Copper spray paint – you won’t regret it! I love the hammered look – it goes on flawlessly, gives it a professional look and it hides any blemishes there might be.
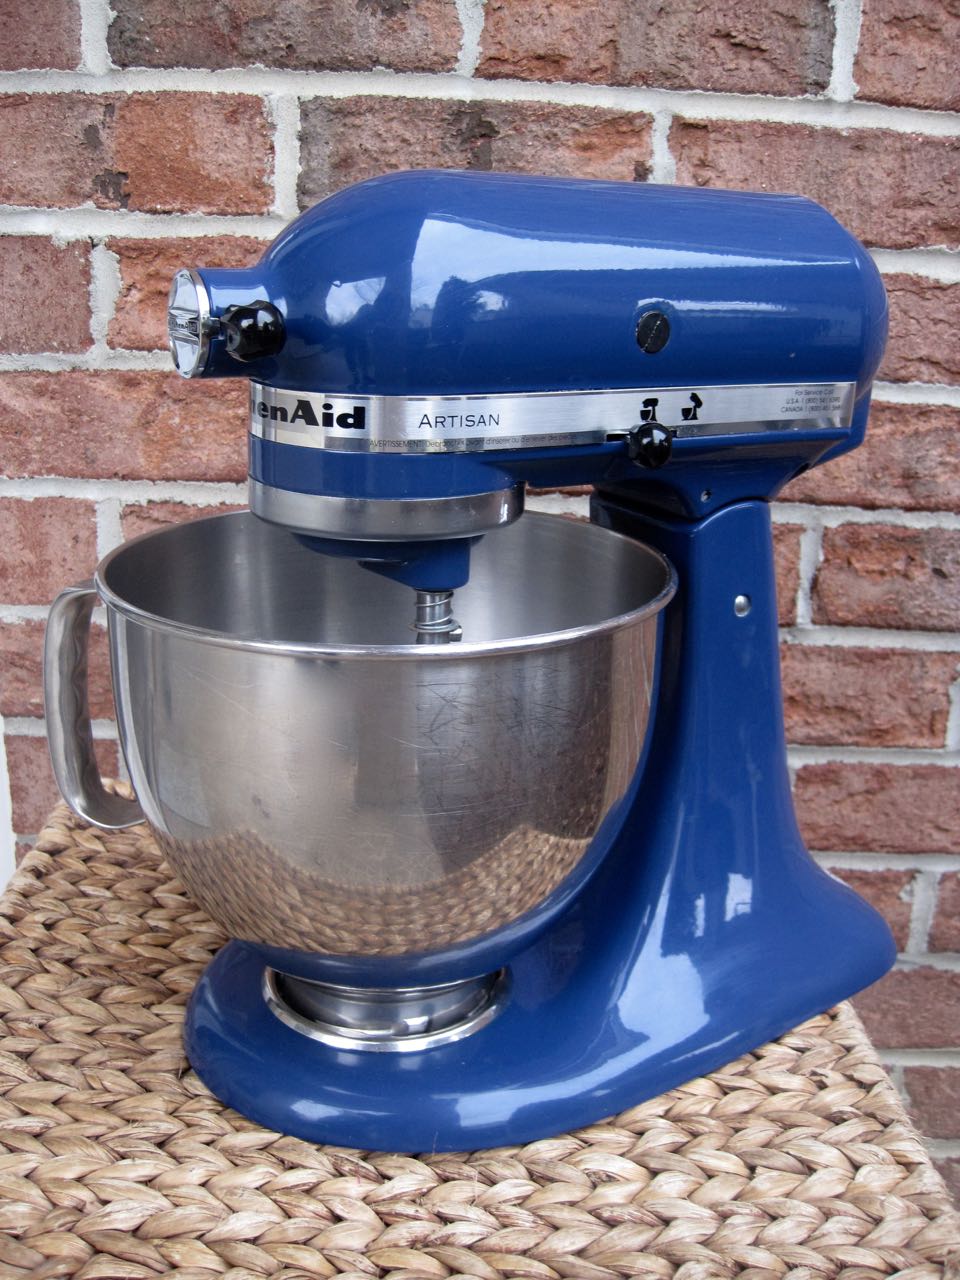
BEFORE
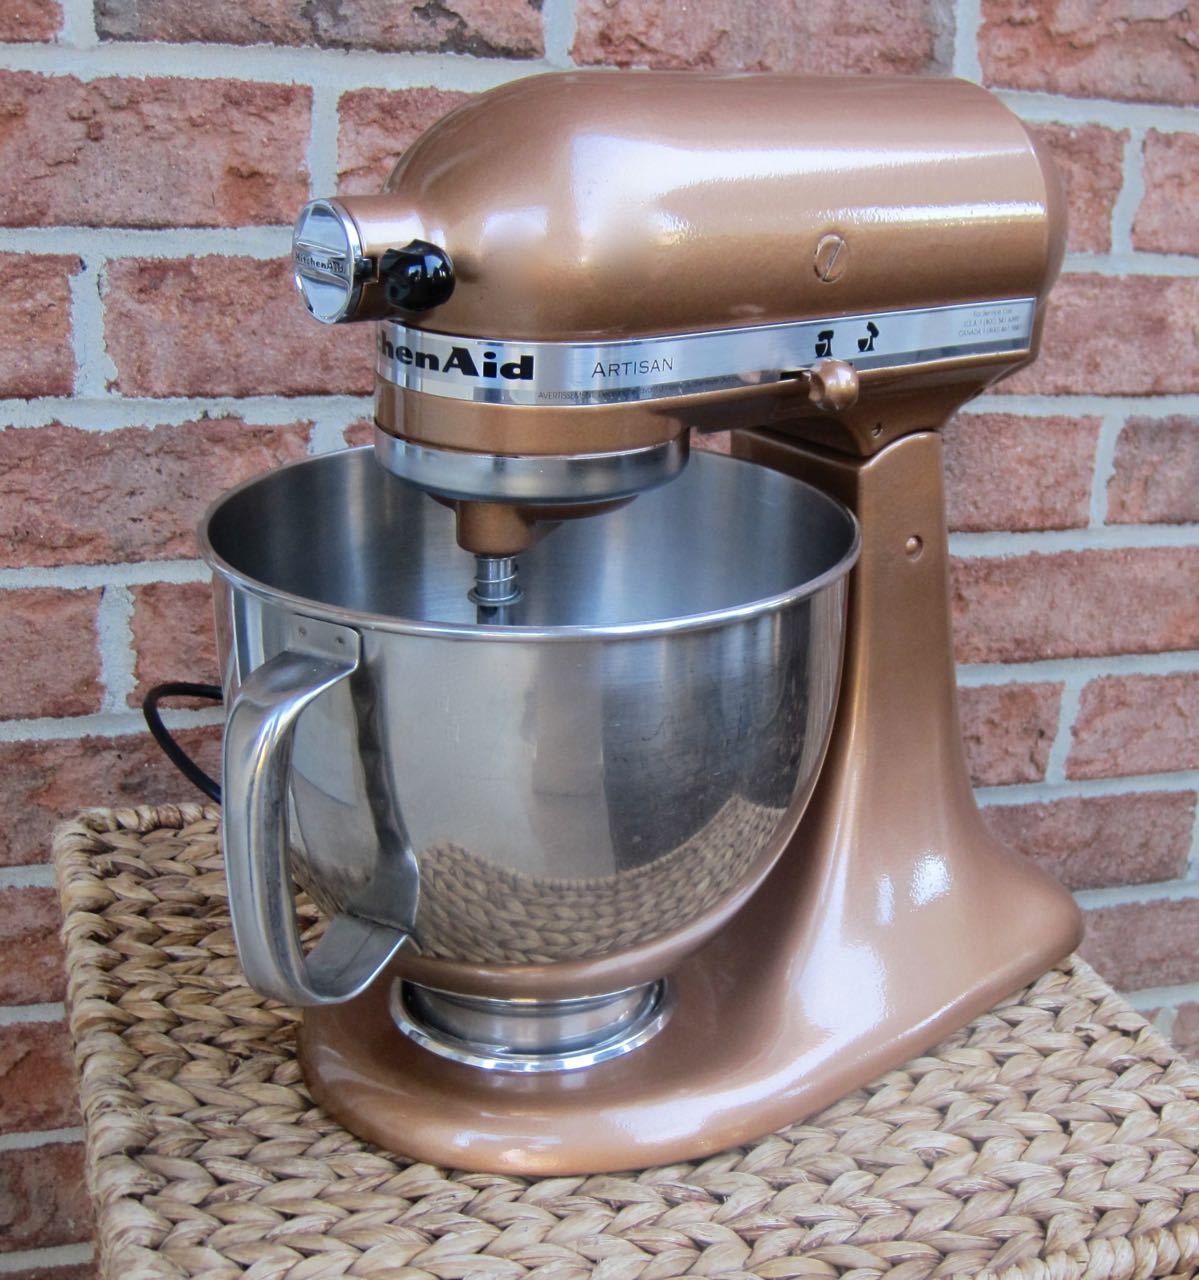
AFTER
WHAT YOU NEED:
-Spray Paint*
-220 Grit Sand Paper
-Painter’s Tape
-Cleaning Solution
-Screw Driver/Flat Head
-Razor Knife (If you’re doing more detailed taping)
-Paper Towel or Grocery Bag
*If your spray paint doesn’t have primer included make sure you buy primer and spray it on first!

Here you can see I have everything I need and I’ve disassembled the parts of my machine I could easily take off. The trickiest part you might think is taking the silver ring off around where the beater attaches – simply use your flat head to pry off (gently)… Everything else comes off easily with screws and should be self-explanatory. Remember those little rubber feet on the bottom!
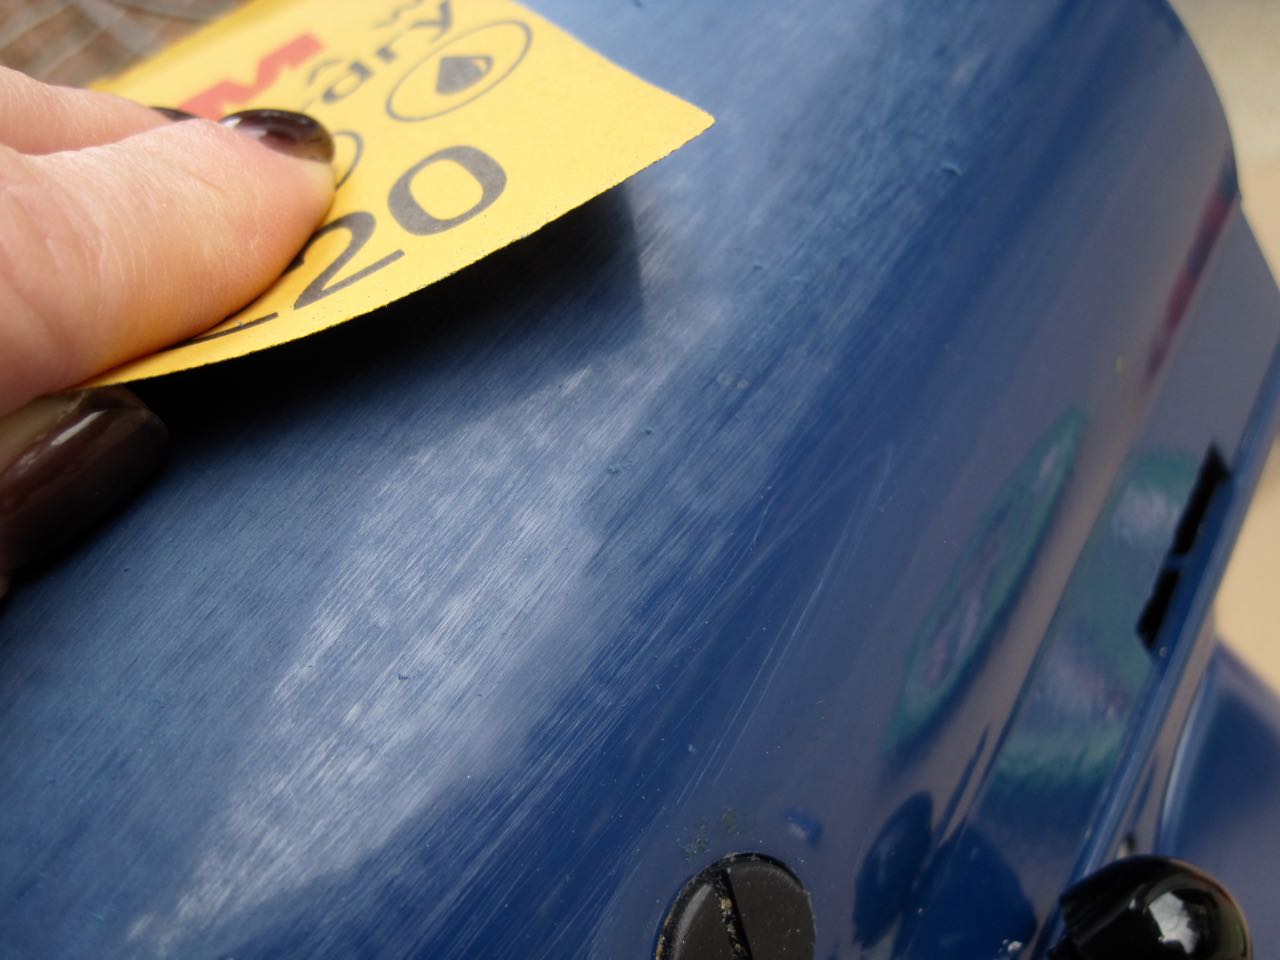
Sand your machine down to give it a matte look – any gloss finish makes spray paint hard to adhere to.

I didn’t worry about sanding underneath my machine (even though I painted it). Clean the surface really well so it is free from sanding dust. I used TSP Cleaning Solution (specifically for surfaces you are prepping for paint).

Tape off anything on your machine you don’t want painted. I put my cord in a bag and tapped the rest and used paper towels to stuff around where the back was exposed and taped off the edges. The only other thing I taped was the silver part where the beater attaches.
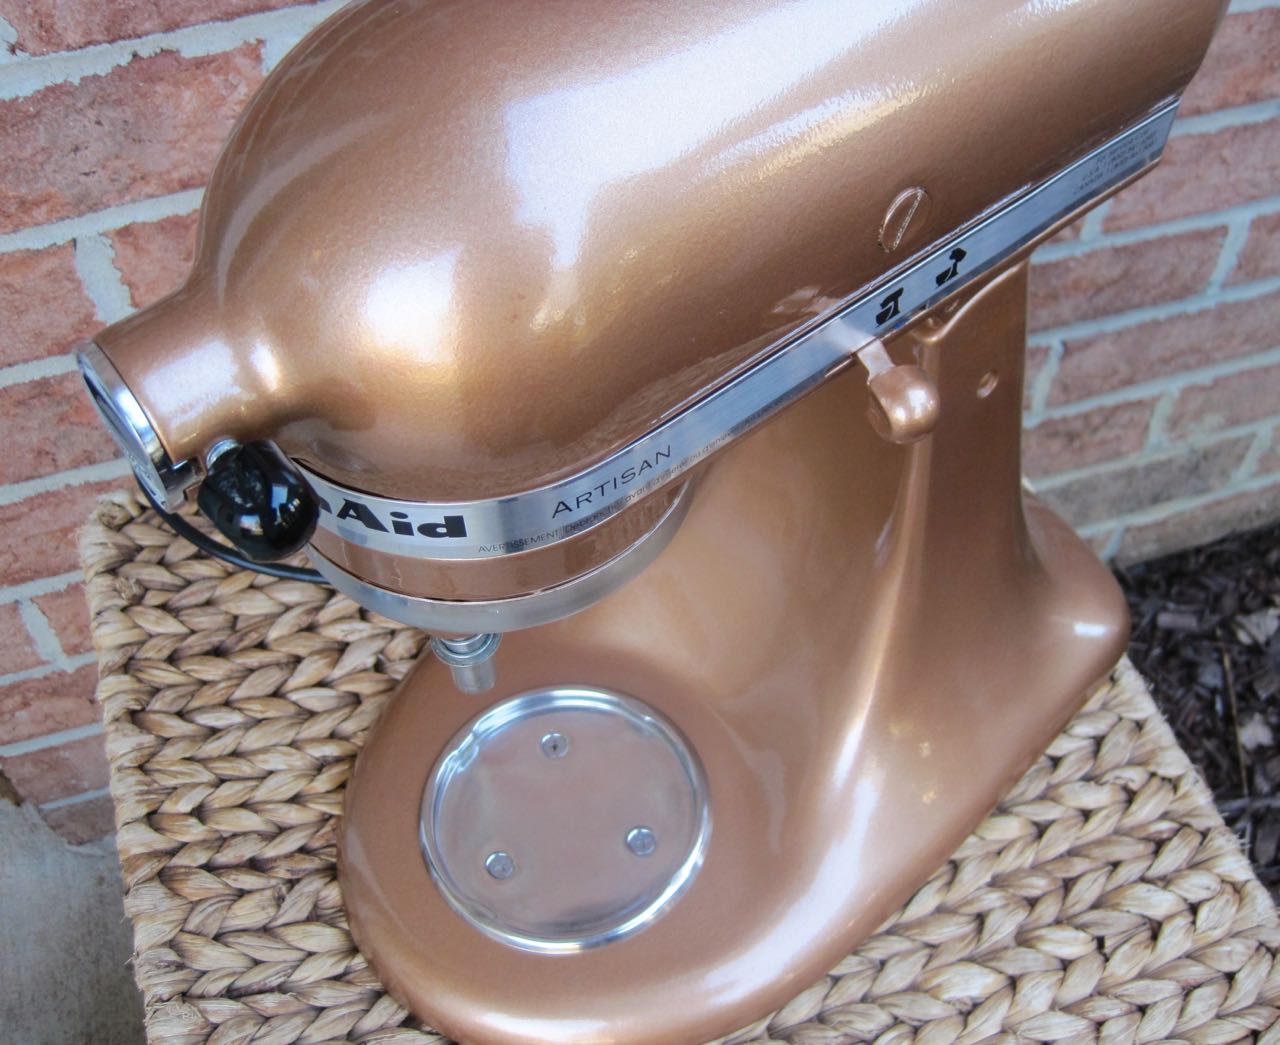
TIP: If you want to paint the bottom/inside of your machine do it first then you can tip your machine back and paint the rest. Also, do the same with the back cap. (I’ve never seen the bottom of my machine until now but I knew it would bug me knowing it was still blue inside).

Do 2 to 3 light coats of paint. Follow the directions on the back. It was 50-degrees outside when I painted which is right on the edge of when it says not to paint so I had to give more time in-between coats. Even then, the surface was tacky for a long time so I brought it inside to finish curing (and it stunk up my house)!

This is after the 2nd coat of paint – much different than the first!
Give your paint 24 hours to dry before you add the hardware back on and another 24 hours (at the least) before you handle/use your mixer.

I love how it turned out!


18 Comments
How has the paint held up? I want to paint mine but I'm worried it will look bad after flour and food goo sprays all over it 😉
January 10, 2016 at 5:49 pmIt's been great!! I've washed it down a few times with a warm water and dish soap. The finish is super smooth and glossy.. Best thing I've ever done for my kitchen! 🙂
January 10, 2016 at 5:51 pmThis looks great! Love the idea:)
May 4, 2016 at 8:09 amWow. Super scared to try something like sanding down my beloved mixer, but your close-up picture helps in convincing me to try the same. She's a beauty!
July 12, 2016 at 11:38 amIt's one of the best things I've done, really! I really didn't like the blue color but now I LOVE my mixer! I don't think anyone would ever know I spray painted it because it still looks perfect! 😉
July 12, 2016 at 11:40 amI almost sold my perfectly good yellow one for $100, but stopped when I saw this !!
November 1, 2016 at 6:51 amNo way can I spend $600 just because I like copper better than yellow. ! This willl be my weekend project.
Oh, I'm so glad you didn't sell it! Changing the color is easy and makes the biggest difference! Good luck!!
November 1, 2016 at 6:53 amDid you use a topcoat or sealer?
January 7, 2017 at 2:48 pmNo, I didn't. I imagine a gloss top coat wood make it even easier to wipe clean though!
January 7, 2017 at 2:49 pmI have a metallic silver that I would love in copper. My current mixer is also a silver metallic. Super scared to mess with it. How hard was sanding for you? My new kitchen has copper accents and I would
March 7, 2017 at 2:22 pmLove for my mixer to match !
Sanding was super easy once everything was off… it took about 5 minutes! You could use 180 or 220 grit paper and get really nice results. You're looking for the old finish on your mixer to become 'matte' and not 'glossy' so the paint will stick better. It's such an easy project and makes a huge difference! Good luck!!
March 7, 2017 at 2:25 pmIs it safe to use spray paint? Wasn't sure if there was any concern with that – looking to paint my red kitchen aid to copper!
March 27, 2017 at 2:01 pmI personally wouldn't be concerned at all. Food never touches my mixer. Just make sure you're in a well-ventilated area when sanding/spraying and you should be fine. It's such an easy fix – go for it! 🙂
March 27, 2017 at 2:03 pmHow well does the spray painted finish hold up with use? That's my biggest concern.
December 12, 2017 at 1:17 pmIt’s been 2 years and the paint still looks really great! There are a few spots where the paint got rubbed off from our move. Considering we have 4 busy kids who are in the kitchen 50% of the time and our mixer is in the middle of all the traffic it’s very impressive!
December 12, 2017 at 1:23 pmHow well has it held up with use? That's my biggest concern. I have a basic black mixer that I'd love to paint.
January 31, 2018 at 8:39 pmI have a 90th anniversary kitchen aid candy red mixer I gave my daughter, which she sold back to me later, but now the paint finish has surface scratches all over it! Is there any good way to repair the scratched surface color without changing the paint color? Help please!
March 12, 2023 at 7:37 amNo, not really. If the surface is heavily scratched you’d want to fix the scratches with Bondo and sand smooth and spray paint over the top (you could get a paint color that matches the existing color).
May 19, 2023 at 6:56 am