
Do you have a Bernina 290 Foot Pedal that is acting up? It could be not working at all, working only at full speed or you may have heard a loud “POP!” or have seen it smoking, etc.
Chances are you just need to open up your pedal and replace the main capacitor!
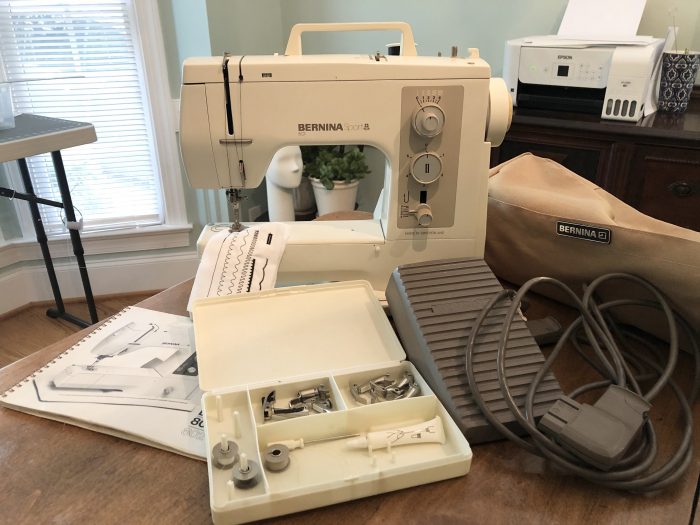
I bought this lovely Bernina 801 Sport without testing it only to find that it only ran at the highest speed. Upon researching and reading forums I discovered the culprit was most likely the main capacitor inside the pedal.

I ordered a bunch of capacitors from overseas hoping it would fix my problem so that I’d be able to sell the rest of the capacitors to others who are having the same challenge. Buying capacitors can be daunting because of all the different specifications…

…but I found these that are identical! In the pictures above you can see the original is a darker color with the leads already cut and the new one has the cardboard attached.
WHAT YOU’LL NEED FOR THIS REPAIR: New capacitor, soldering gun, solder, wire cutters, long-skinny screwdriver and a piece of thin wire/yarn/fishing line/etc.

To open your pedal you’ll need to remove the 4 small screws that are holding plastic “clamps” on the underside.
Once you have those off you’ll notice your top/bottom pieces are still stuck together. When you look inside you’ll see a white “hook” holding onto a brown plastic tab that is hanging down from the top. You need to gently pry them apart with a long-skinny screwdriver.
Once apart you’ll see a black cover held on with 3 screws. Remove them.
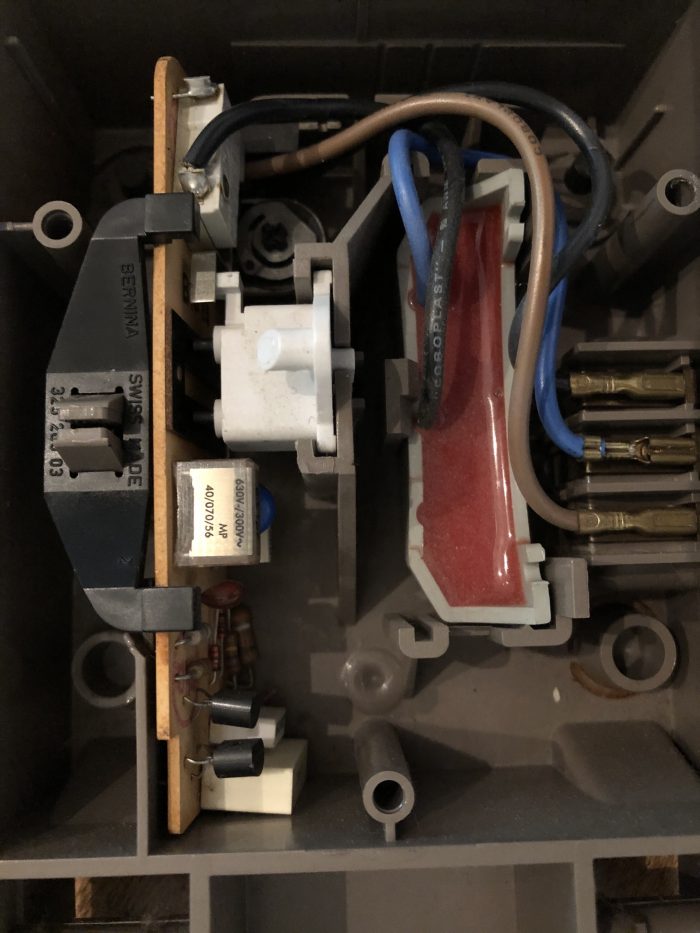
Here you can see the capacitor on the left side just under the white piece. To get to it you need to remove the black part that is anchoring the circuit board down. Just squeeze those two plastic fingers together in the center and wiggle it off.
Now you can get the capacitor off. You’ll need a soldering iron to melt the solder from the back side while you pull on the capacitor at the same time to get it out as soon as the solder is soft.

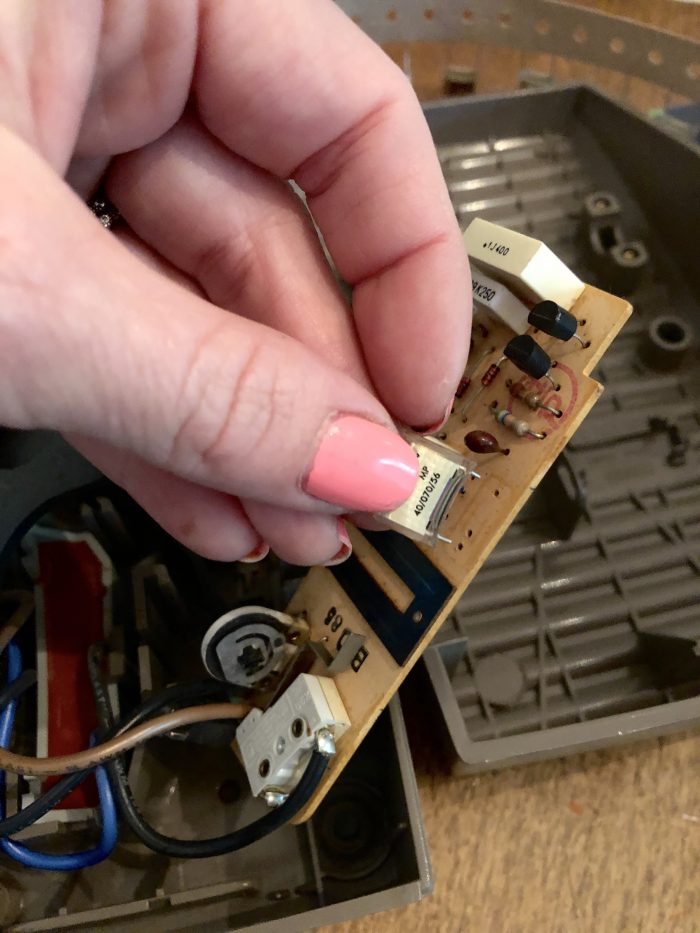
Next I trimmed the leads on my new capacitor to be the same length as the old one. We put it in place and soldered the wires onto the back just as the original. Easy peasy!

You are now at the hardest part. You’ll put everything back together but you’ll need to make sure the white finger that extends out is UNDER the metal tab that is attached to the circuit board. The trick will be to now keep it there when you attach the top of the pedal (remember this white piece is attached to the top of the pedal and you had to pry it off?).

To make this next process possible you need to remove the “Bernina” piece on the top of your pedal case (I believe it is removable exactly for the process you’ll follow below).

Now you’re going to use a thin piece of wire, thick fishing string, yarn, etc. to go around the white hook above. Be careful to not pull it up very much or that white finger will get pulled above the metal tab, remember!? If this happens and you go to press on your pedal to use it that finger will snap off and you’ll need to re-glue it (I know from experience)! Also, make sure you have the large springs in place.
Now you’ll fish your string/wire through the top of that open hole you created in the top of your pedal and aline the springs to fit inside the top knubs as well. You’ll see what I’m talking about!
The trick is to carefully put that white hook back inside that plastic tab hanging down. DON’T pull up TOO much (JUST enough) with your string or you’ll need to take everything back apart to get the pieces in the right place. As you’re holding the white piece in place you can pry that tab over to get it to hook onto the white piece. I used the long-skinny screwdriver.
Okay, NOW you can breathe and reattach those 4 screws and plastic clamps on the underside.

You can see here the white hook is inside the tab and I can cut & pull my wire off. Replace the “Bernina” plastic piece and YOU’RE DONE!
Hopefully this repair has fixed your machine and you’re on your way to happy sewing days 🙂
If you want to buy one of these capacitors I have them in my Ebay shop <click HERE>. They’ll ship from Raleigh, North Carolina.
23 Comments
i just did this fix for my wife and it worked perfectly. The only comment I have is about the fishing line/wire bit while trying to push with a screwdriver. I tried this for about 30 minutes, then stopped and looked at the design because I could not get it to work.
I noticed that the white part had an angled piece to get over, but that the white piece at rest would settle all the way down flat to the bottom of the pedal. I wondered why it would not work to just push the pedal down while angling it a little to let the brown tab slide easier down the angle and push the pedal top all the way down. It snapped in perfectly first try. I think this is A LOT easier. I did it twice to verify it worked again, and it did. This would take the only hard part out. I still left the Bernina badge out so I could verify it went to the right place. No fishing line, no thin screwdriver to pry the brown tab over. Just get the springs in and slowly push the top all the way down and the brown tab with the hole slides perfectly down the angled part of the white piece (our white piece was black) and then slides into the hole.
October 3, 2020 at 7:20 pmI’m glad it worked! I can’t remember back to when I first did my pedal exactly if I tried the method you explained. I’m pretty sure I did but not certain. Thank you for writing!
October 4, 2020 at 4:20 pmI can confirm with this above method. I tried the wire loop onto the white wiper control but decided the Swiss must had had a simpler process. Then I scrolled down to read Bob’s comment. Very simple. I attached the brackets that keep the pedal-top to the base then pushed down fully and the plastics snap into place. Done.
And thanks Dani for providing this information. (I purchased the capacitor part from your ebay store too.)
NOTE: the small adjustment potentiometer accessible from the base can adjust the startup speed for the needle (+ [faster] or – [slower] ).
September 2, 2021 at 10:34 amDo you have one of those 801 Sport capacitors left? If so I’m interested. What would you charge for this?
November 4, 2020 at 11:13 pmI have capacitors for the 290 foot pedal. What kind of foot pedal do you have? Here is a link to the eBay listing: http://ebay.us/mlTEgd?cmpnId=5338273189
November 5, 2020 at 8:00 amI clicked on b your link to purchase some capacitors but the link isn’t working. How can I get a few. I have a 290 footpedal.
April 2, 2023 at 8:11 pmHere’s the link: https://www.ebay.com/itm/224887648352
April 3, 2023 at 4:42 pmHi Dani,
November 10, 2020 at 5:44 pmReceived the capacitor for the Bernina foot pedal, and I installed it today. Upon testing it I did notice an improvement in control. However it still starts suddenly at the halfway point on the pedal. Backing off a bit gives the control, but it isn’t smooth.
Do you think it’s the carbon contact rods? They are a bit worn, and still making contact with the plate.
I may just buy a new generic, and wire in the Bernina connectors.
Thanks for your help.
– Chuck
Hi Chuck! Hmm.. I’m not sure what it could be.. but it very well could be those carbon contact rods. I know I had to change some on another pedal I was working on. Did you get it to work afterall?
November 24, 2020 at 11:40 amJust a note: on my unit the ‘white’ hook with the little round protrusion cut off at an angle is black plastic, not white. –Eric
January 19, 2021 at 11:25 pmMine is black too but I assume it is a different colour on some 290 foot pedals. It is black on the YouTube video about how to change the carbon pins.
April 11, 2021 at 5:16 pmMy first thought is for you to check the needle length and make sure it’s the rights sizes. If it’s too short or too long it won’t pick up the thread. Nice work getting the timing down! 🙂
April 16, 2021 at 8:23 amThank you so much! I have scoured the Internet looking for what those black thingys are called inside my pedal, and now I know: “carbon contact rods.”
August 13, 2021 at 8:28 pmOne of mine broke… where did you find replacements?
Hi! I’m glad you found what you were looking for! I can’t quite remember where I bought the contact rods but it was most likely on eBay. Best of luck to you!
August 15, 2021 at 8:38 amHi Dani,
October 16, 2021 at 1:23 pmI solved the “white hook” mounting by making a small hole in the side of the pedal,
just above the brown wire (3 – 4 mm)
then with a srew driver I blocked the “white hook”in it’s upper position.
Click the upper part of the pedal, and put back the four srews on the hinge.
(remove the srew driver 🙂
I got the carbon contact rods at my local sewing machine shop http://www.larmuseaunaaimachines.be he get all the SM equipment at http://www.callot.com
which is our main supplier here in Europe.
I just repaired a pedal where every part containing silicone “smoked up”.
Finding the components and replacing them is doable !
Thanks for this page, it was very helpfull.
(I have the schematic of the board)
Jean S
Thank you Jean!
January 29, 2022 at 2:38 pmHi Dani,
I was planning to reverse-engineer a schematic from my 285 pedal, & then learn how it is supposed to work. Your tip has saved me a lot of hard work – thanks!
I fitted a 0.22µF part in place of the 0.01µF original, just to see, & the motor runs again, albeit a bit rough. I will get the real part on Tuesday.
These caps are similar to the ones that fail in Senseo coffee machines.
Many thanks,
Richard
October 30, 2021 at 3:33 pmBelgium
Many thanks for the clear helpful instructions. Footpedal on my 801 sport now working with two speeds and husband extremely pleased with himself. (Based in the UK)
March 16, 2022 at 11:17 amYay, this makes me so happy to hear!
March 17, 2022 at 8:36 amYou are a dream come true, the repair was easy and the pedal works perfectly now, thanks for sharing your wisdom
April 26, 2022 at 7:23 pmThis is wonderful to hear! Nice work!
May 19, 2023 at 7:09 amRecently acquired a Bernina and researching what I can before I have company next week. Your article is very detailed and appreciated as are the comments. Very happy to see you have things available on eBay. Many thanks!
May 4, 2022 at 8:55 amYou bet, thanks for the comment! 🙂
May 19, 2023 at 7:09 am