Singer Sewing Machine Wood Base Tutorial (Pictures of Building Process)
January 23, 2014
Interested in buying a base? See what’s available, HERE.
My original post for how to make wood sewing machine bases has been popular so I decided to make this tutorial with pictures of the building process for a base with a side cubby and full dovetail joints*. *If you don’t want the side cubby you can easily alter the 20″ front/back wood pieces to be 16″-long. If you don’t want to make dovetail joints you can alter the side pieces to be 6-3/4″ instead of 8-1/4″ and use your own joining technique for the corners such as glue or screws.
SINGER SEWING MACHINE BASE BUILDING PLAN Finished Outer Dimensions: 20″ long by 8-1/8″ deep by 2-11/16″ tall Materials and Tools Shopping List: 1″ x 3″ x 8′ select pine board 1/4″ or 5mm utility plywood (measuring at least 9″ x 21″) 12″-long 3/4″ quarter round trim piece (for corners) 3/4″ straight router bit Dovetail router bits Flush trim router bit 1/4″ round-over router bit 1 1/4″ brad nails (for nail gun) or finish nails (use hammer) 2 Metal Mirror Clips (optional) 3/4″ finish nails Drill bits Wood glue Sand paper Wood filler Wood Stain and/or Polyurethane Tools: Safety Glasses & Hearing Protection Measuring Tape Pencil Hammer Drill Table & Miter Saw Router Dovetail Jig Nail gun or Hammer Sander Cut List: 2 – 1×3 @ 20″ (front & back) 2 – 1×3 @ 8-1/8″ (sides) 1 – 1×3 @ 7-1/4″ (cubby divider) 4 – quarter round trim @ 2-9/16″ (corner pieces) 1 – 8-1/2″ x 20-1/2″ utility plywood (bottom)
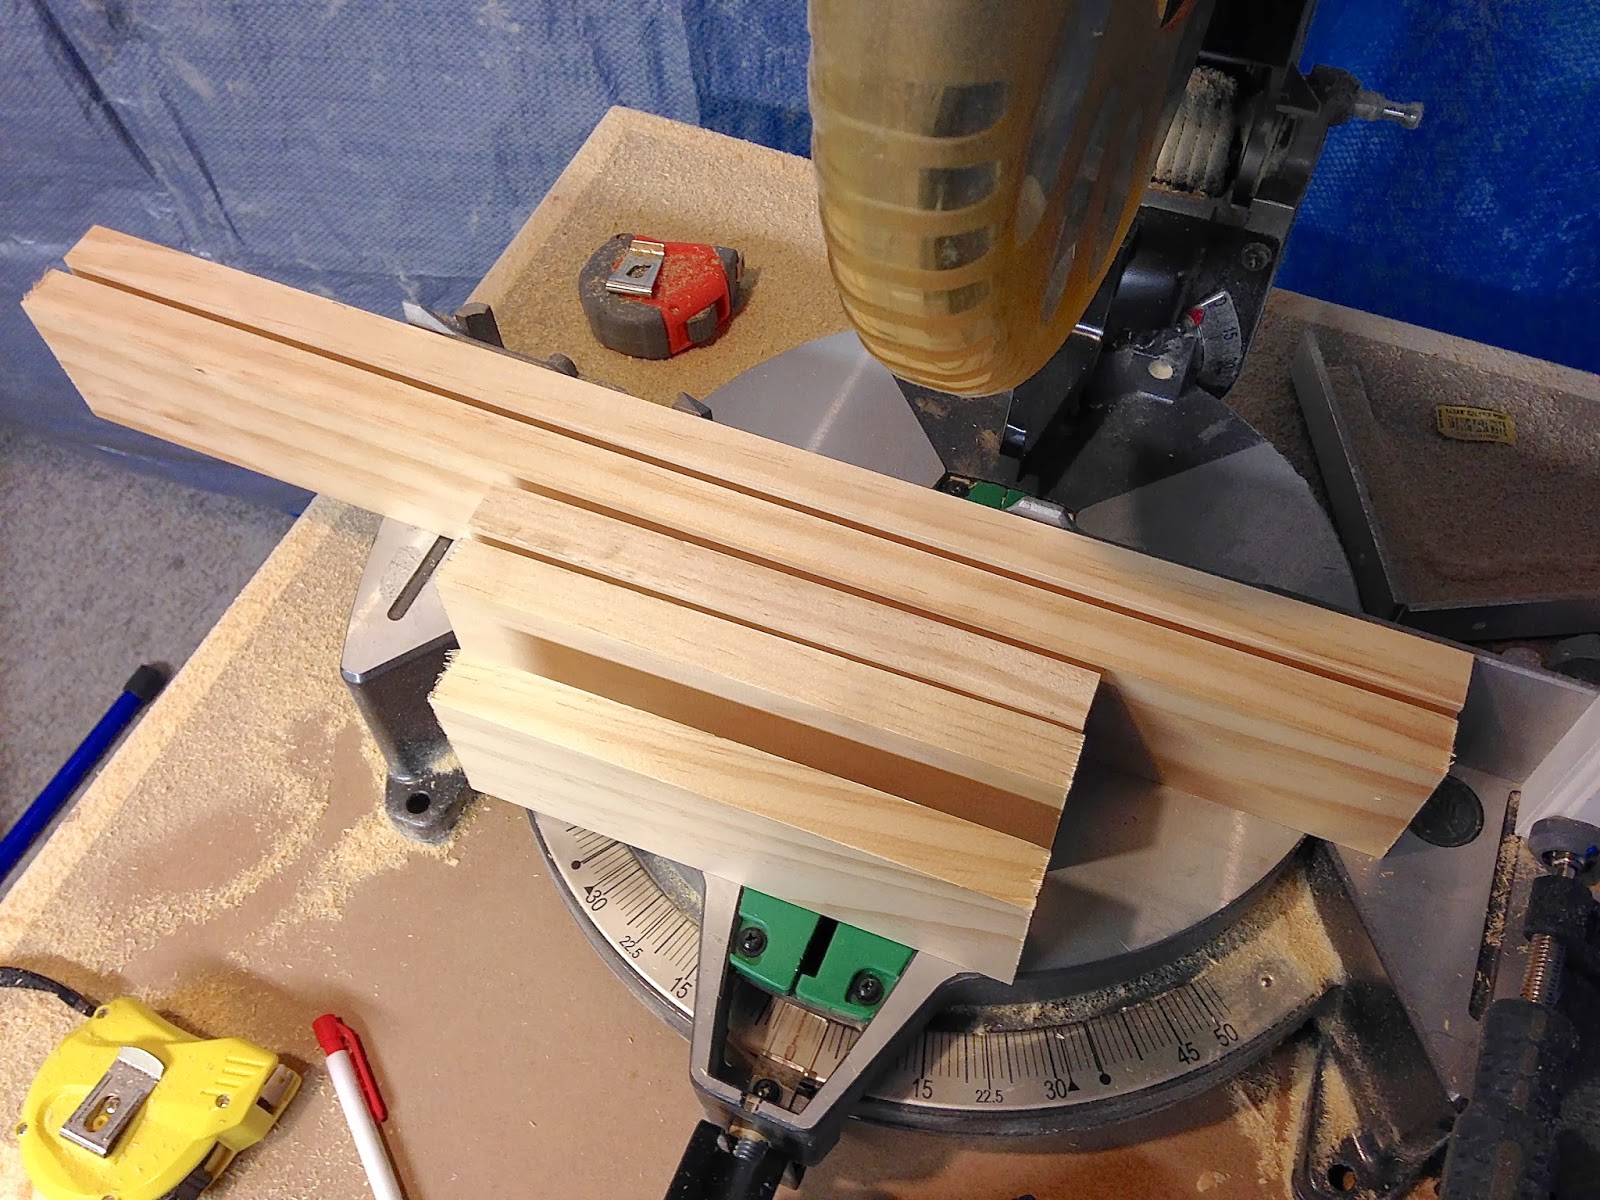
Refer to cutting list to cut your front/back, sides and cubby divider out of pine board.
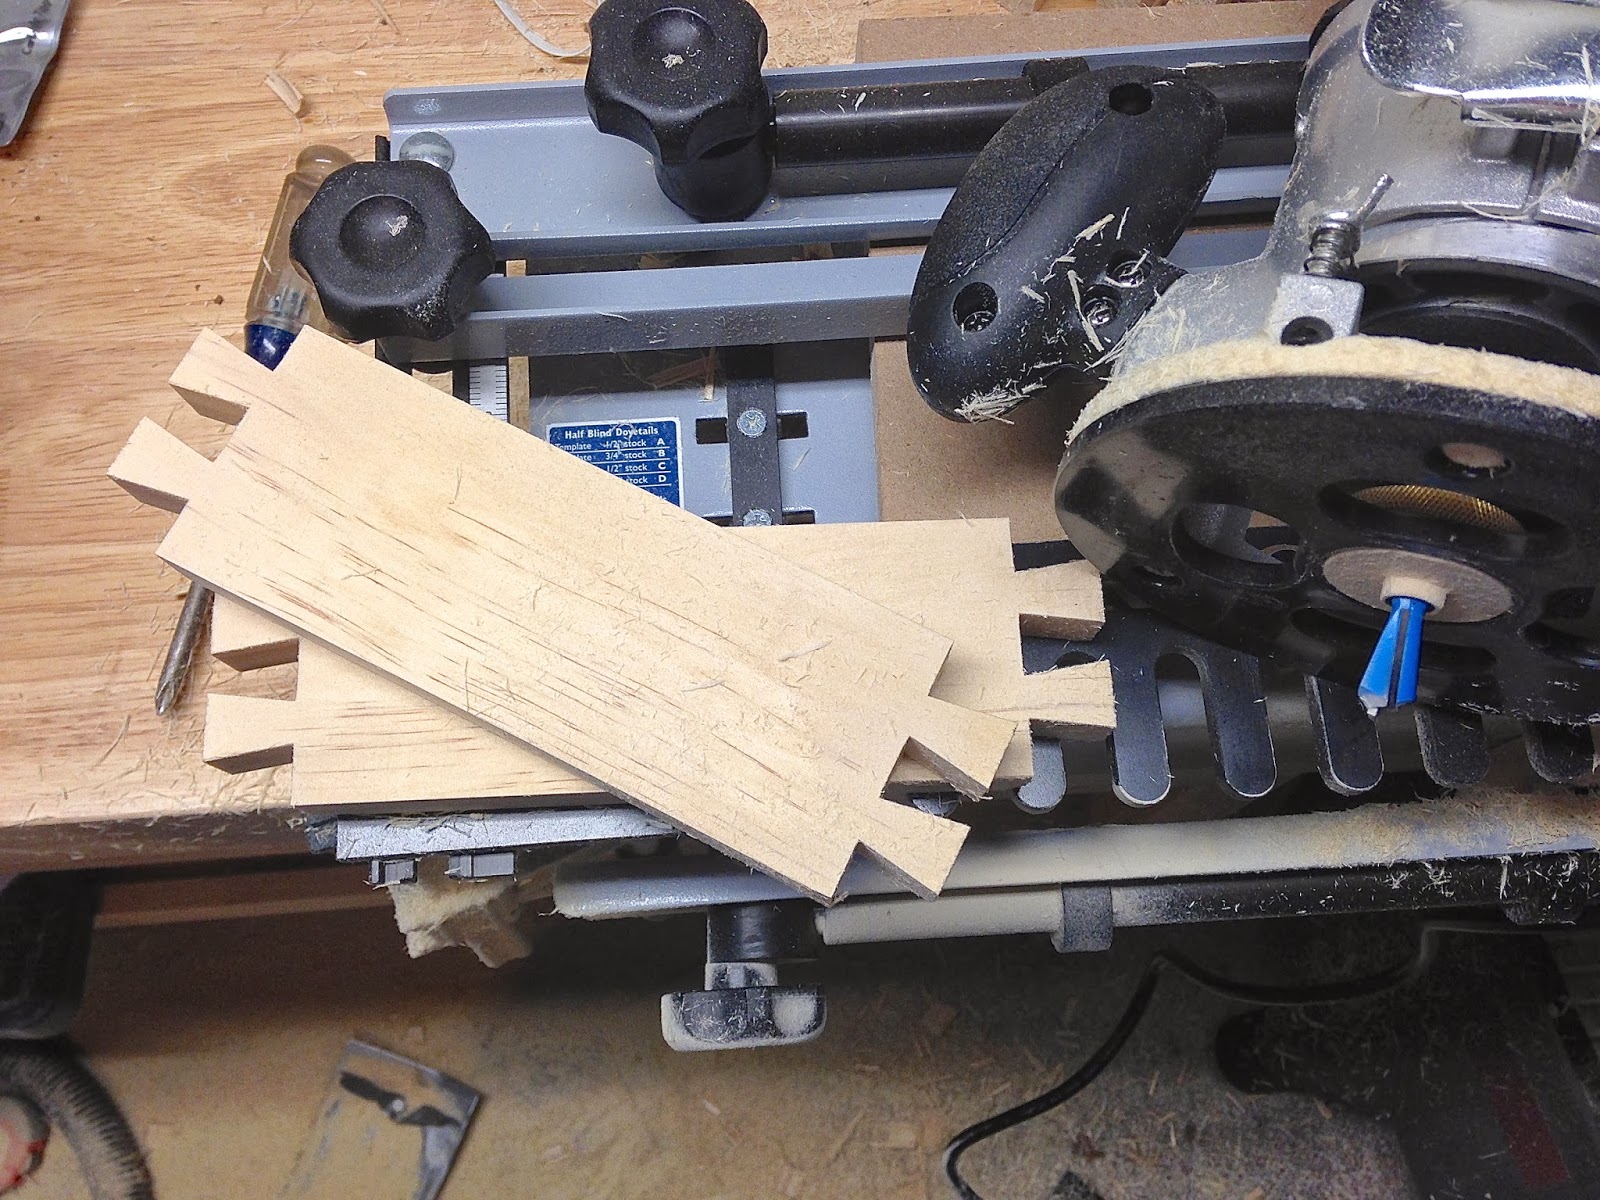
Make your full dovetail joints on your front/back and sides (picture shows sides). Refer to your jig manual on how to do this. It is a very precise joint that requires precise adjustments.
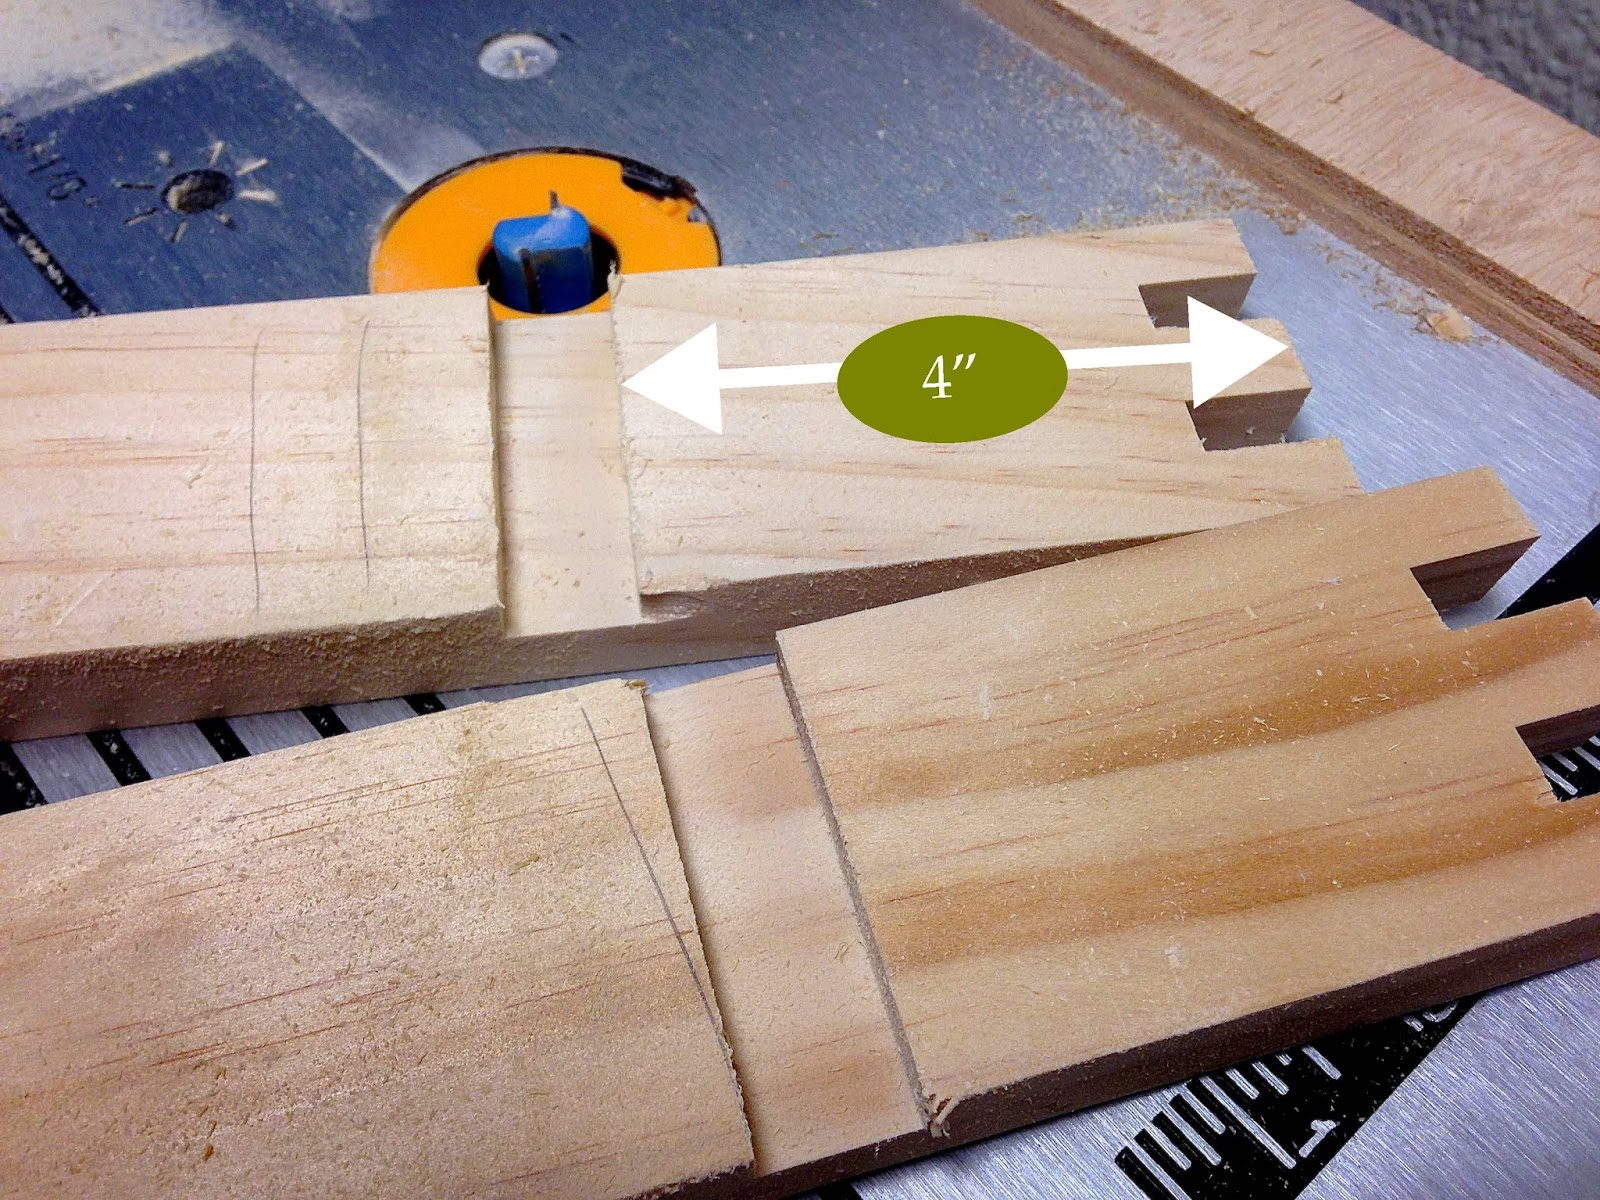
Dry fit your outside pieces. Make an ‘x’ or something with pencil on the INSIDE, right corner of your front & back pieces.
Measure 4″ from edge you marked and make a 1/4″-deep rabbit.
Your pieces should look like picture above. Do another dry fit to make sure your cubby divider fits in the rabbits.
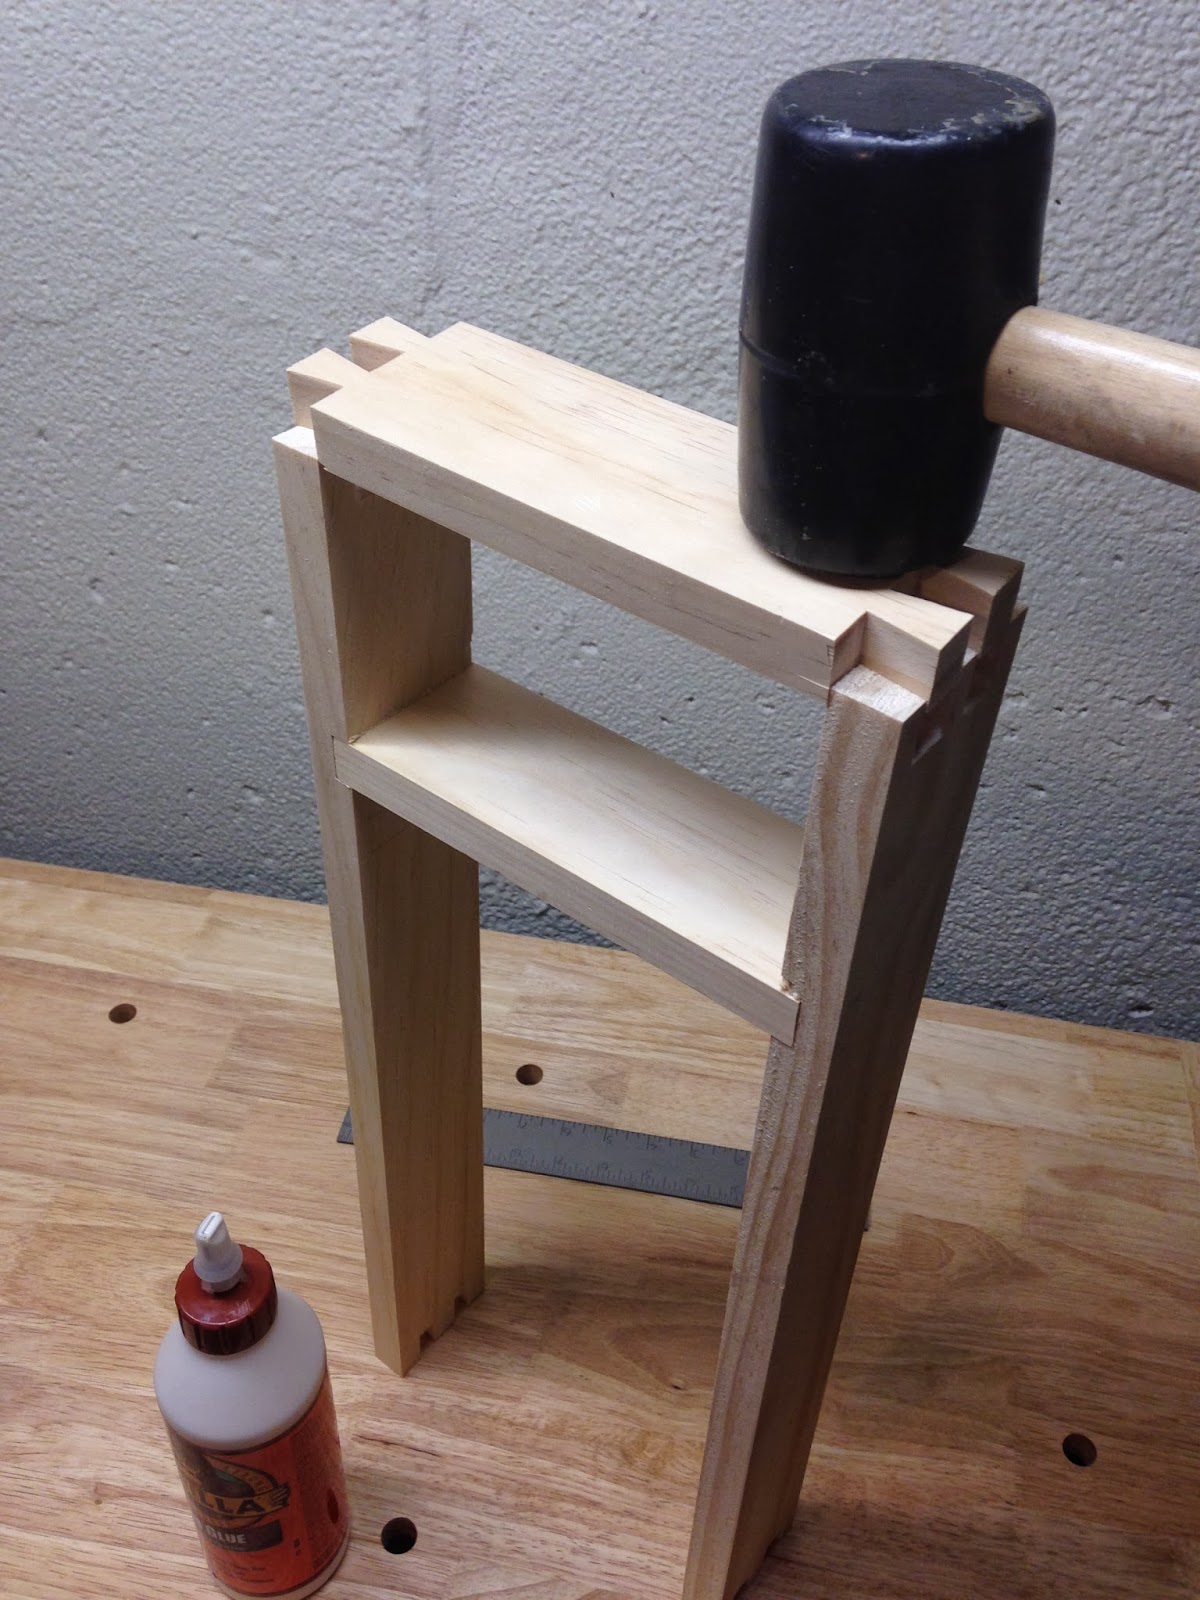
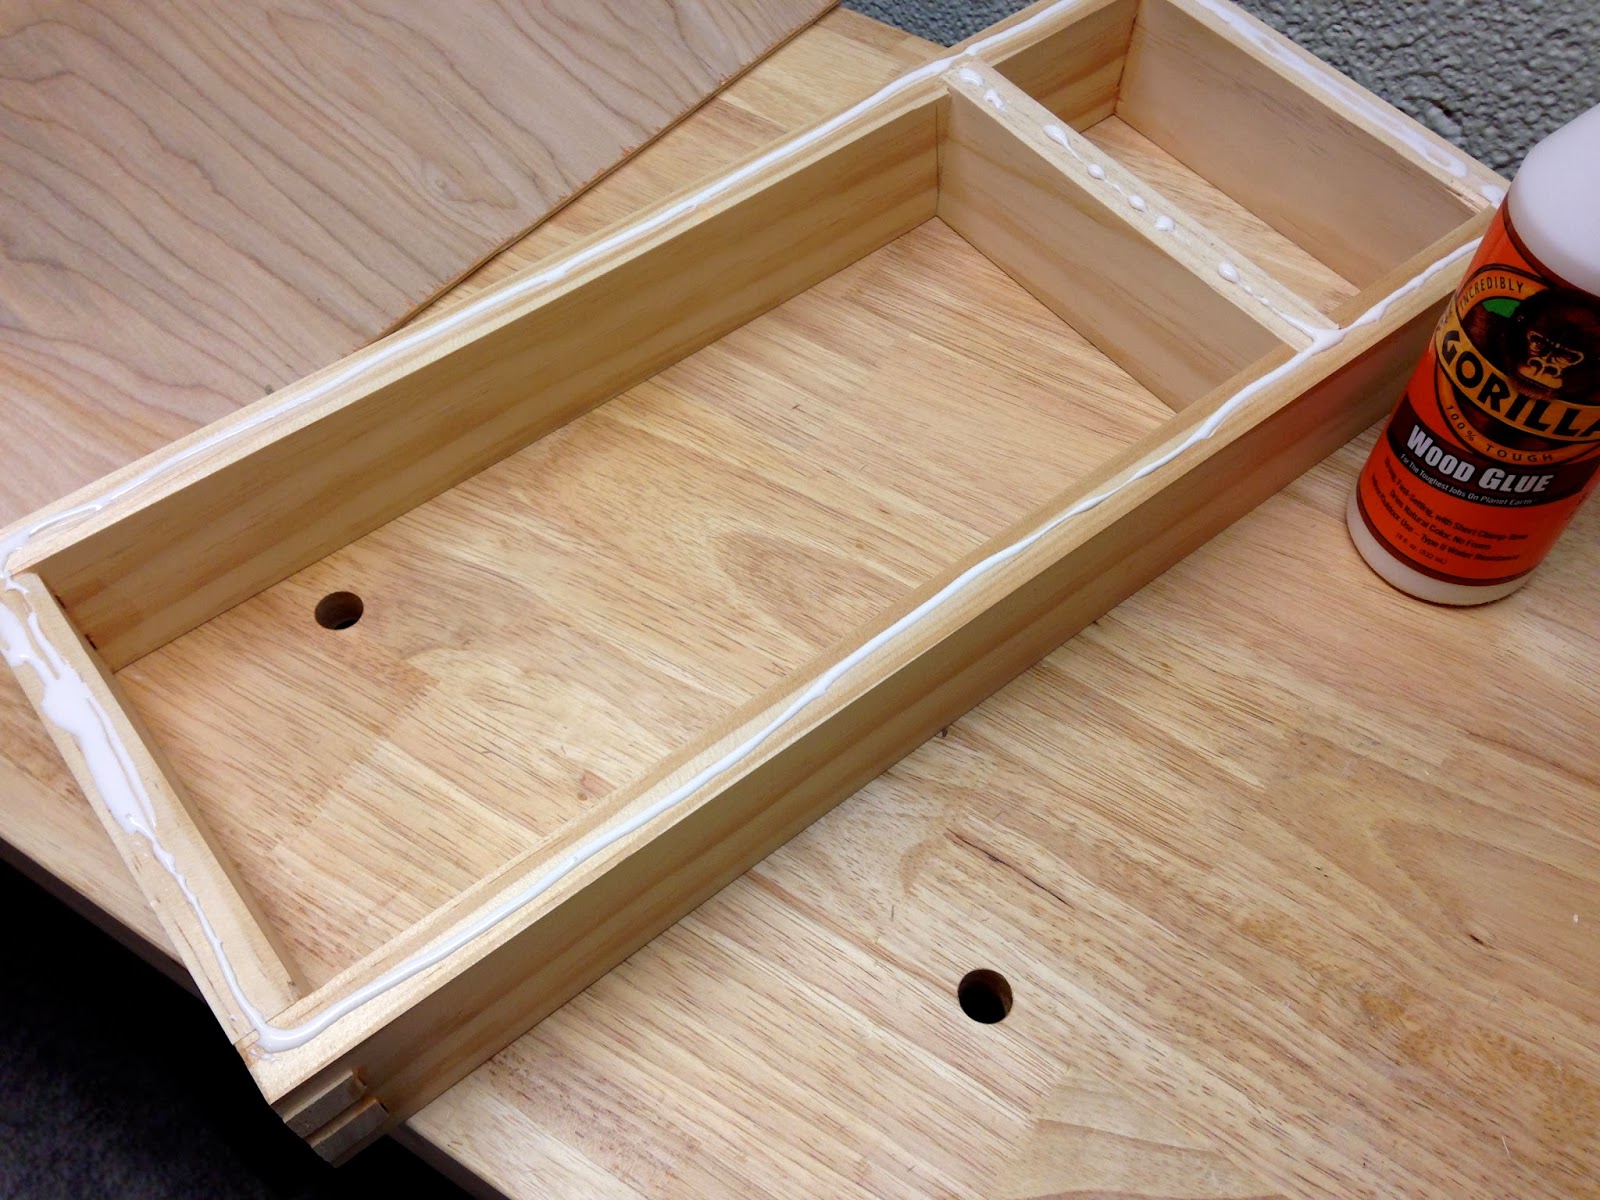
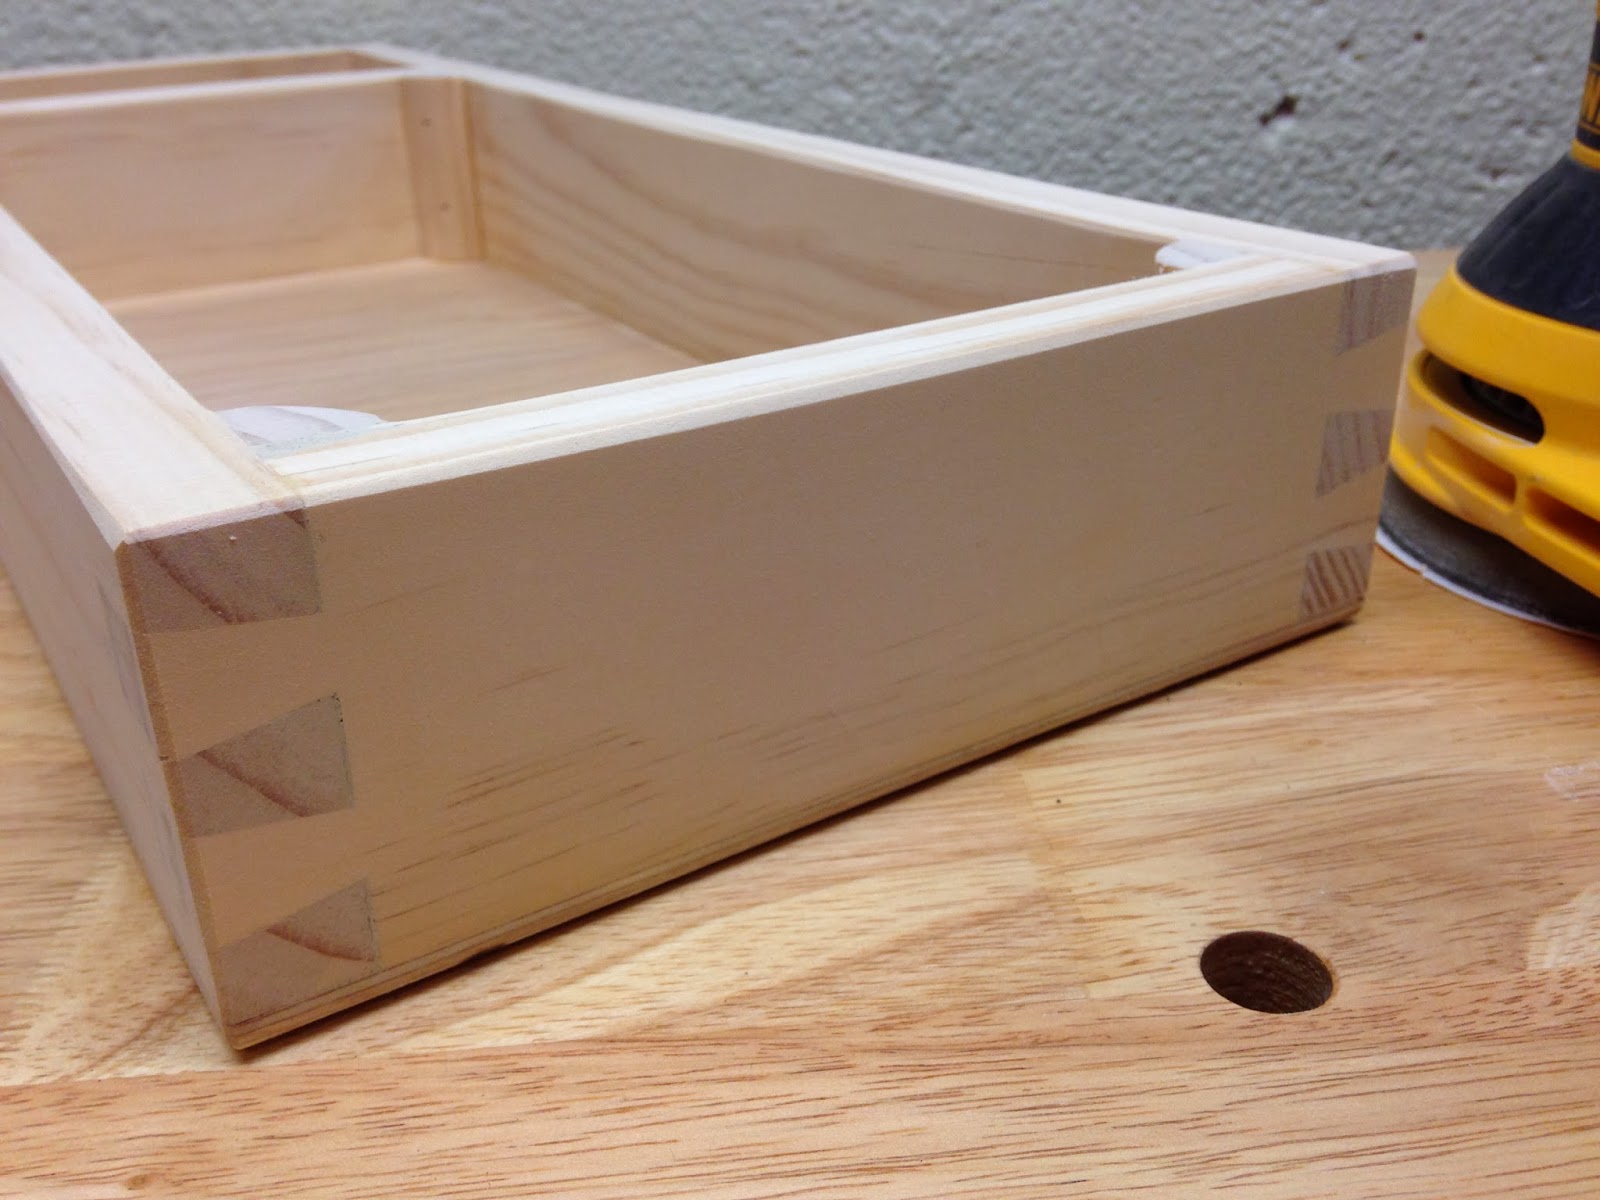
Make your final assembly by first glueing the ends of your cubby divider and set inside rabbits. Glue around all edges of dovetail joints that will be wood-on-wood and set sides in.
Very important: Make sure your base is square by measuring opposite corners and comparing to other opposite corners. If one side is longer use a wood clamp to bring together. Measure again. Once both opposite corners equal the same length your base is square!
While your base joints are drying cut out your corner pieces and bottom. I like to cut my bottom larger than the base and trim off the excess later.
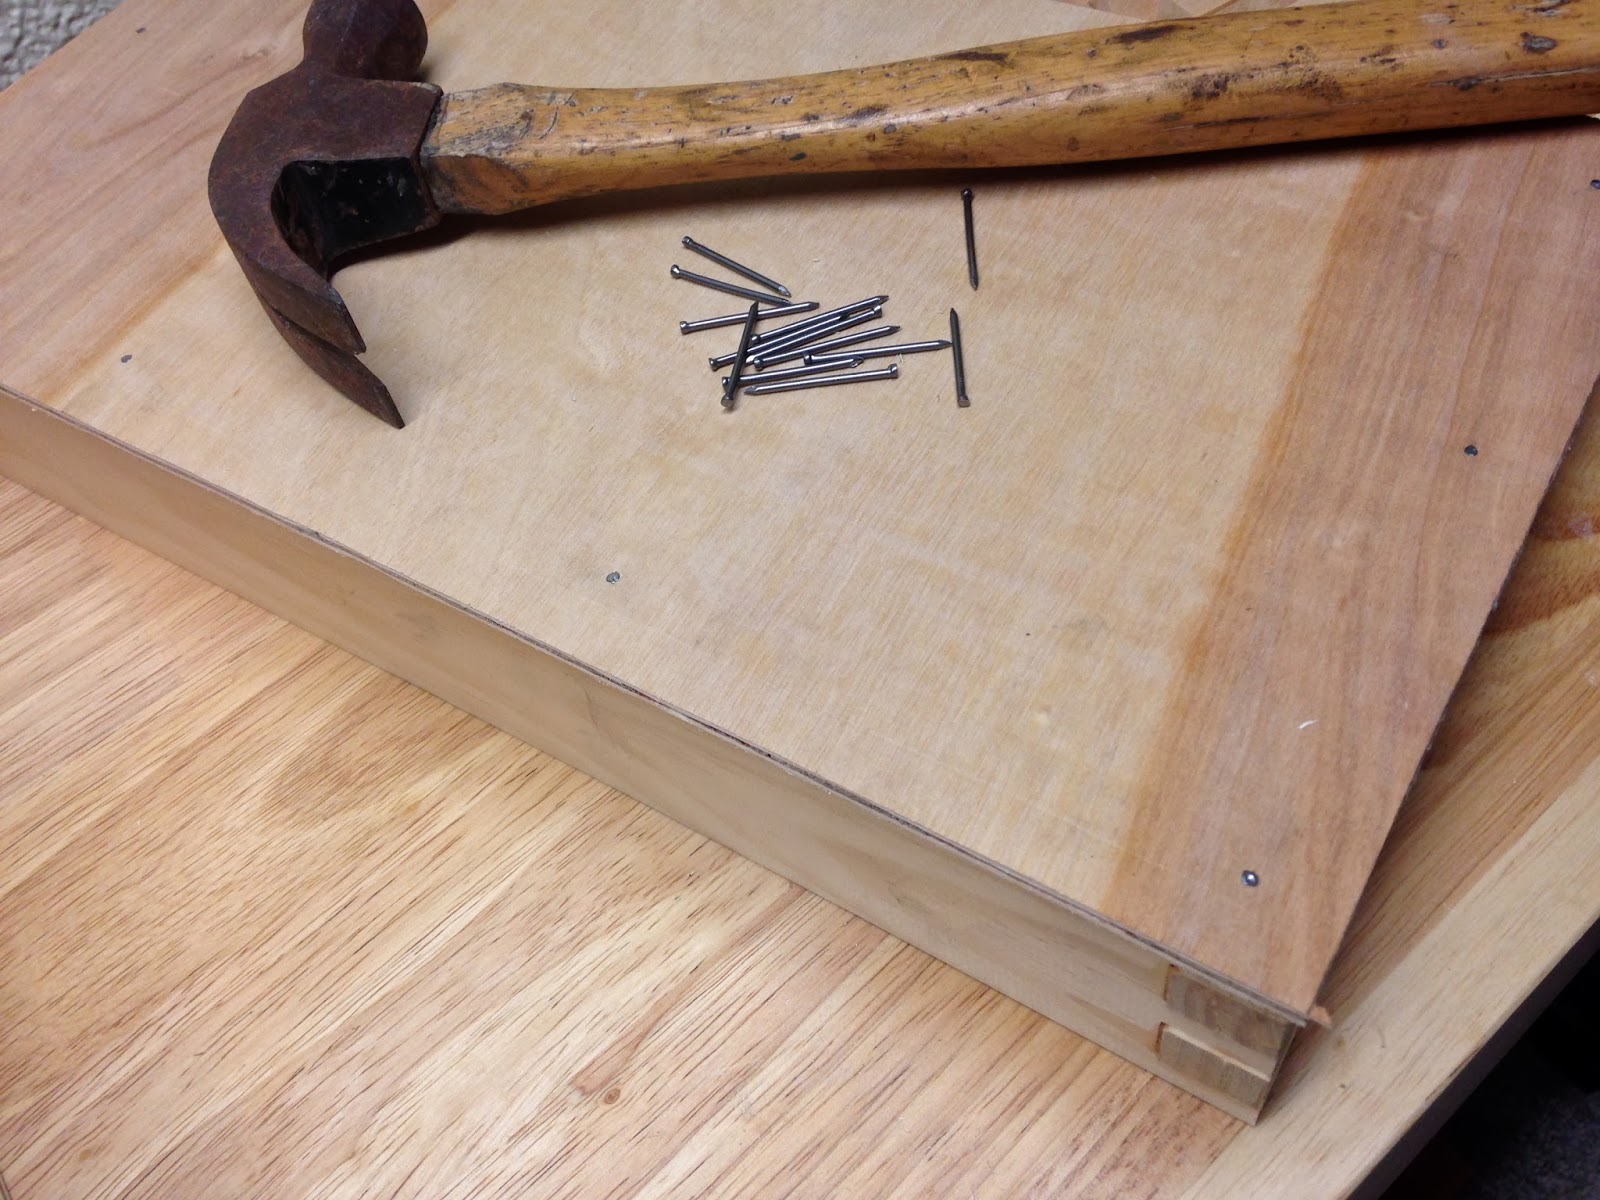
Glue the bottom edges of base and spread evenly.
Place bottom piece over glue and use 3/4″ finish nails to tack in place. I like my nails spaced out no more than 5″.
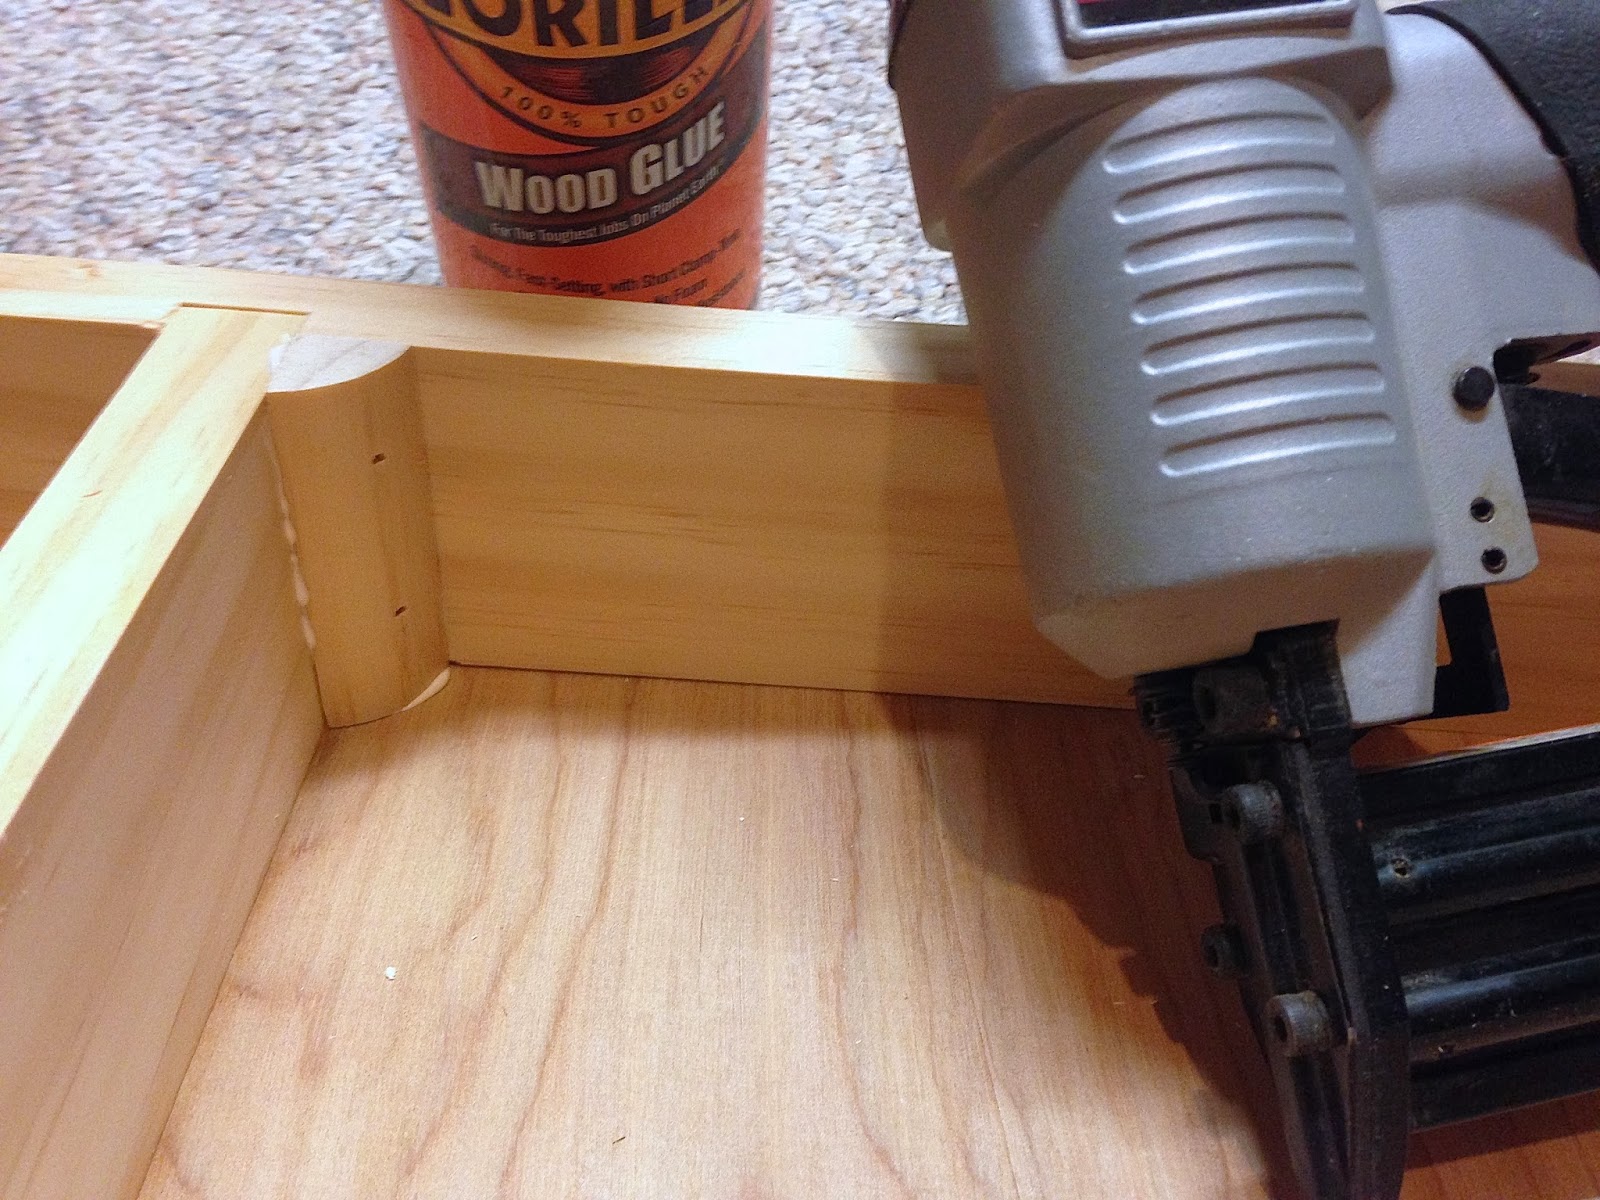
Glue corner pieces and use brad nailer or 1-1/4″ finish nails to tack in place. Wipe excess glue with wet sponge.
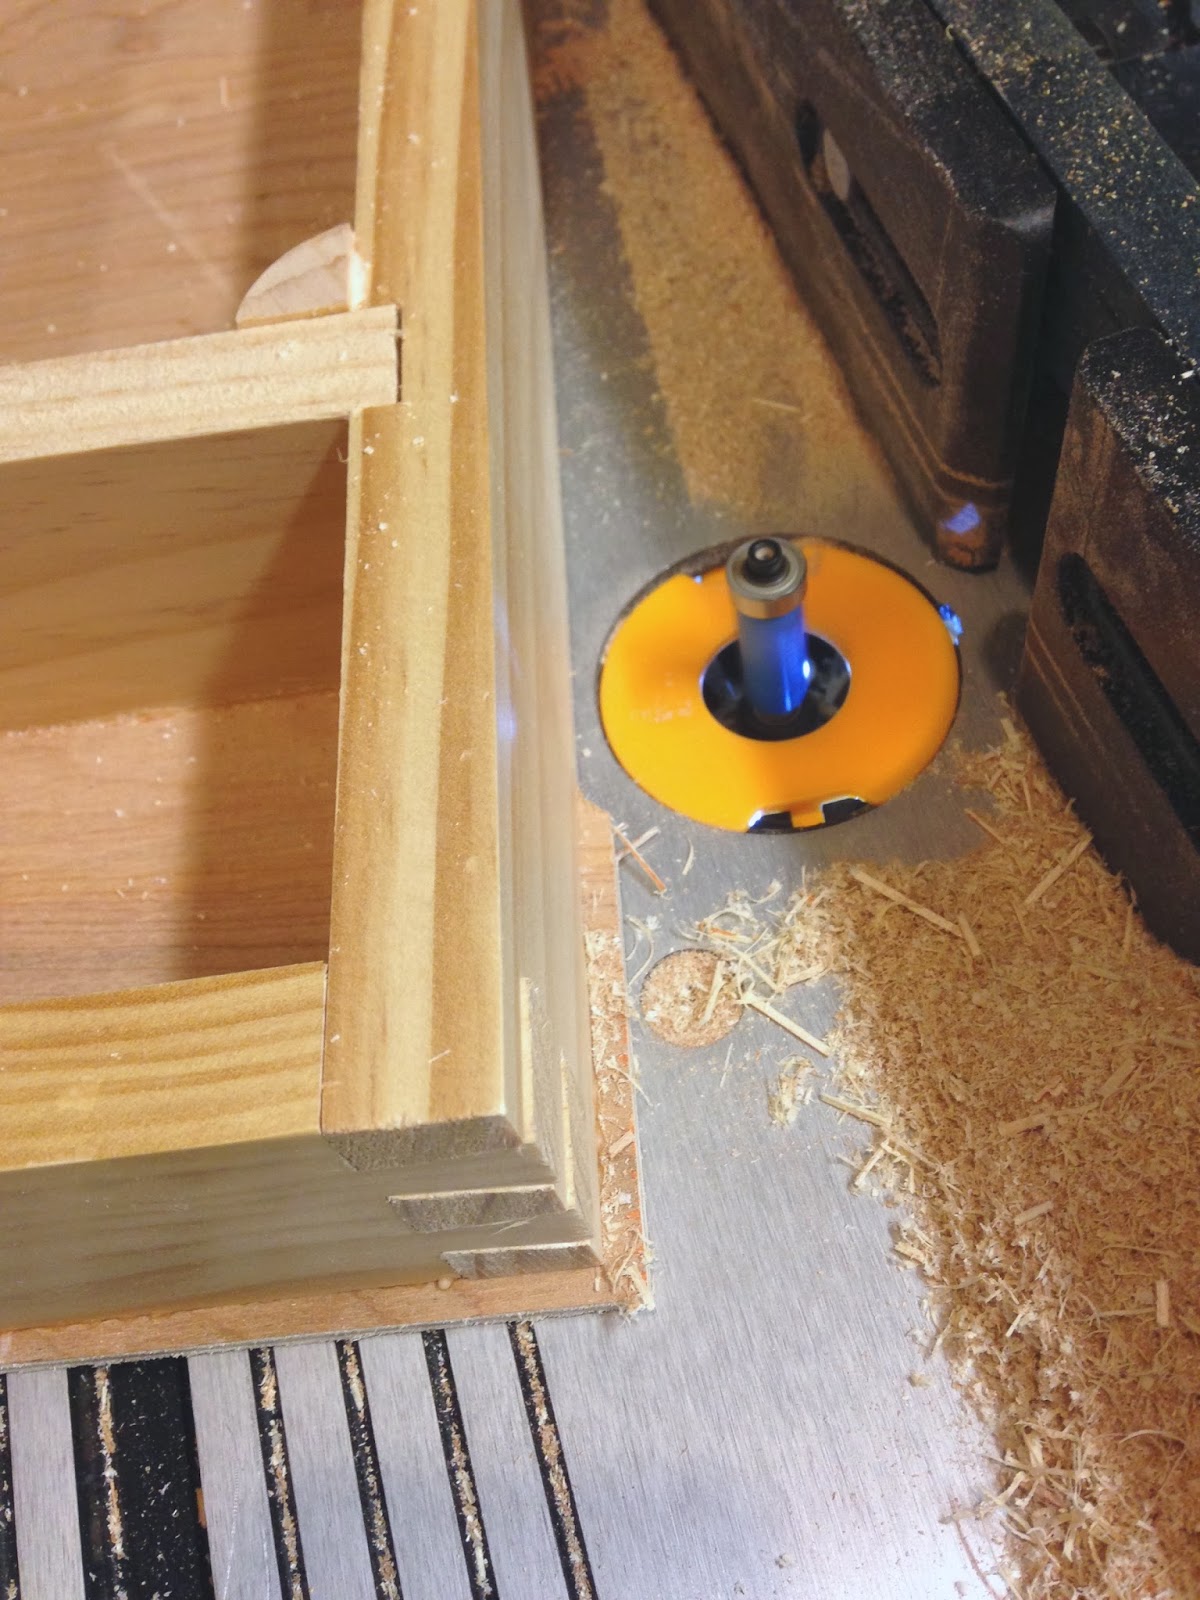
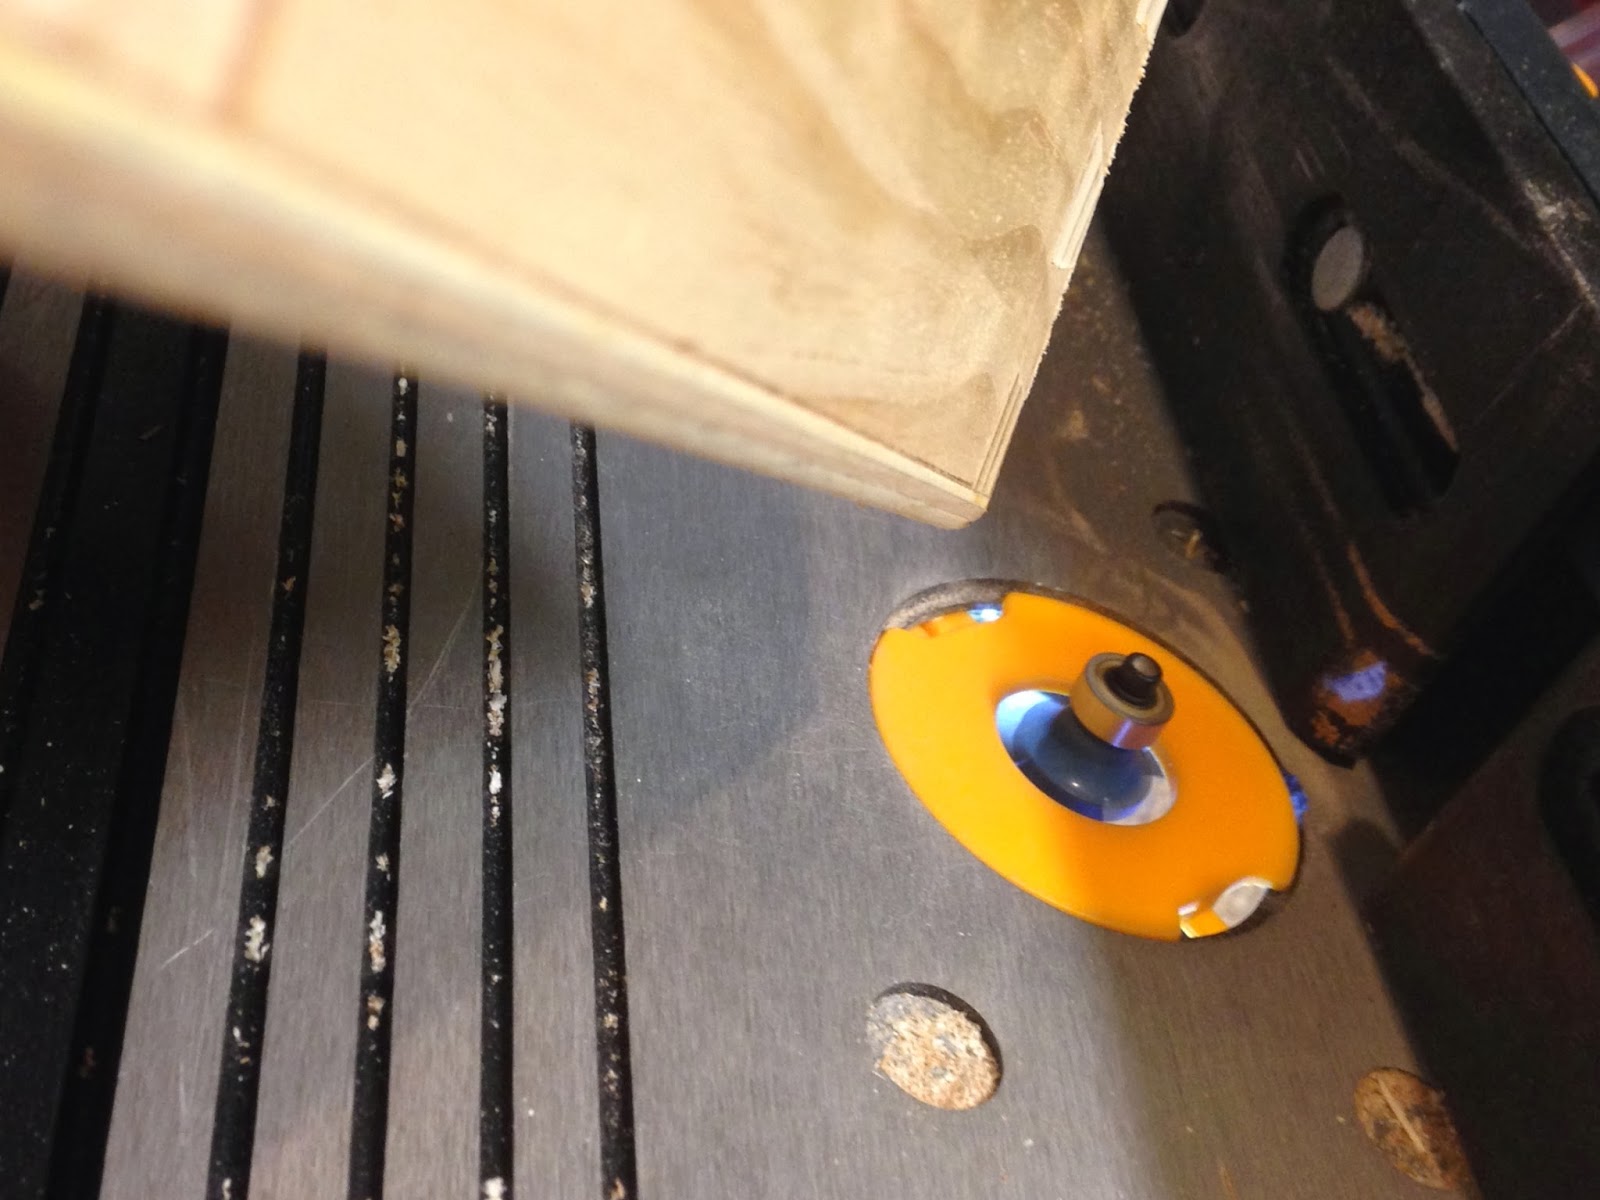
Use flush trim bit in router to trim off bottom excess.
Use flush trim bit to trim off any parts of dovetail joints that need trimming.
Use 1/4″ roundover bit to round bottom edges of base.
Fill in any holes or imperfections with wood filler. Let dry.
Sand base smooth, finishing off with 220 grit paper.
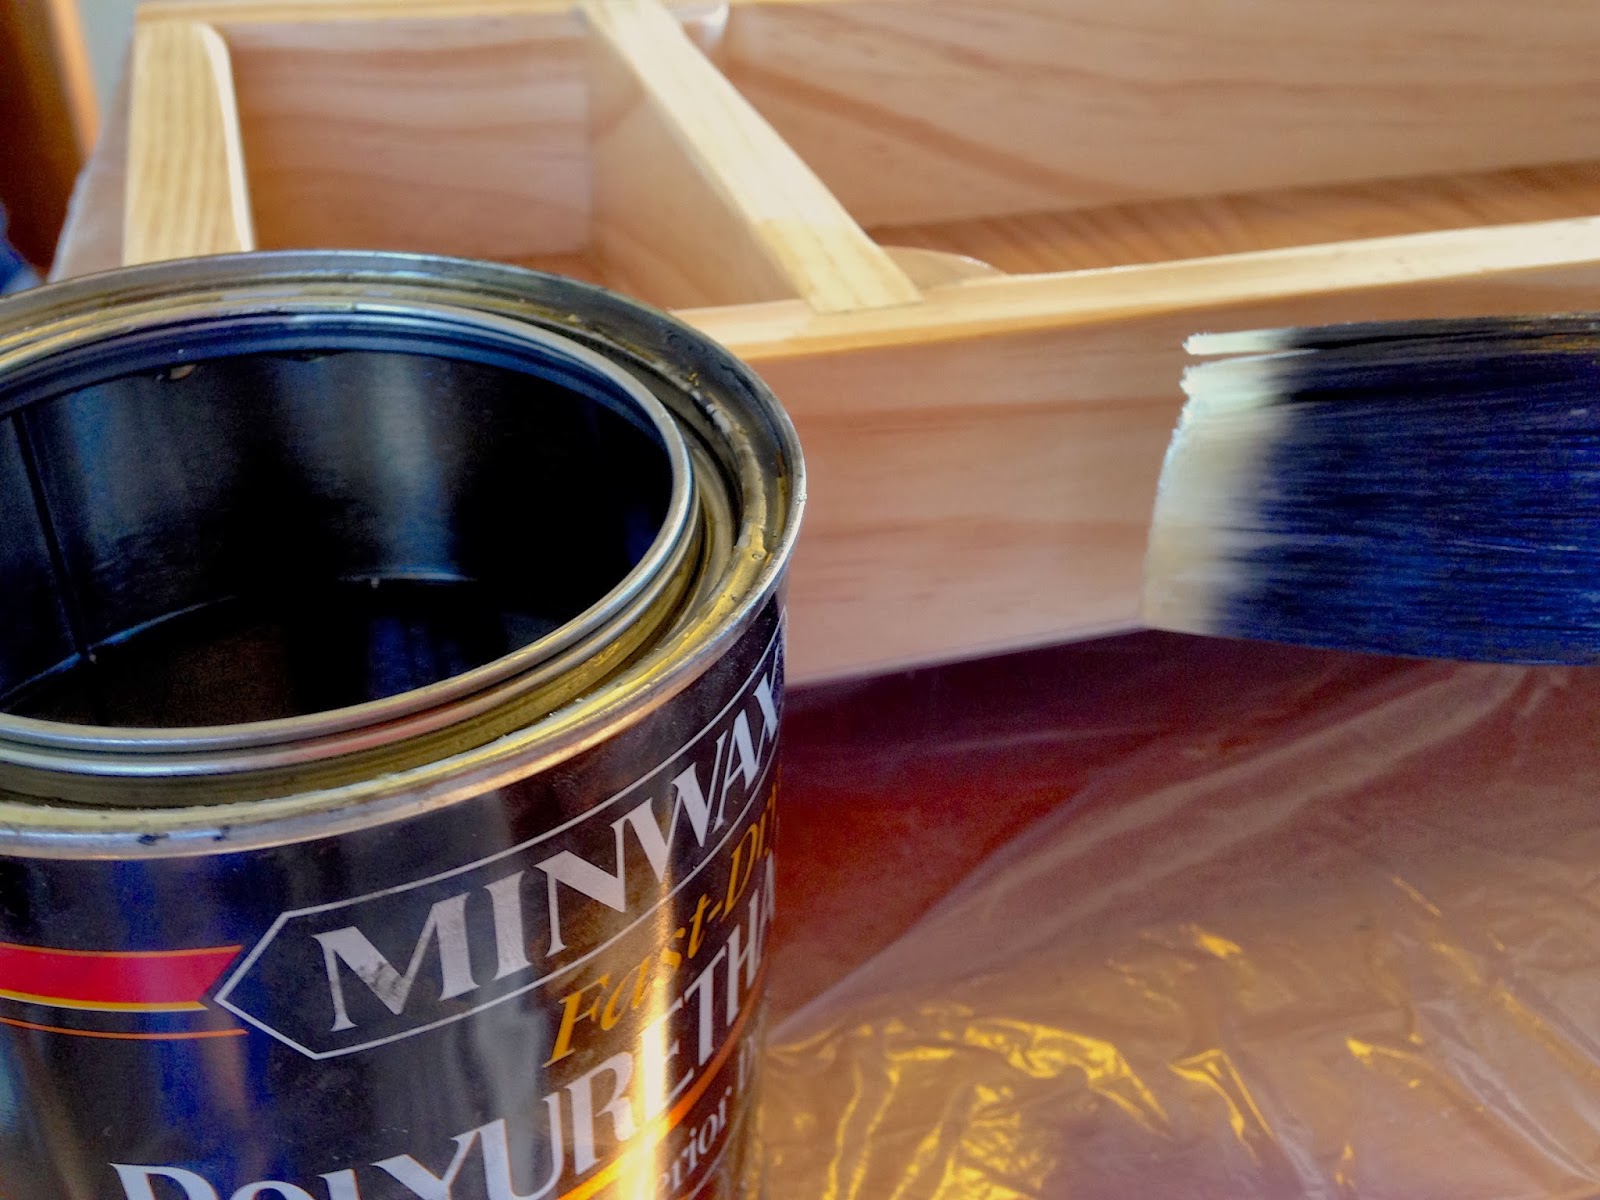
Dust off your base and stain or paint if you want and finish off with 2-3 coats of Polyurethane (follow directions).
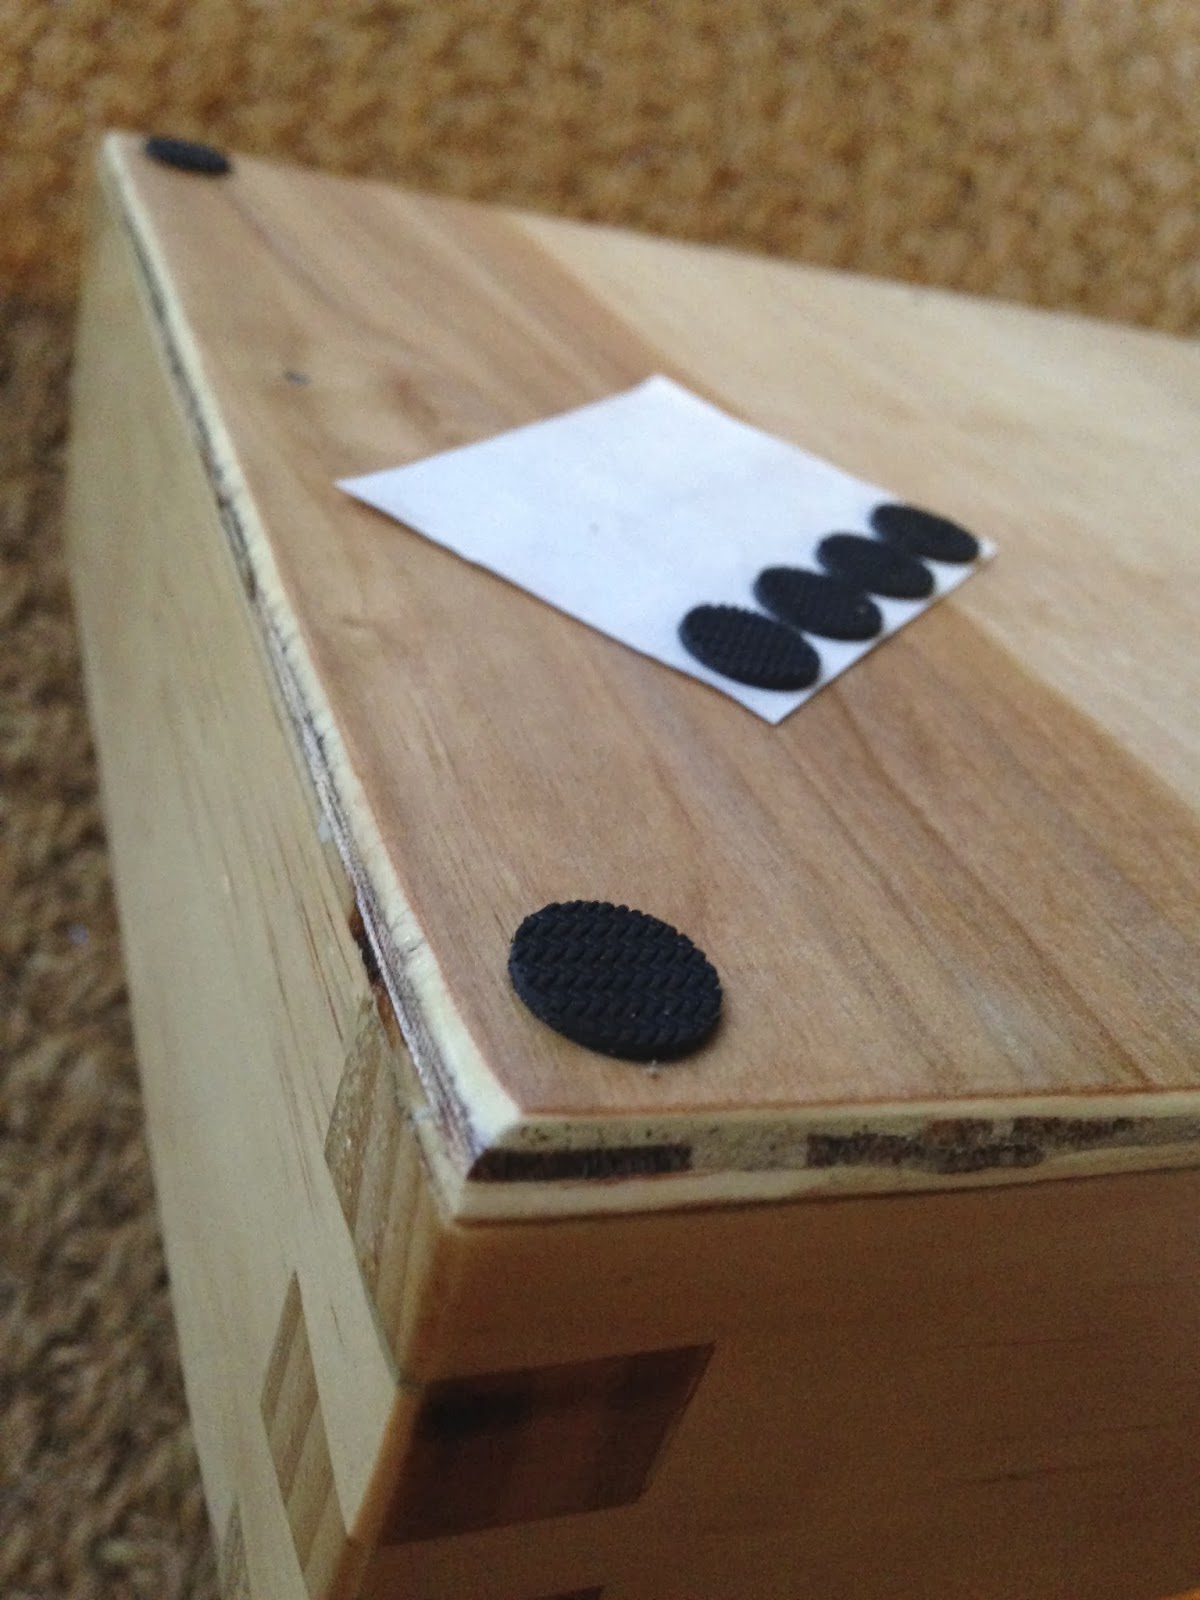
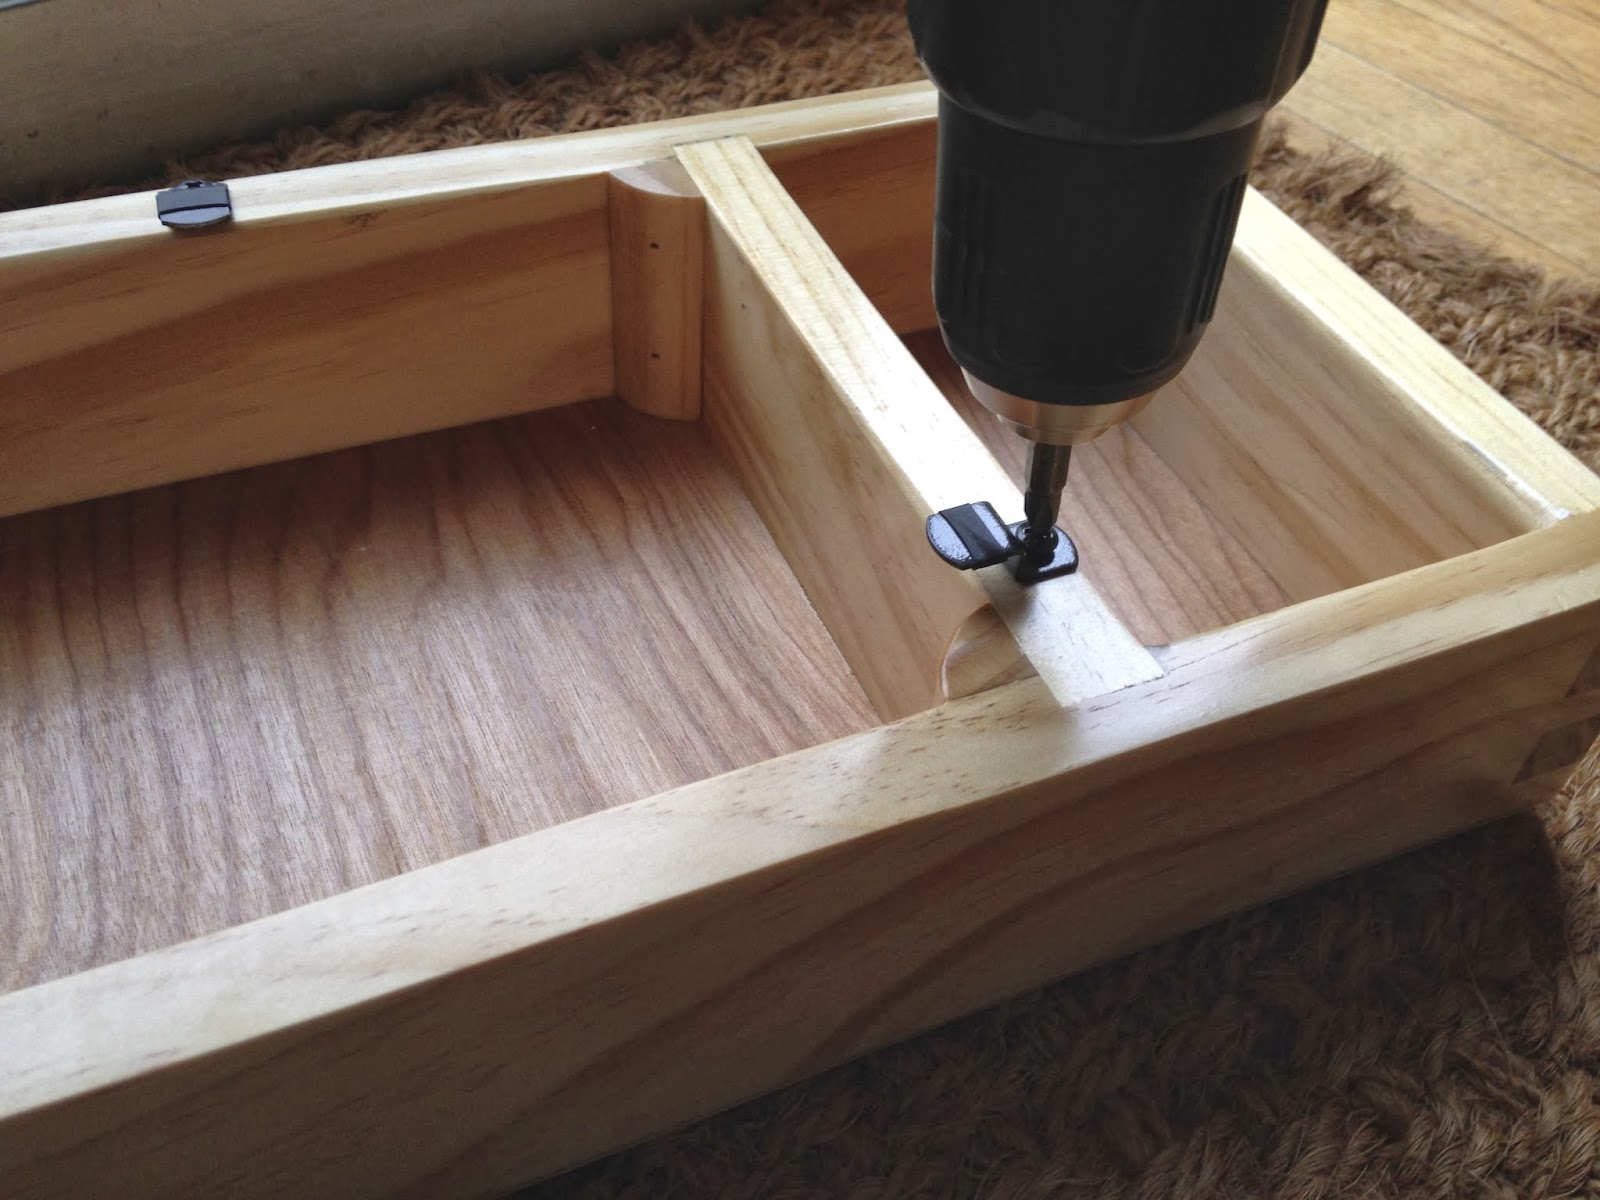
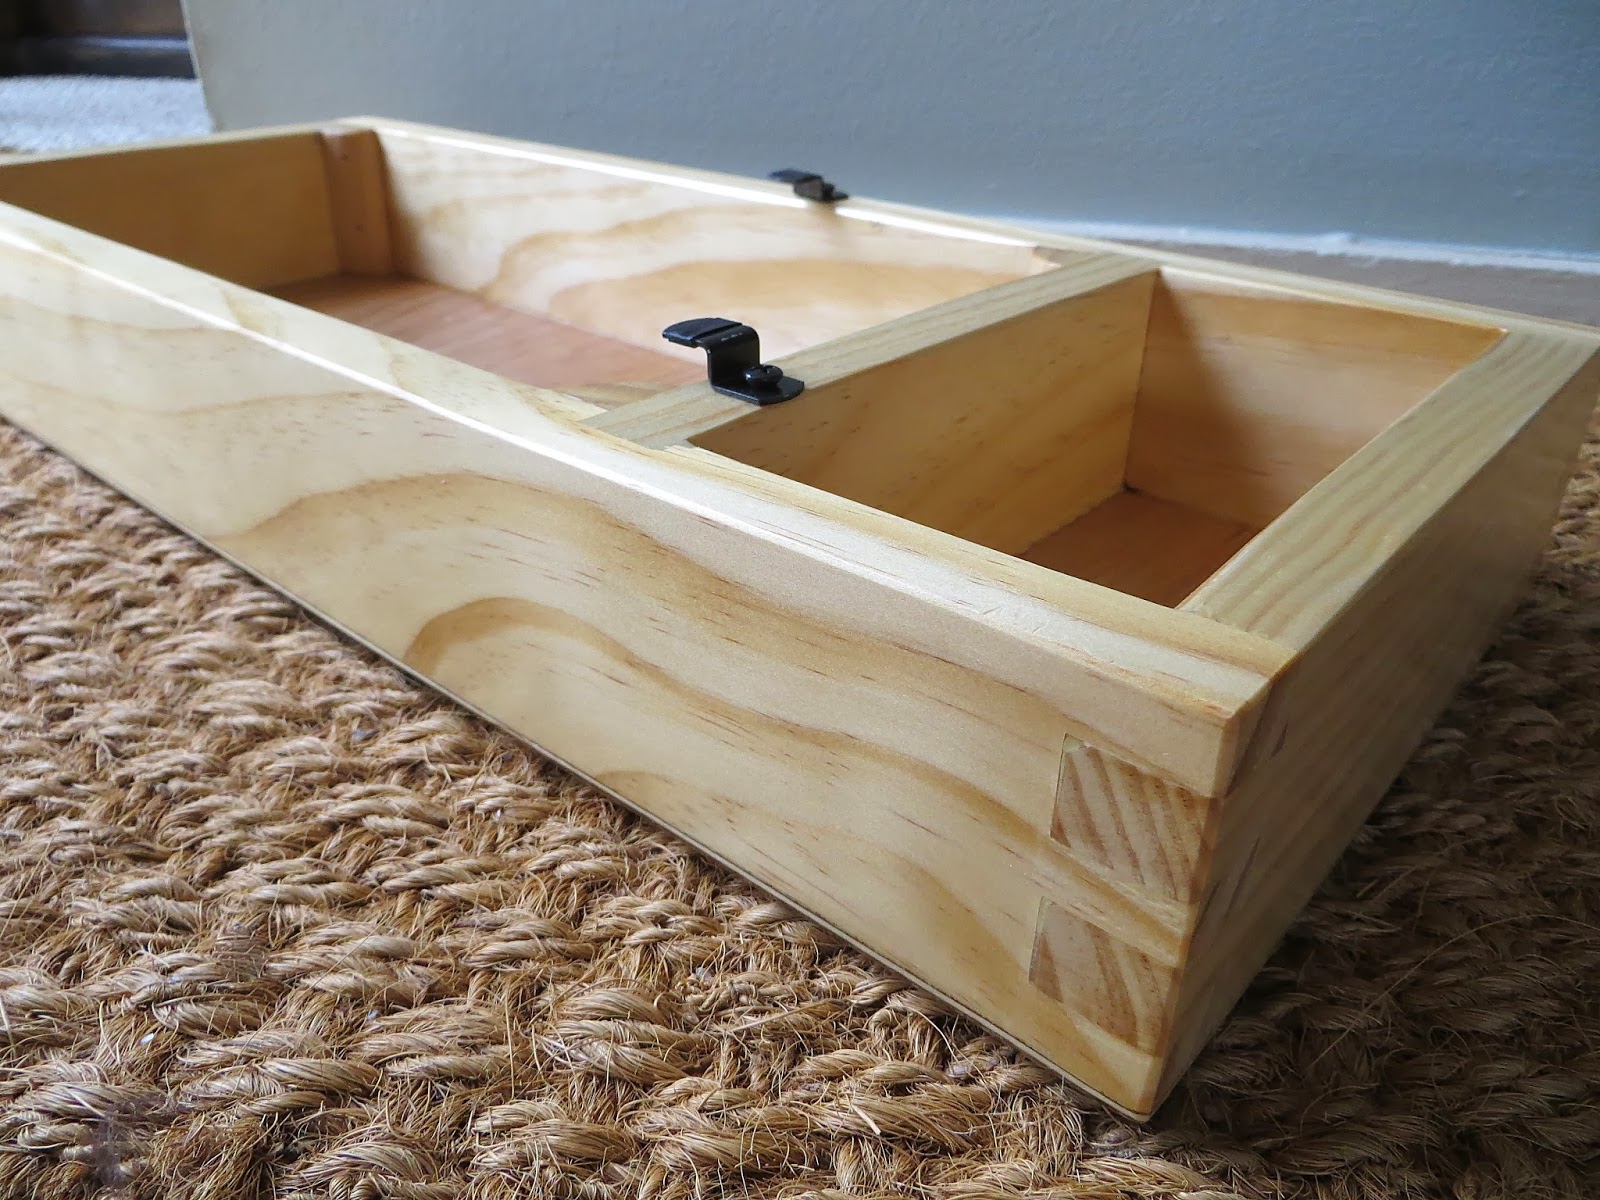
I added rubber pads to the bottom of my base to keep it skid proof and protect table top from scratches.
Set your machine in base and mark where you’d like to place your mirror clips. Pre-drill holes and screw in. I spray painted my clips black and heated a strip of heat shrink tubing over end that would be touching machine (gotta protect our babies!).
DONE!
(Left to right: Singer 201-2 in base with cubby, Singer 15-91 no cubby)
Stand back and admire that big-black beauty in the base YOU just made!
This is fantastic, thanks! I am planning to make a base for my Singer 99K which is a smaller machine, so I think I need to make my own cutting list. How did you decide how large to cut the side pieces based on the actual dimensions of the machine base?
Hi Alexis! Measure the base of your machine and you'll want your base opening to be that size or up to 1/4"-smaller on each side. Just make sure there's no obstructions under that base that would interfere with it resting on the wood base (if it's going to overlap the base).
The base opening can be the same size as the machine bed because it rests on the corner pieces in the base. If you want your machine to be recessed inside the base, so the wood sides and bed of machine are flush, then you'll want your base opening slightly bigger than machine bed and cut your corner pieces down to make up for the height of the machine bed.
Once you know how big you want your opening, factor in the width of your wood and you can figure out your outside measurements from there for cutting.
That is absolutely beautiful! Thank you so much for sharing the process. I have a 201 (my FAVORITE machine) sitting in its old plastic base that is crying out for one like this. 😉
THANK YOU! My mother-in-law just gave me a beauitful Singer 15-91 and even though I adore the table it came in, I just don't have a space for it. Luckily this is something I am eager to tackle. You're amazing for creating this tutorial. <3
Thanks for the idea! I just started a base for my 10 year old daughter's "new" 15-90 which she has started to restore but was on a very wobbly table when we found it…. NR
Hi, Dani. I just saw your response about not having any of these bases to sell, but when or if you do have some, could you let us know. Like Anna, I'm very interested in one of these bases for a Singer 15-91, and I'm not handy with woodwork. I'd be happy to pay you for it. You wouldn't even have to stain it for me, even though I know that's really the most insignificant part of making one of these.
Your tutorial is right on the mark! It occurred to me just today that I could make boxes to set my machines into for display on a shelf AND be able to take them down to drop into an opening in the work desk for use. If the boxes are all the same size to fit the desk no need for the multiple sewing cabinets taking up space. Now I have to repurpose those cabinets 🙂
I got a router for Christmas! Totally brilliant idea! Back to the drawing board to design a table for all my machines,that would be in boxes,to drop into. Thank you!!!!
Oh that's a great idea! Cabinets take up so much space! You could also have one machine in a cabinet and the others in the boxes that you can set on top of the cabinet when you want to use a different machine! That's what I do sometimes!
My daughter set me this link, along with a request for one. I sent her a link to “Woodworkers Store” to pick out her choice of wood. I’ll be making this base for her out of rosewood. Thank you for the informative tutorial.
woodwork and old sewing machines…you are a girl after my own heart !!!☺
I have a huge collection of old Singer, some French, some UK, some China !!
and a woodwork shop. No excuse now I must get on to it. Wonderful design
Thanks for sharing.
Geo
I used driftwood to make a base, no perfect edges, no perfect joints, but that’s why I used driftwood. The machine was a flood salvage that needed a complete restoration, so I thought it fitting to use a piece of 2×4 from the Delaware river.
Great tutorial and beautiful woodworking! How much do you estimate this would cost to make after buying all the supplies? I already have the tools and handyman to help me out. Just wondering what the wood and hardware might run me
Hi Grace! The select pine board is the most expensive portion, and I think at the time of making the bases I was paying $12 a board, not sure how much prices have changed since. I believe you can buy a 2’x4′ piece of plywood and that might run you around $12 as well. The hinges you’ll need to buy on eBay (used) and would probably be around $5. The trim for the corners might be $1.50. Maybe $30? That doesn’t include finishing stuff like sandpaper or stain/poly 🙂
Any reason not to cut a rabbet into the bottom to recess the plywood? I’m going to try this and use pocket holes to join the pieces. Thanks for sharing!
You could most definitely make a rabbet around the bottom edge to slide the plywood into. I didn’t do that because I was limited with the amount of tools I had at the time and I was trying to keep it simple as well.
[…] first step in cleaning the iron sewing machine base is to remove the bottom plate before removing the needle plate. If you don’t have access to a […]
Love your tutorial on the SINGER SEWING MACHINE WOOD BASE TUTORIAL I`m going to give it a try I do have a router on your building list you said Dovetail router. but you didn’t say what size to get anf the


25 Comments
I absolutely love your tutorial. I have been looking for a way to make some bases and this will work splendidly! Thank you so much for sharing!
March 2, 2014 at 9:48 pmThis is fantastic, thanks! I am planning to make a base for my Singer 99K which is a smaller machine, so I think I need to make my own cutting list. How did you decide how large to cut the side pieces based on the actual dimensions of the machine base?
March 4, 2014 at 12:51 pmHi Alexis! Measure the base of your machine and you'll want your base opening to be that size or up to 1/4"-smaller on each side. Just make sure there's no obstructions under that base that would interfere with it resting on the wood base (if it's going to overlap the base).
The base opening can be the same size as the machine bed because it rests on the corner pieces in the base. If you want your machine to be recessed inside the base, so the wood sides and bed of machine are flush, then you'll want your base opening slightly bigger than machine bed and cut your corner pieces down to make up for the height of the machine bed.
Once you know how big you want your opening, factor in the width of your wood and you can figure out your outside measurements from there for cutting.
March 4, 2014 at 1:43 pmThat is absolutely beautiful! Thank you so much for sharing the process. I have a 201 (my FAVORITE machine) sitting in its old plastic base that is crying out for one like this. 😉
April 28, 2014 at 1:54 pmTHANK YOU! My mother-in-law just gave me a beauitful Singer 15-91 and even though I adore the table it came in, I just don't have a space for it. Luckily this is something I am eager to tackle. You're amazing for creating this tutorial. <3
August 8, 2014 at 1:36 amYou don't happen to sell any of your bases, do you? If so I am very interested. My husband isn't very "wood handy".
February 23, 2015 at 2:14 pmI don't have any for sale at the moment, sorry!
February 23, 2015 at 2:58 pmThanks for the idea! I just started a base for my 10 year old daughter's "new" 15-90 which she has started to restore but was on a very wobbly table when we found it….
March 18, 2015 at 2:05 pmNR
Hi, Dani. I just saw your response about not having any of these bases to sell, but when or if you do have some, could you let us know. Like Anna, I'm very interested in one of these bases for a Singer 15-91, and I'm not handy with woodwork. I'd be happy to pay you for it. You wouldn't even have to stain it for me, even though I know that's really the most insignificant part of making one of these.
March 18, 2015 at 2:05 pmYour tutorial is right on the mark! It occurred to me just today that I could make boxes to set my machines into for display on a shelf AND be able to take them down to drop into an opening in the work desk for use. If the boxes are all the same size to fit the desk no need for the multiple sewing cabinets taking up space. Now I have to repurpose those cabinets 🙂
January 17, 2016 at 9:19 pmI got a router for Christmas! Totally brilliant idea! Back to the drawing board to design a table for all my machines,that would be in boxes,to drop into.
February 7, 2018 at 1:04 pmThank you!!!!
Oh that's a great idea! Cabinets take up so much space! You could also have one machine in a cabinet and the others in the boxes that you can set on top of the cabinet when you want to use a different machine! That's what I do sometimes!
February 7, 2018 at 1:06 pmYou're welcome! I'd love to see pictures when you're done! (twirlybirdbaby@gmail.com)
February 7, 2018 at 1:07 pmMy daughter set me this link, along with a request for one. I sent her a link to “Woodworkers Store” to pick out her choice of wood. I’ll be making this base for her out of rosewood. Thank you for the informative tutorial.
August 16, 2018 at 2:12 pmWhat an awesome dad you are! Rosewood will be so beautiful!
August 17, 2018 at 7:20 amwoodwork and old sewing machines…you are a girl after my own heart !!!☺
March 12, 2020 at 4:24 pmI have a huge collection of old Singer, some French, some UK, some China !!
and a woodwork shop. No excuse now I must get on to it. Wonderful design
Thanks for sharing.
Geo
Hi Geo! Thank you for the message! Yes, get to work! 🙂
March 13, 2020 at 1:02 pmI used driftwood to make a base, no perfect edges, no perfect joints, but that’s why I used driftwood. The machine was a flood salvage that needed a complete restoration, so I thought it fitting to use a piece of 2×4 from the Delaware river.
May 16, 2020 at 10:32 amThat sounds lovely Joe! I’d be interested to see a picture of it, sounds cool!
July 4, 2020 at 9:42 amGreat tutorial and beautiful woodworking! How much do you estimate this would cost to make after buying all the supplies? I already have the tools and handyman to help me out. Just wondering what the wood and hardware might run me
August 14, 2020 at 7:33 amHi Grace! The select pine board is the most expensive portion, and I think at the time of making the bases I was paying $12 a board, not sure how much prices have changed since. I believe you can buy a 2’x4′ piece of plywood and that might run you around $12 as well. The hinges you’ll need to buy on eBay (used) and would probably be around $5. The trim for the corners might be $1.50. Maybe $30? That doesn’t include finishing stuff like sandpaper or stain/poly 🙂
September 13, 2020 at 10:24 amAny reason not to cut a rabbet into the bottom to recess the plywood? I’m going to try this and use pocket holes to join the pieces. Thanks for sharing!
September 10, 2020 at 7:02 pmHi Darlene!
You could most definitely make a rabbet around the bottom edge to slide the plywood into. I didn’t do that because I was limited with the amount of tools I had at the time and I was trying to keep it simple as well.
September 13, 2020 at 10:21 am[…] first step in cleaning the iron sewing machine base is to remove the bottom plate before removing the needle plate. If you don’t have access to a […]
December 14, 2022 at 2:03 amLove your tutorial on the SINGER SEWING MACHINE WOOD BASE TUTORIAL I`m going to give it a try I do have a router on your building list you said Dovetail router. but you didn’t say what size to get anf the
May 11, 2023 at 1:37 pm