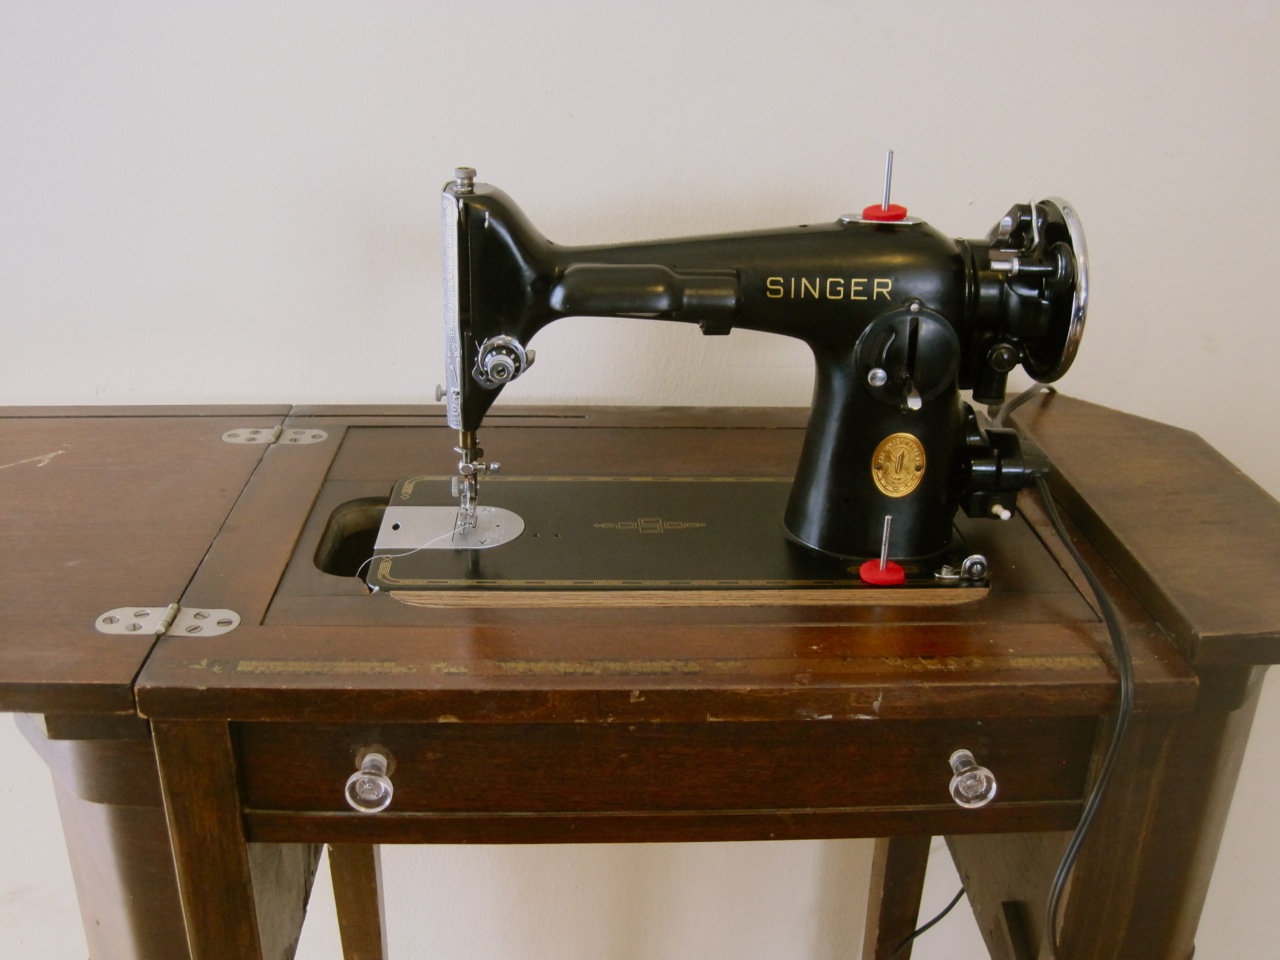
(ABOVE PICTURE IS AFTER SHE’D BEEN MADE OVER)
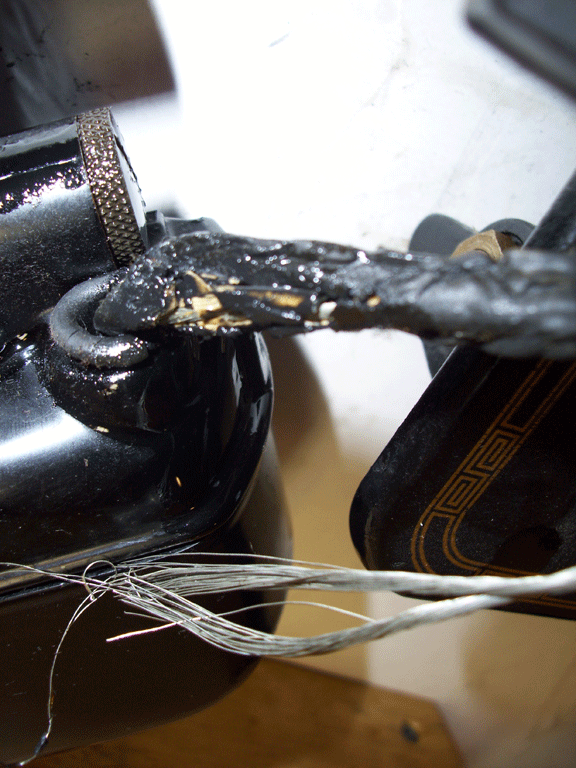
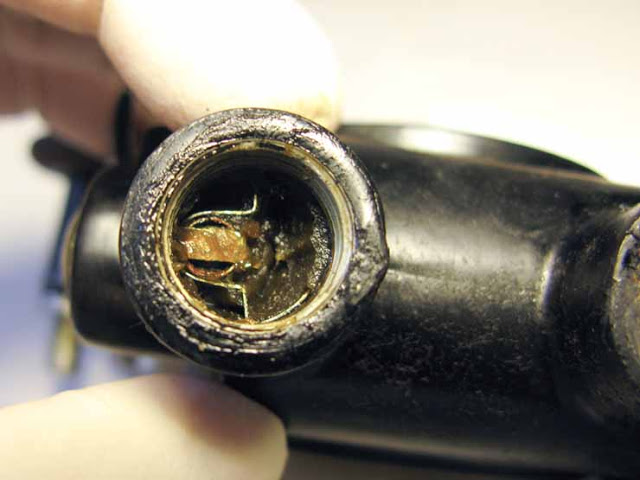
I picked up an old Singer 201 sewing machine from the thrift store. The serial number dates it back to 1940. It came in a beautiful wood cabinet. The machine had probably 40 years worth of dust and grime on the outside and was full of cobwebs (I wish I had taken a picture). The machine didn’t have any of the original accessories or manual and I knew right off that all the wiring would need to be replaced. I bought it of course. I brought it home and spent 5 hours taking things apart to start to clean it. Once I pulled off the motor I saw that the wires to the motor were brittle and wire was exposed.
Not only is electrical/motor stuff intimidating to me – but loosing any of the screws or small pieces would be a disaster. I decided to call my local machine shop. He said it would be $75 to clean and re-wire the motor and that he honestly didn’t want to do it because it’s such a pain and he was so backed up. I guess that meant I’d need to do it myself!
Upon research I found a blog where the guy gives detailed pictures/explanations on how to demount the motor, take it all apart, solder new wiring in, put it back together and grease it up. It’s a huge (and dirty) process. I went to 4 stores trying to get all the right things and boy was it a challenge! I came back home with some 18 guage wire, terminals, heat shrink tubing, rubbing alcohol and swabs. I still needed a solder iron, 60/40 solder, grease wicks (I’ve never heard of them before either), grease, syringe applicators for grease, rubber grommet and carbon brushes for motor. Waiting for everything to arrive was painful – I am so impatient!
Here’s some picture of the process to give you an idea (from the guy’s blog):
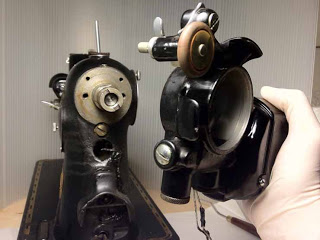
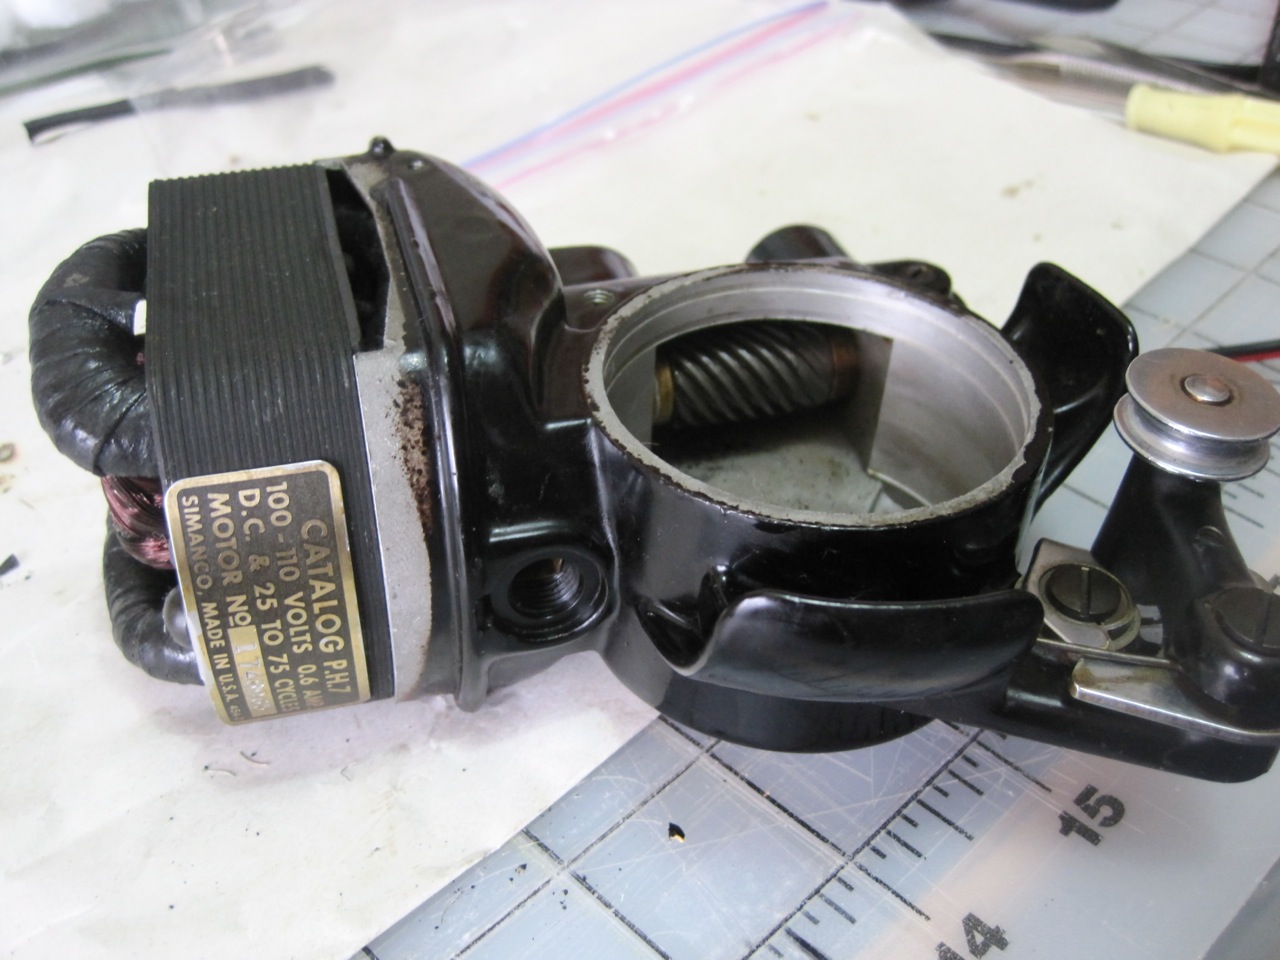
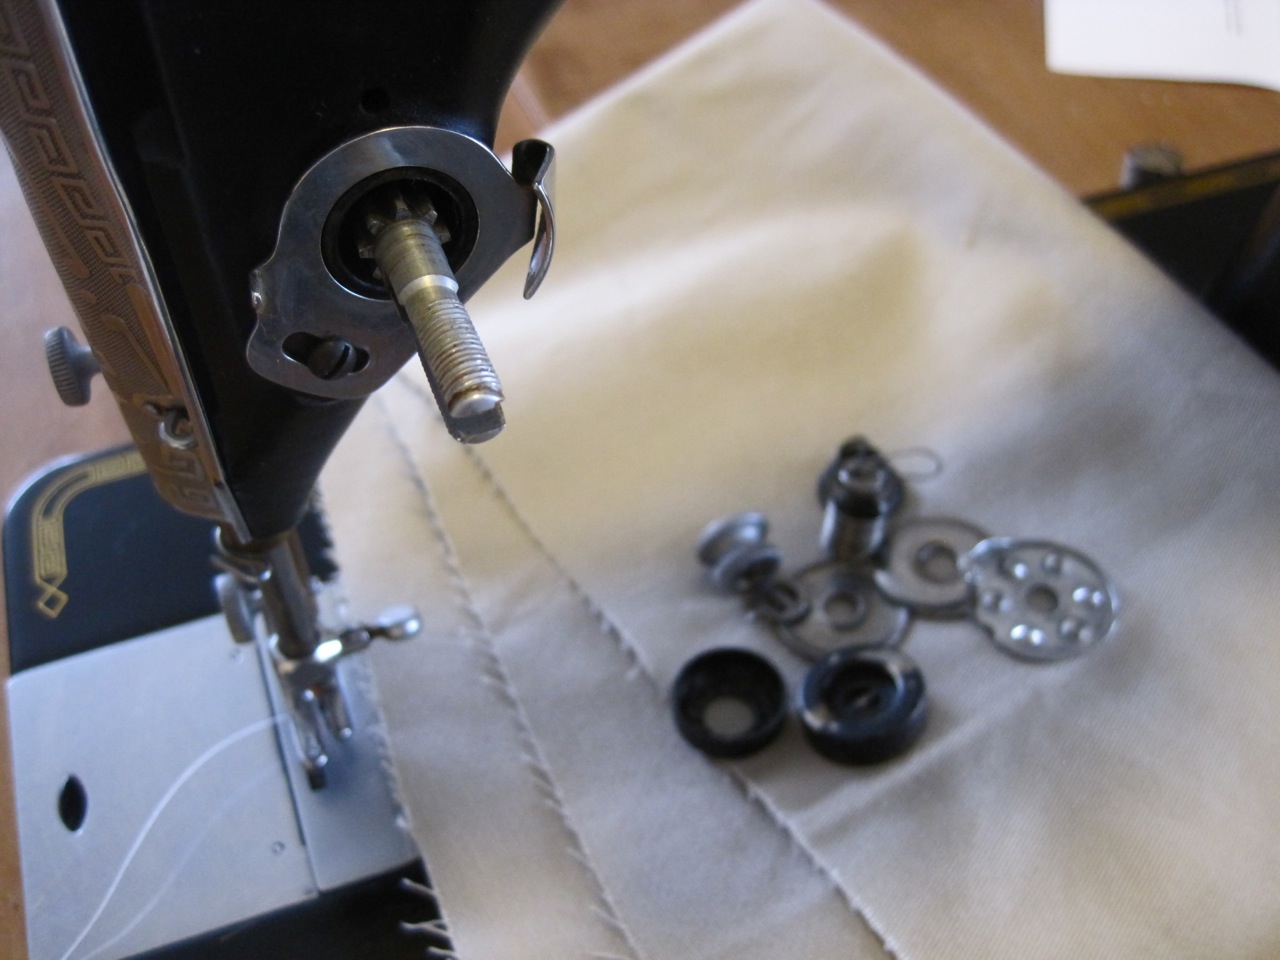
Demounting the handwheel and motor from the machine.
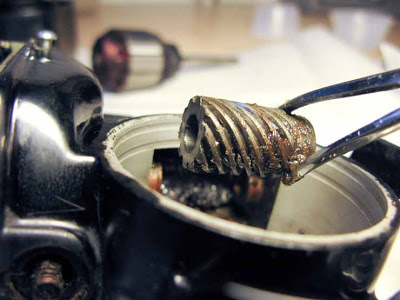
Take out some greasy parts (including ‘the worm’ in the picture) and clean everything up.
Pull out the insides of the ‘grease pots’ and clean up.

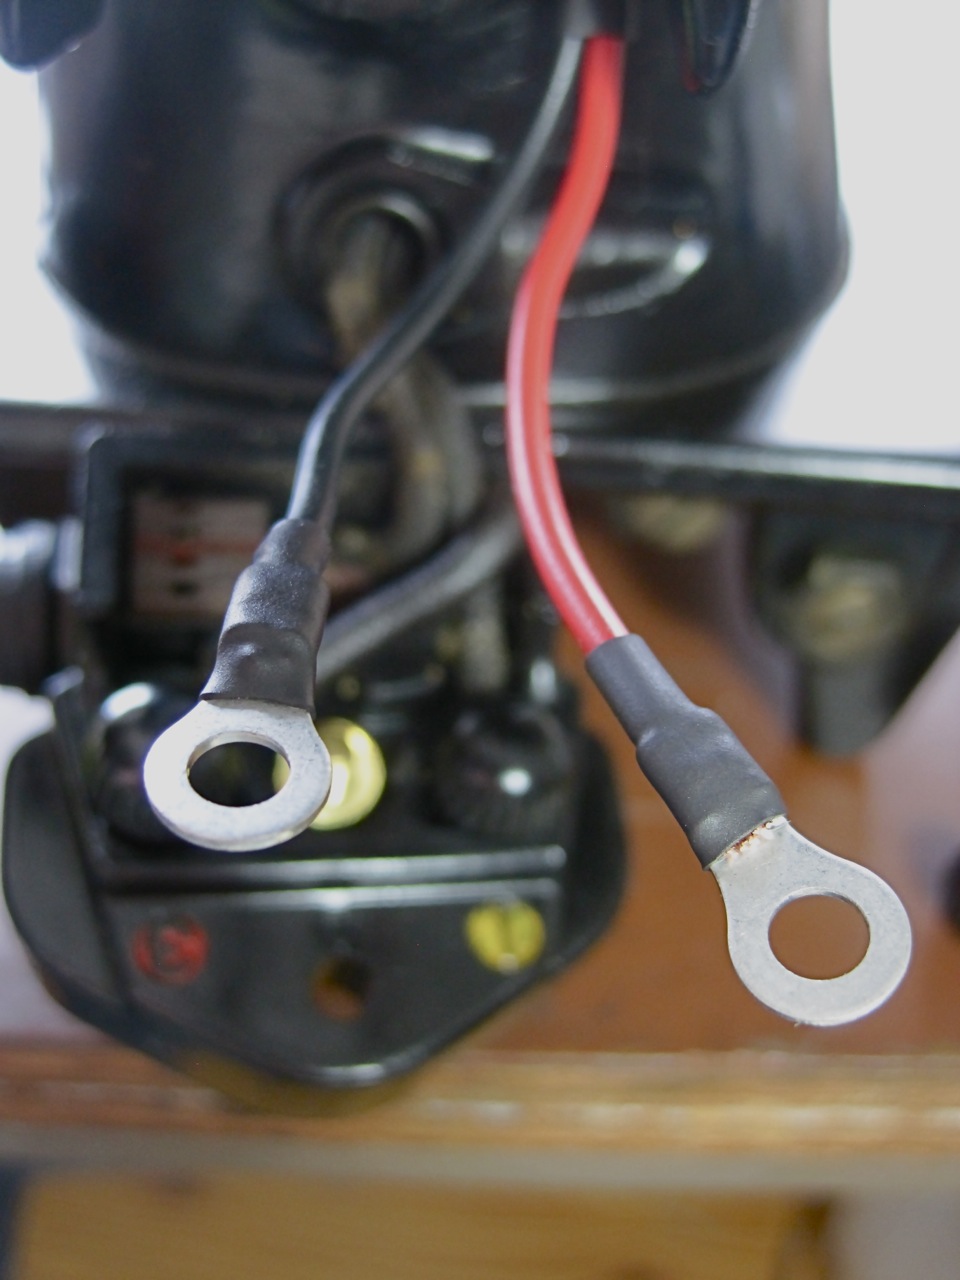
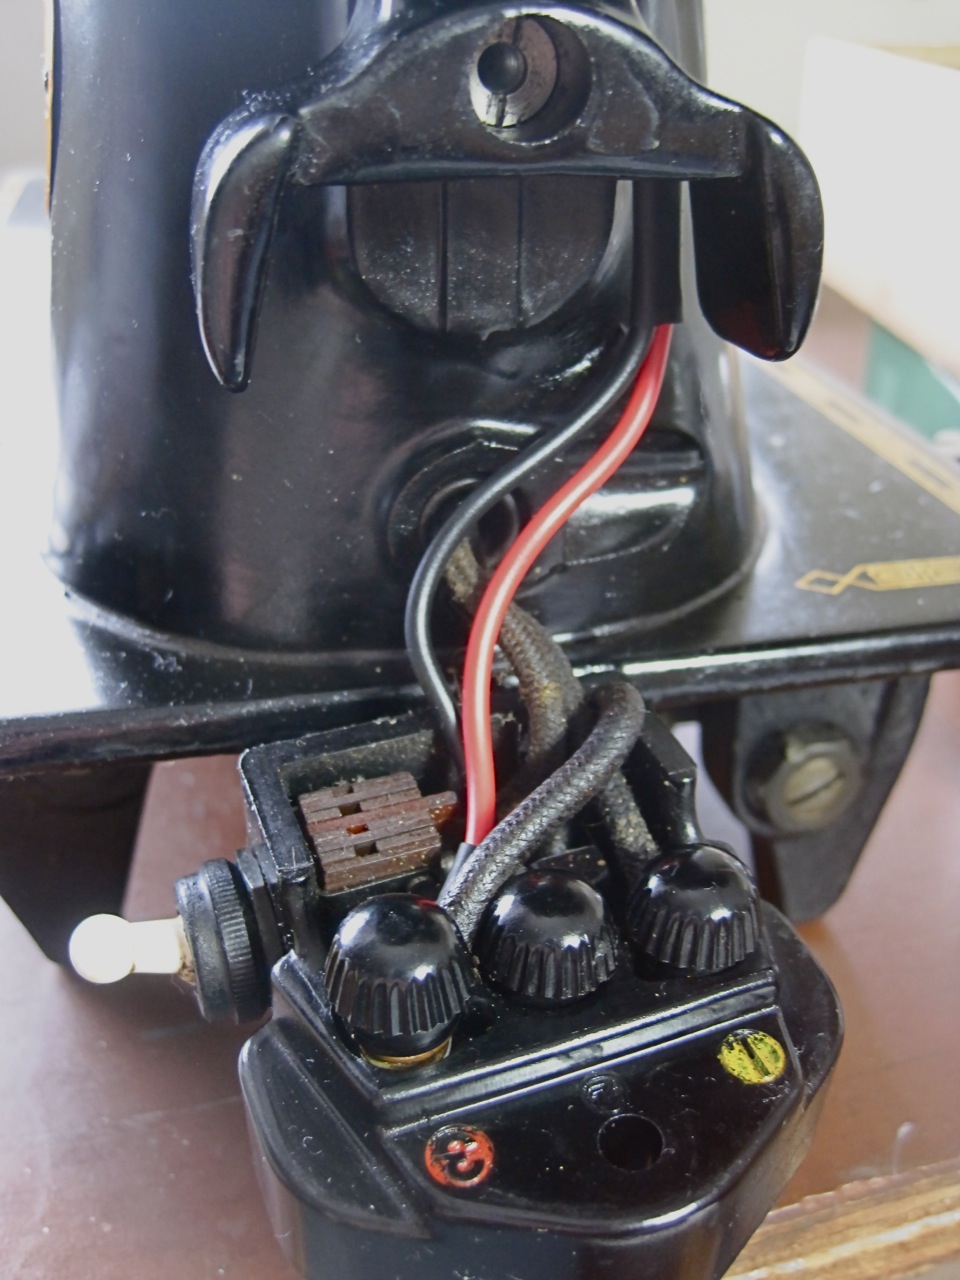
The wires along the bottom coming out of the right side are the ones that need to be replace.
So here’s what I did:
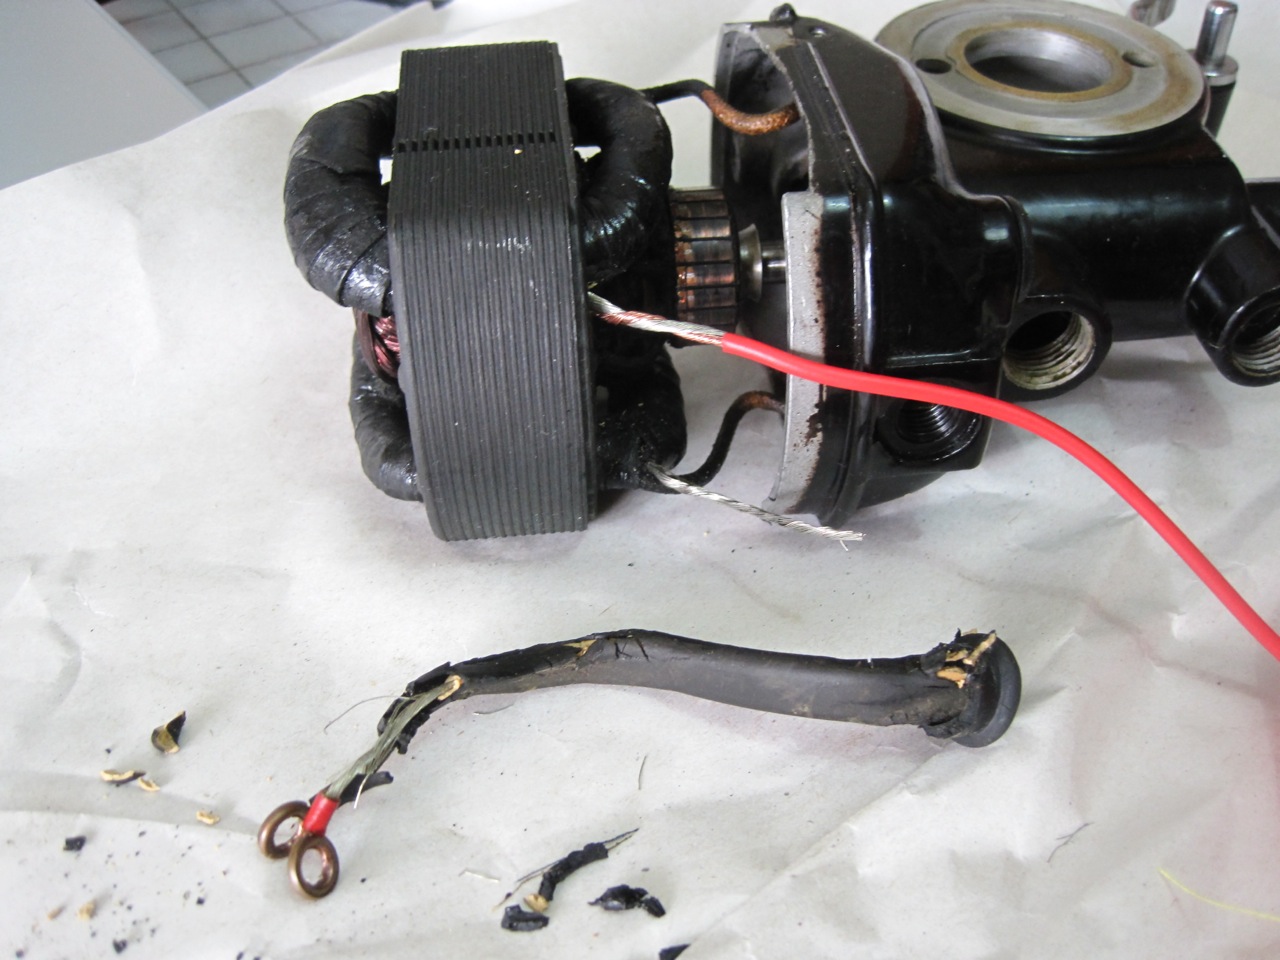
Cut off the original motor wires and braided new wire on.
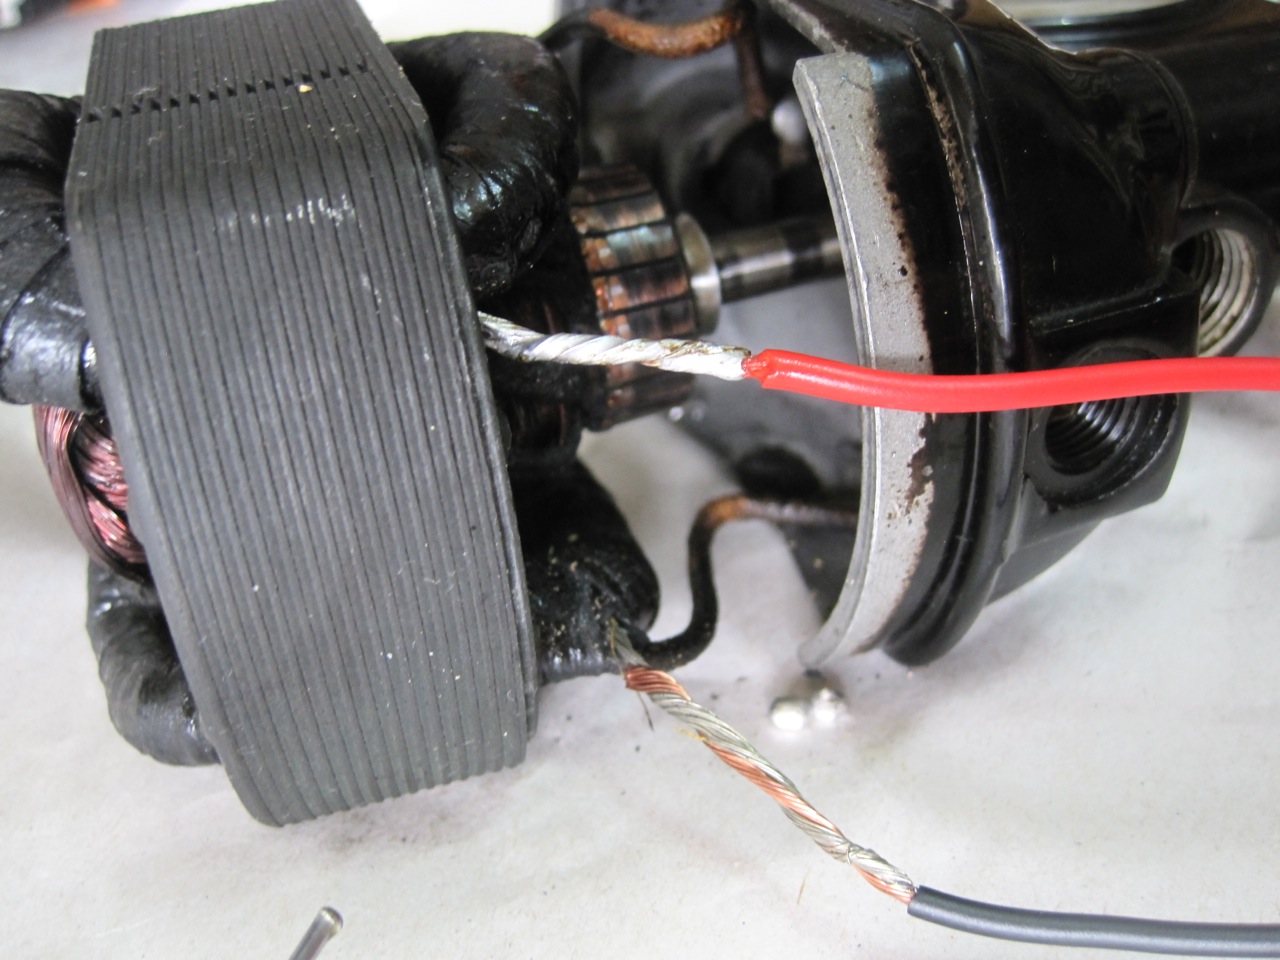
I soldered the top one first. By this point I was shaking so bad I had to take a break and relax. I practiced a few times but had never soldered before this project and was so nervous about doing something wrong and ruining everything.

Next I put heat shrink tubing over the soldered areas.
I did an underwriters knot, put heat shrink tubing over both wires and put it through the hole exiting the motor (notice the nice new rubber grommet the wires are going through).
Next I put the ‘worm’ back on the armature shaft and screwed it back in place – it was tricky!
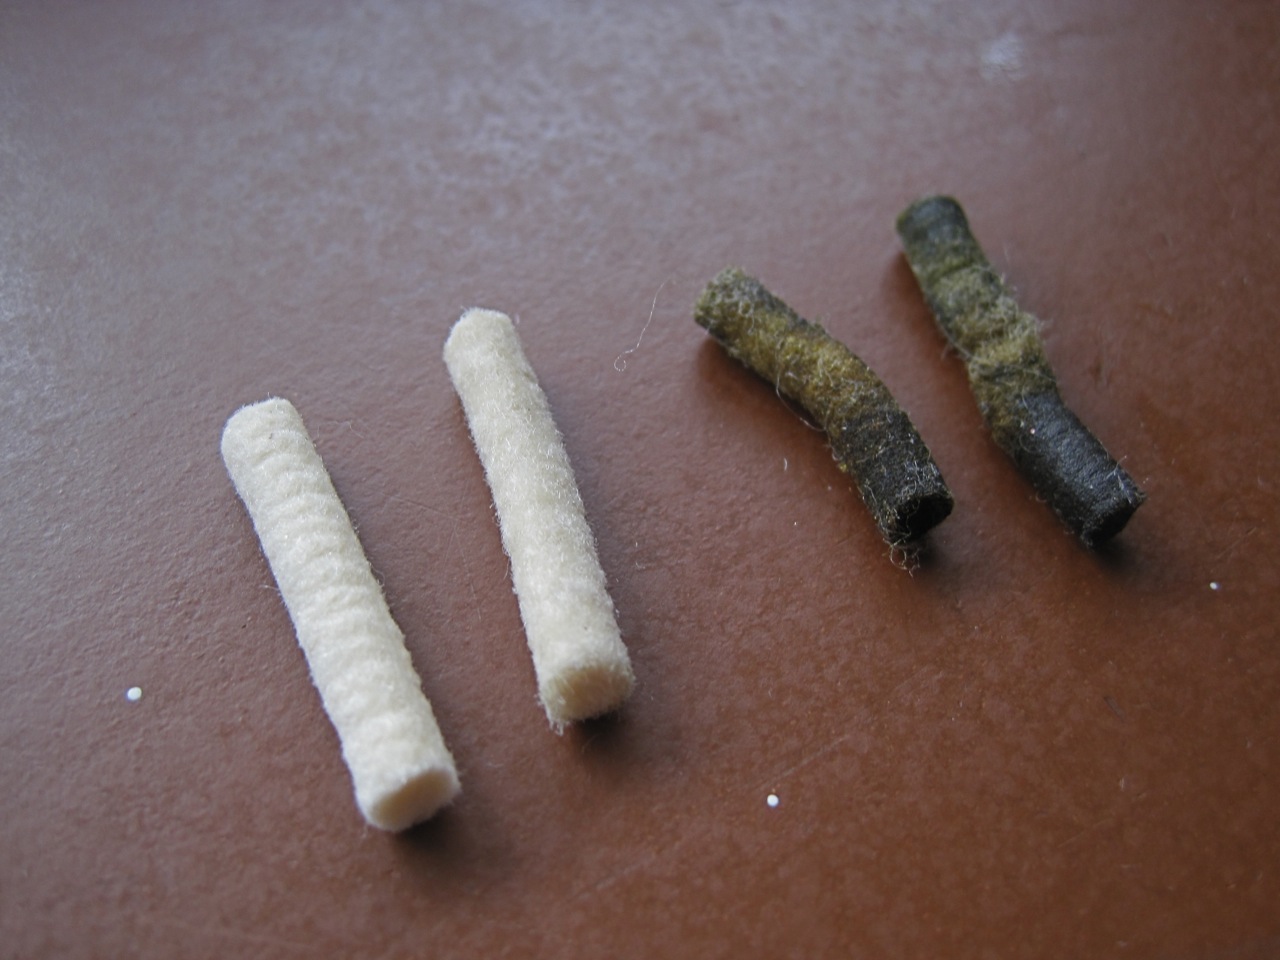
I cut new grease wicks to put in. See how nasty the old ones are!

Put the wicks on the old springs.

Put the wicks back into the grease pots with clips.

Covered the wicks with new Singer Lubricant and put the caps back on. At this point I also put in some new carbon brushes.

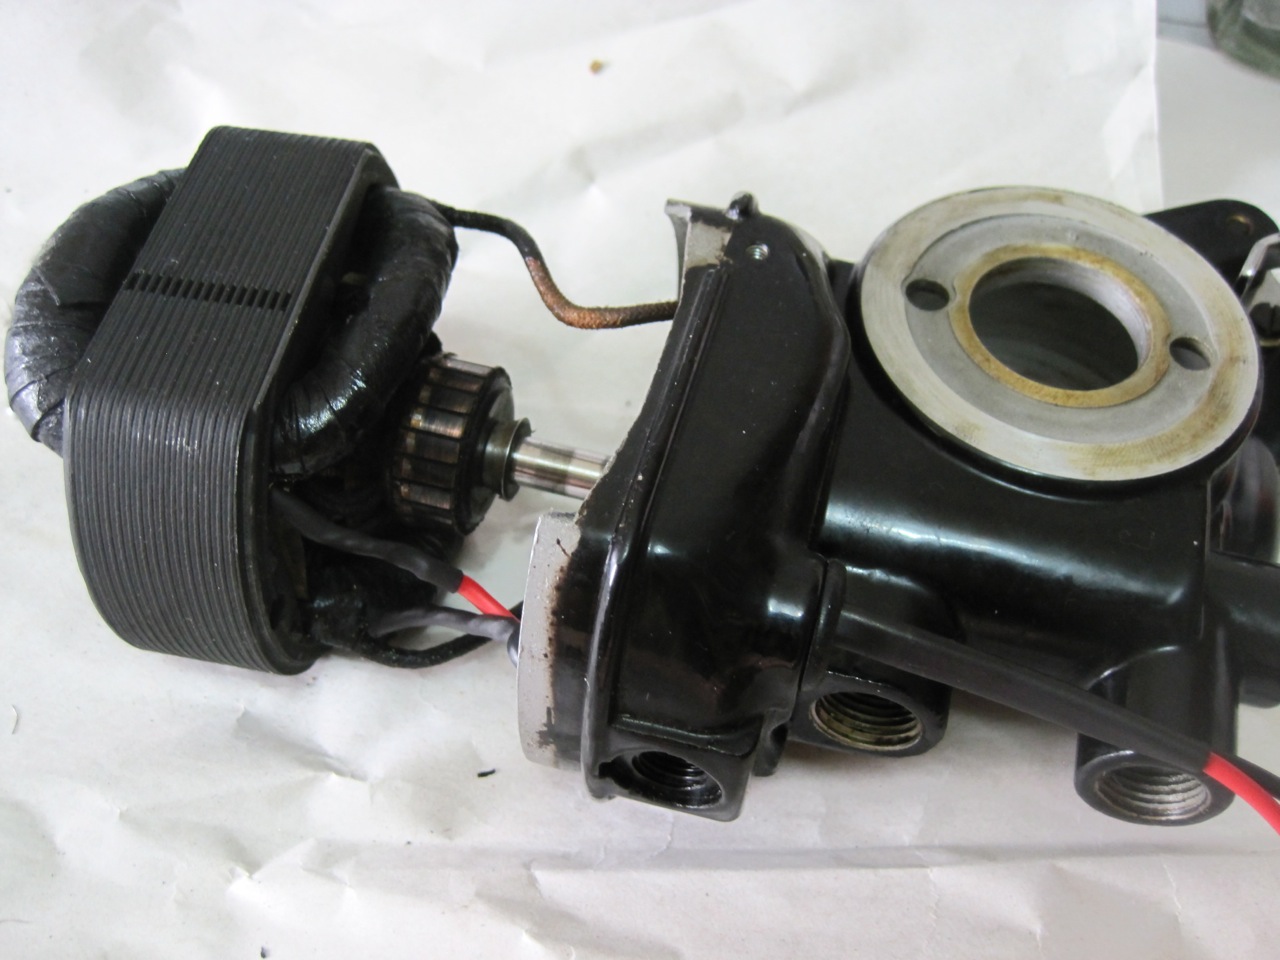
Screwed the motor back into place and added some Singer lubricant to the ‘worm’. I thought I put too much so I wiped some off after this picture.
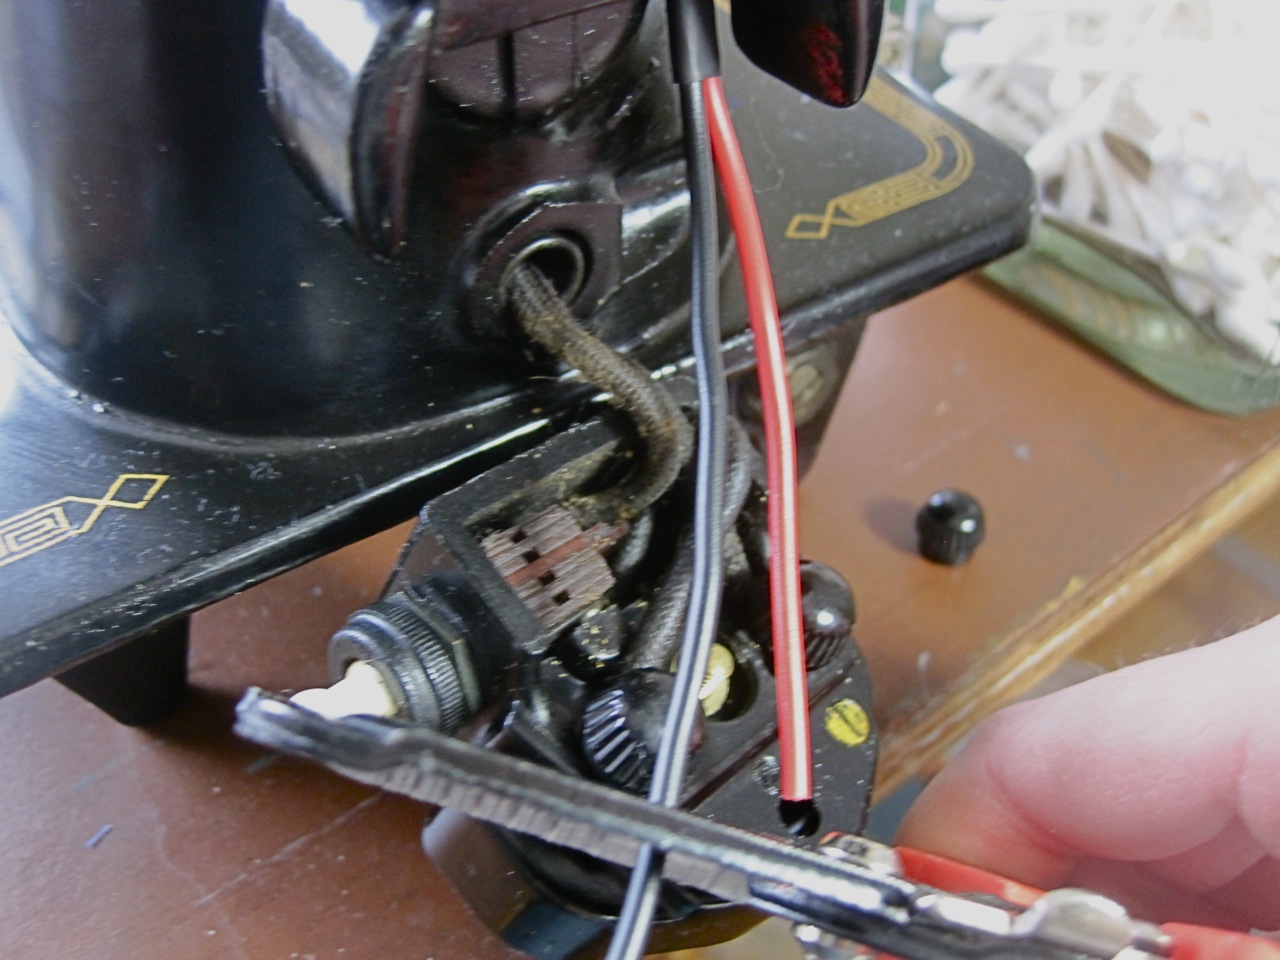
I cut the motor wires to length and stripped off the ends.
I crimped terminals on the ends.
Heat shrunk some tubing over the ends.
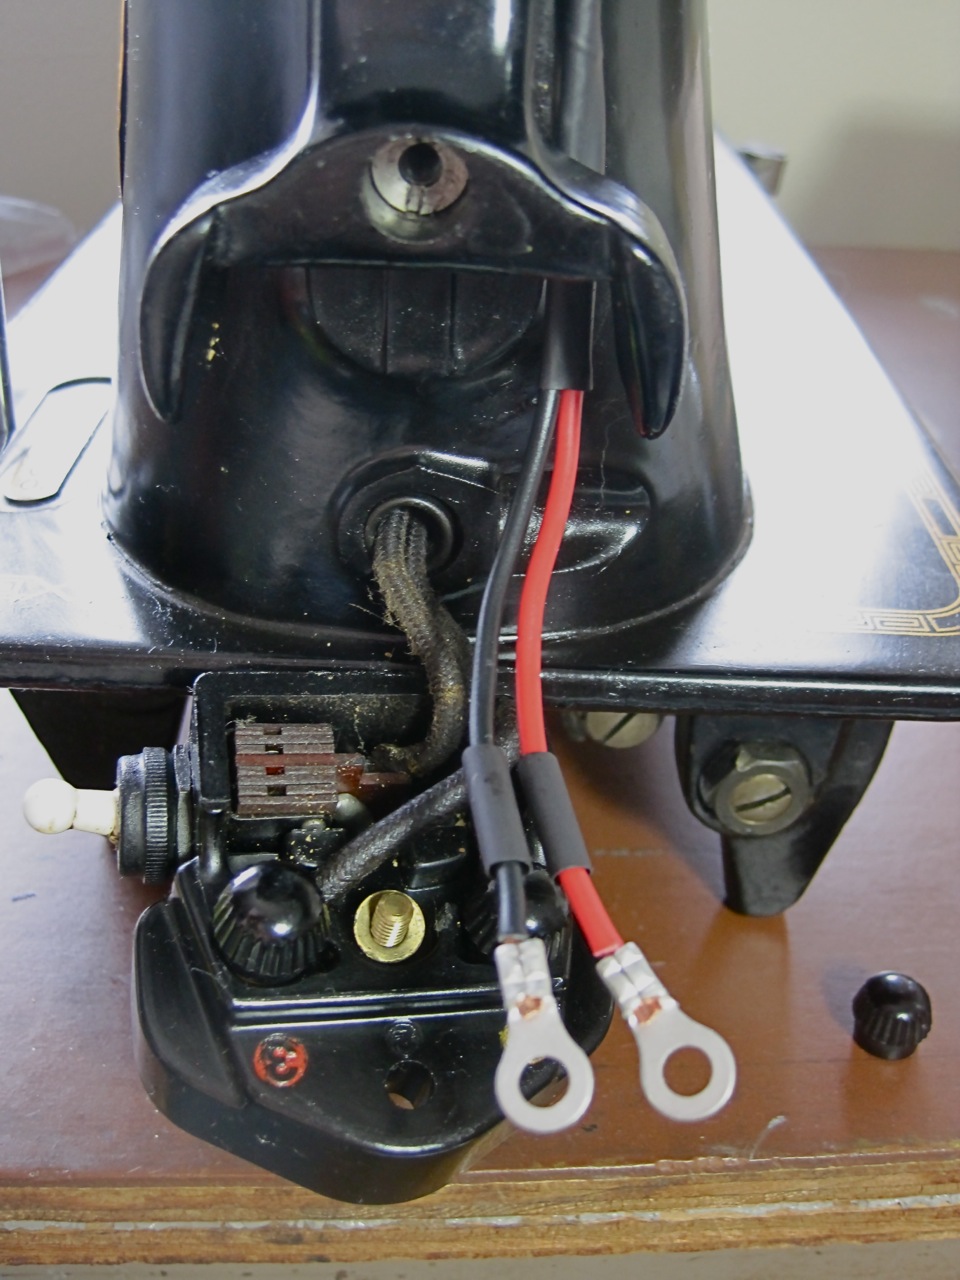
Screwed the motor wires back onto the terminal.
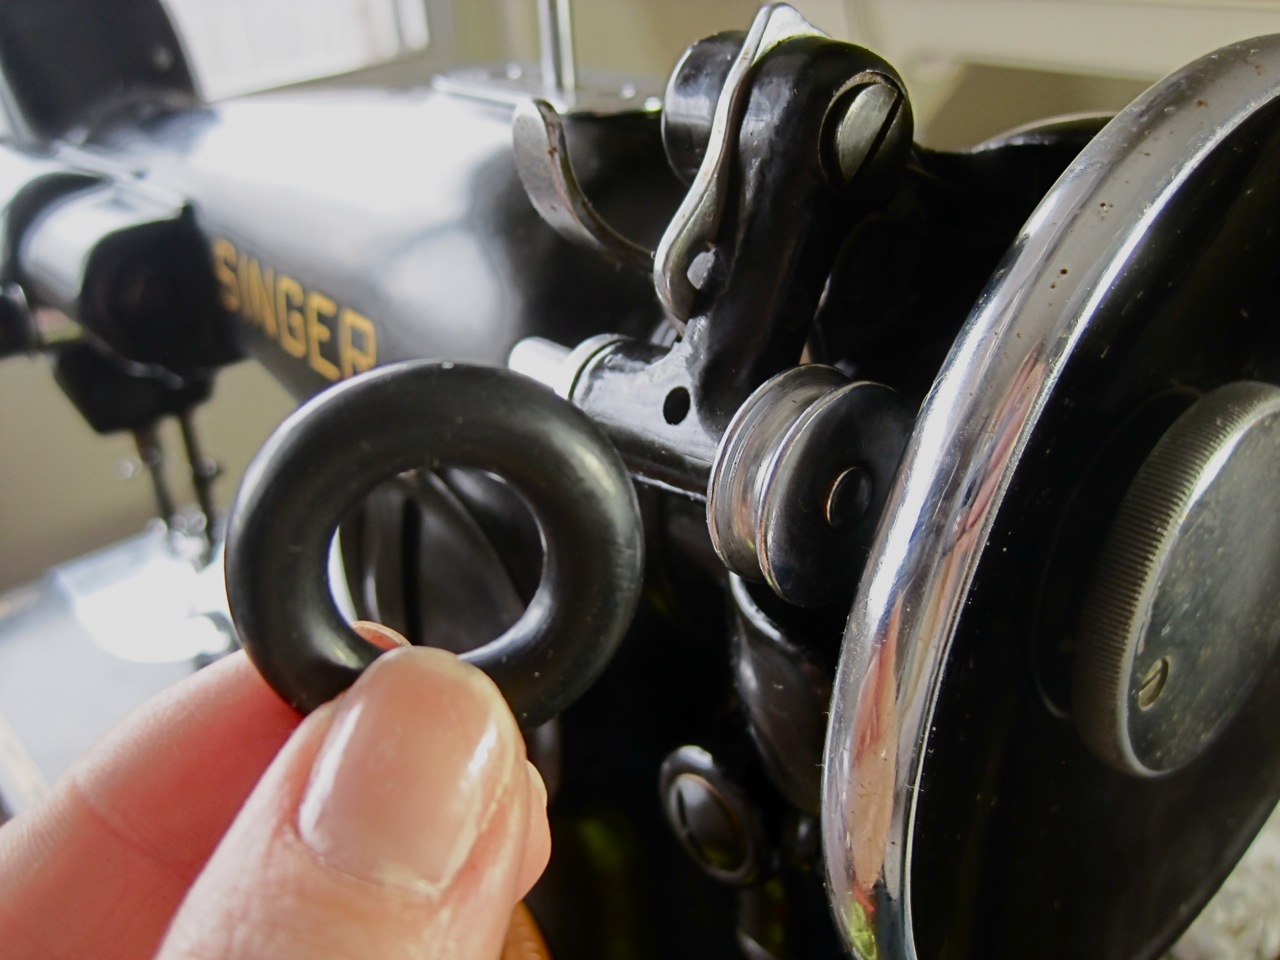
Put the hand wheel back on. Replaced the bobbin winder tire.
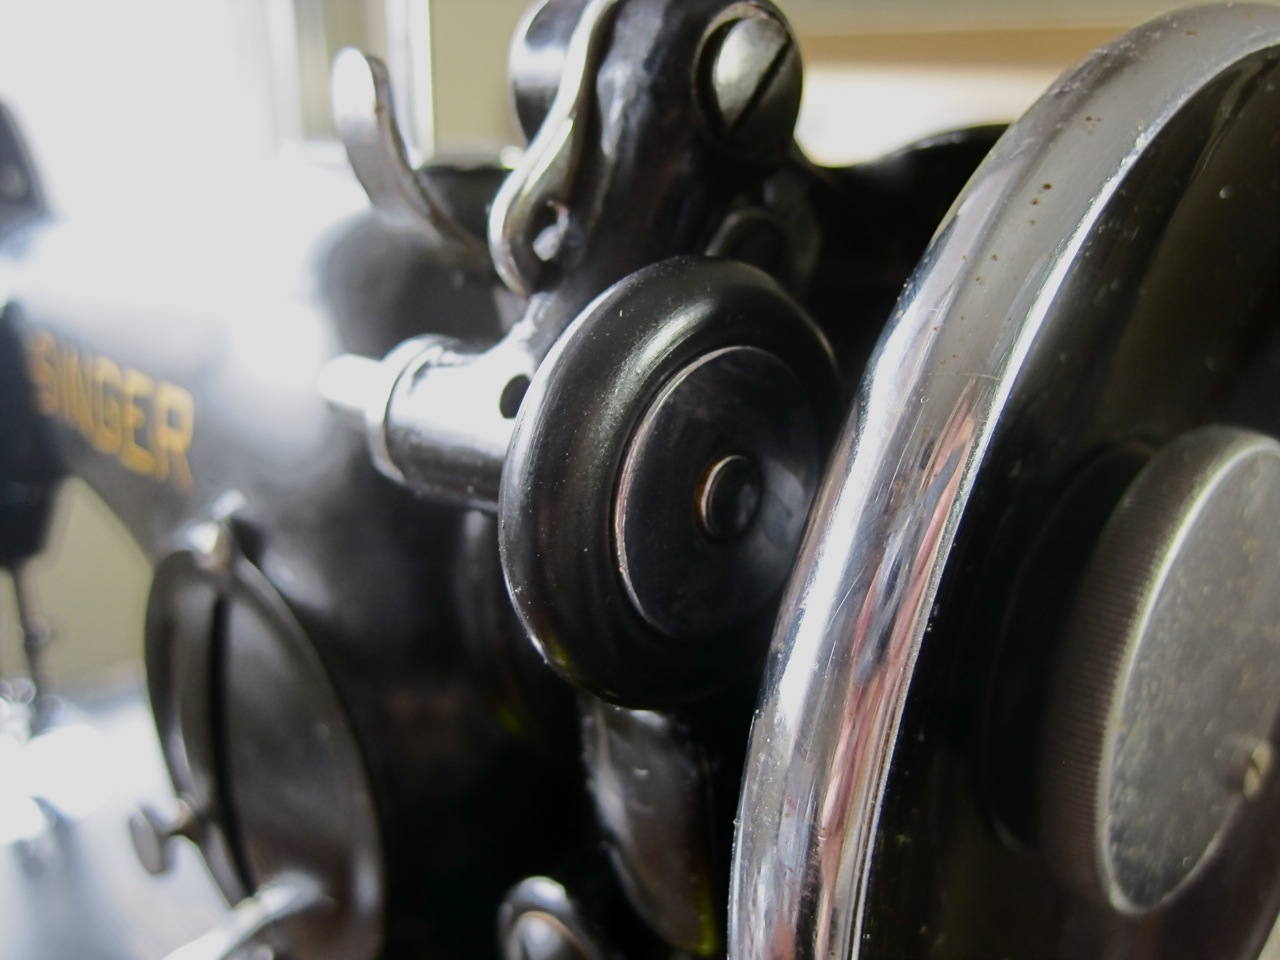
Adjusted the tire so it had perfect tension on the hand wheel when engaged.

Opened up the bobbin assembly and cleaned it out really well. This only shows half off the grime that was there before I took the picture!

Put everything back together – see how clean! I adjusted the bobbin tension so it was perfect and added the new needle plate with the numbered guides.
The upper tension assembly was way off and the spring wasn’t in the right place so I took it apart and cleaned all the parts.

I adjusted the main rod so it was perfectly horizontal.

Put it all back together and fixed the tension so it was just perfect!

Here’s the original cords to the machine. I took those off…

…replaced the cords with new ones.

The rubber feet on the bottom of the pedal were missing and I replaced them with new ones (not shown).
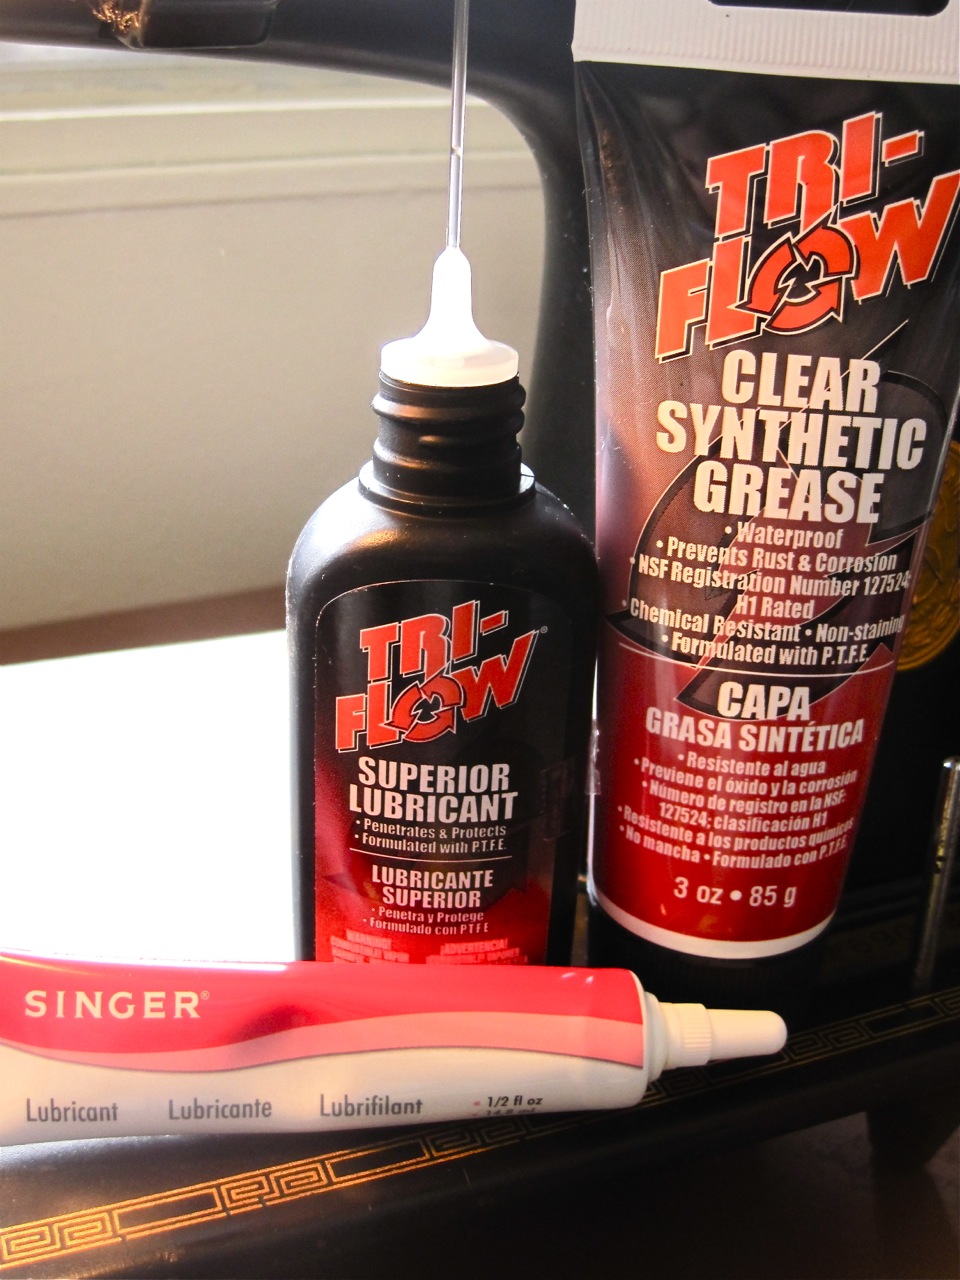
I used the best oil and grease for the machine. Singer lubricant for the motor grease pots, Tri-flow grease for the other gears and Tri-flow oil for all the metal-to-metal joints.
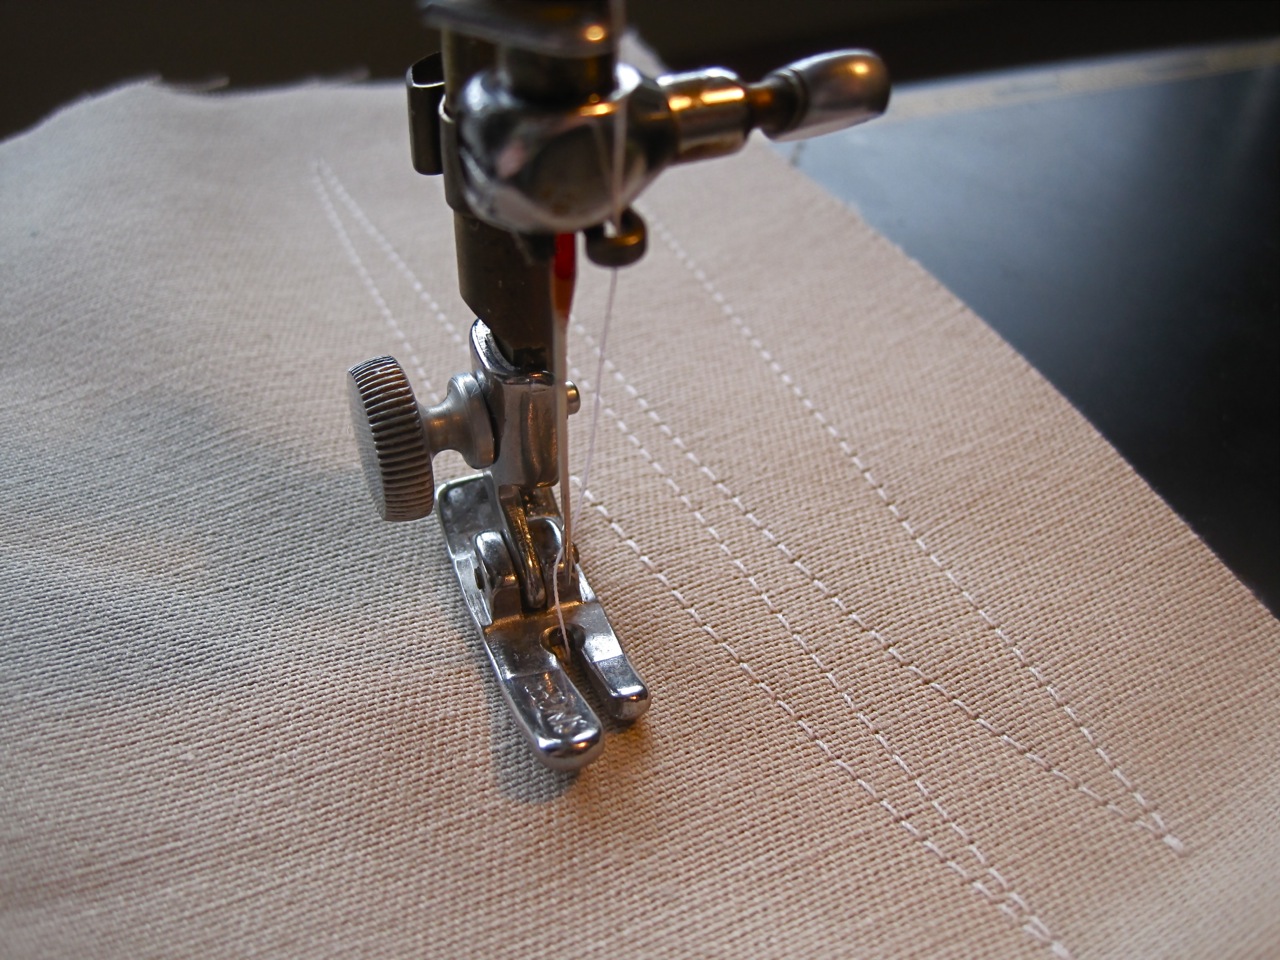
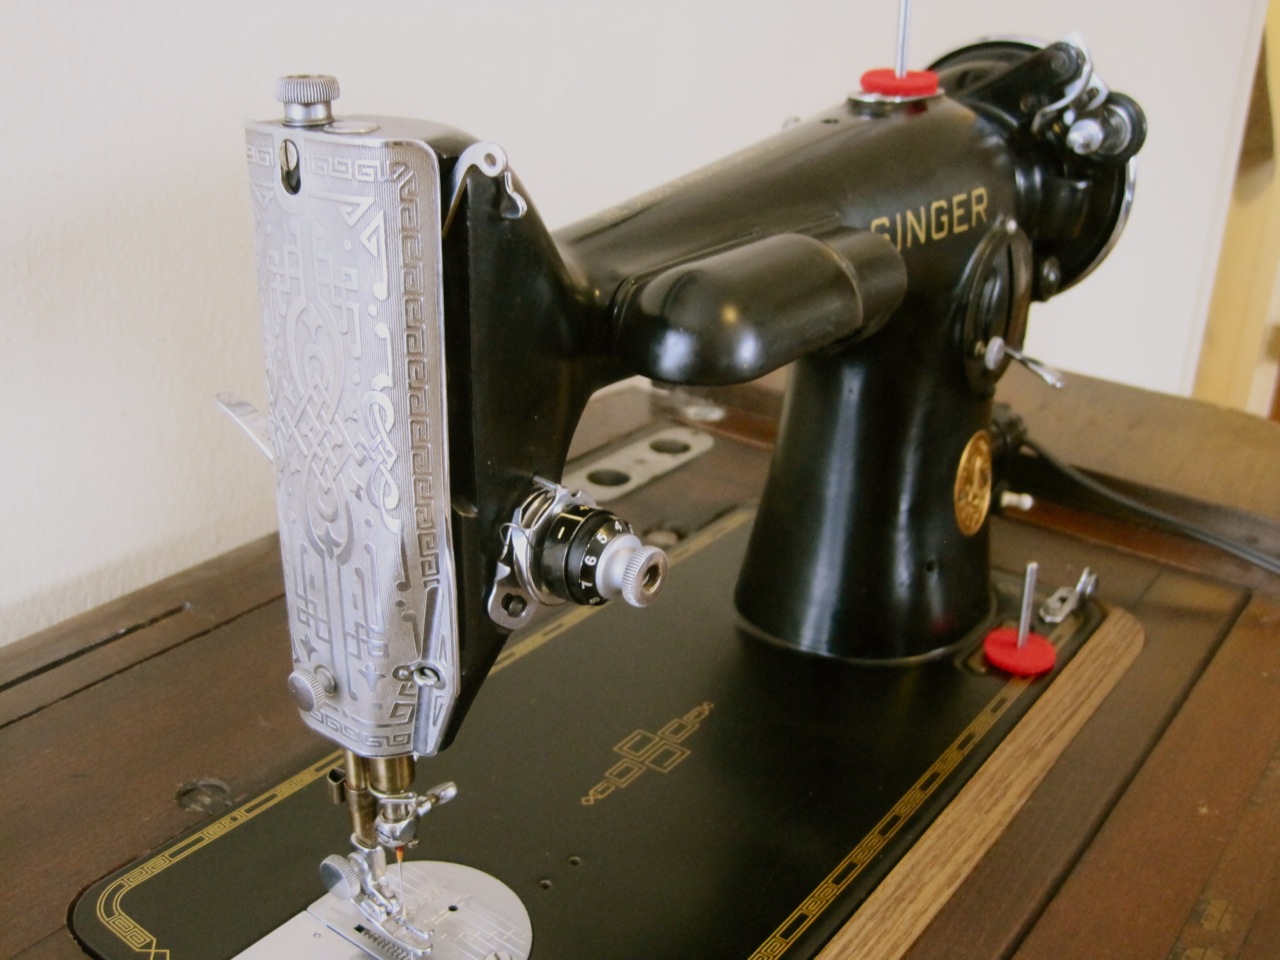
I replaced the original presser foot with a new one because the bottom was rough and rusted. I got new bobbins, needles, light bulb and spool felt pads. It stitches beautifully!
Here’s a before and after video clip of the machine running. The difference is crazy!
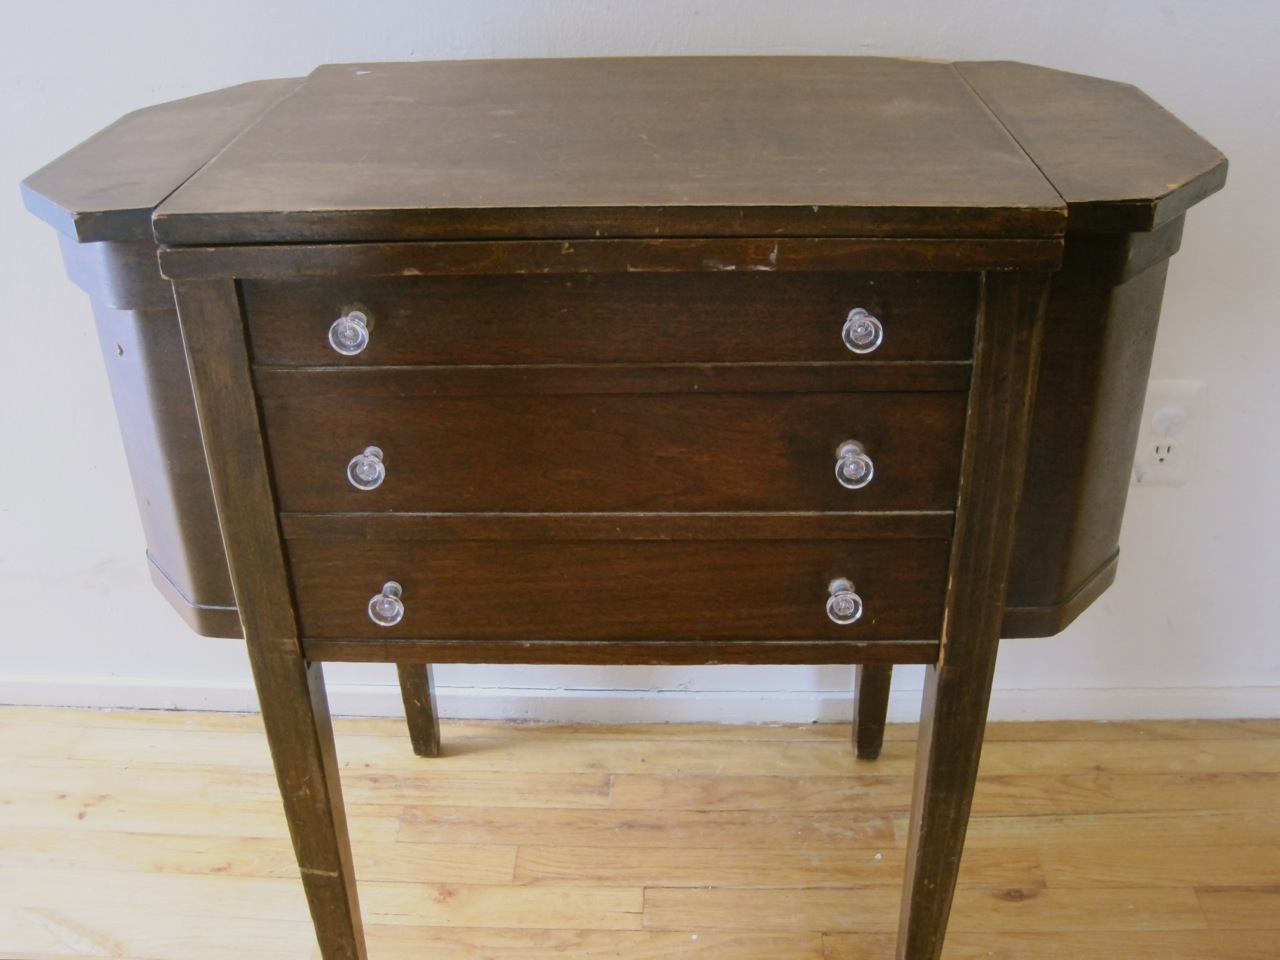
Here’s the cabinet it came in (not it’s original). I replaced the old wood knobs with some crystal knobs.
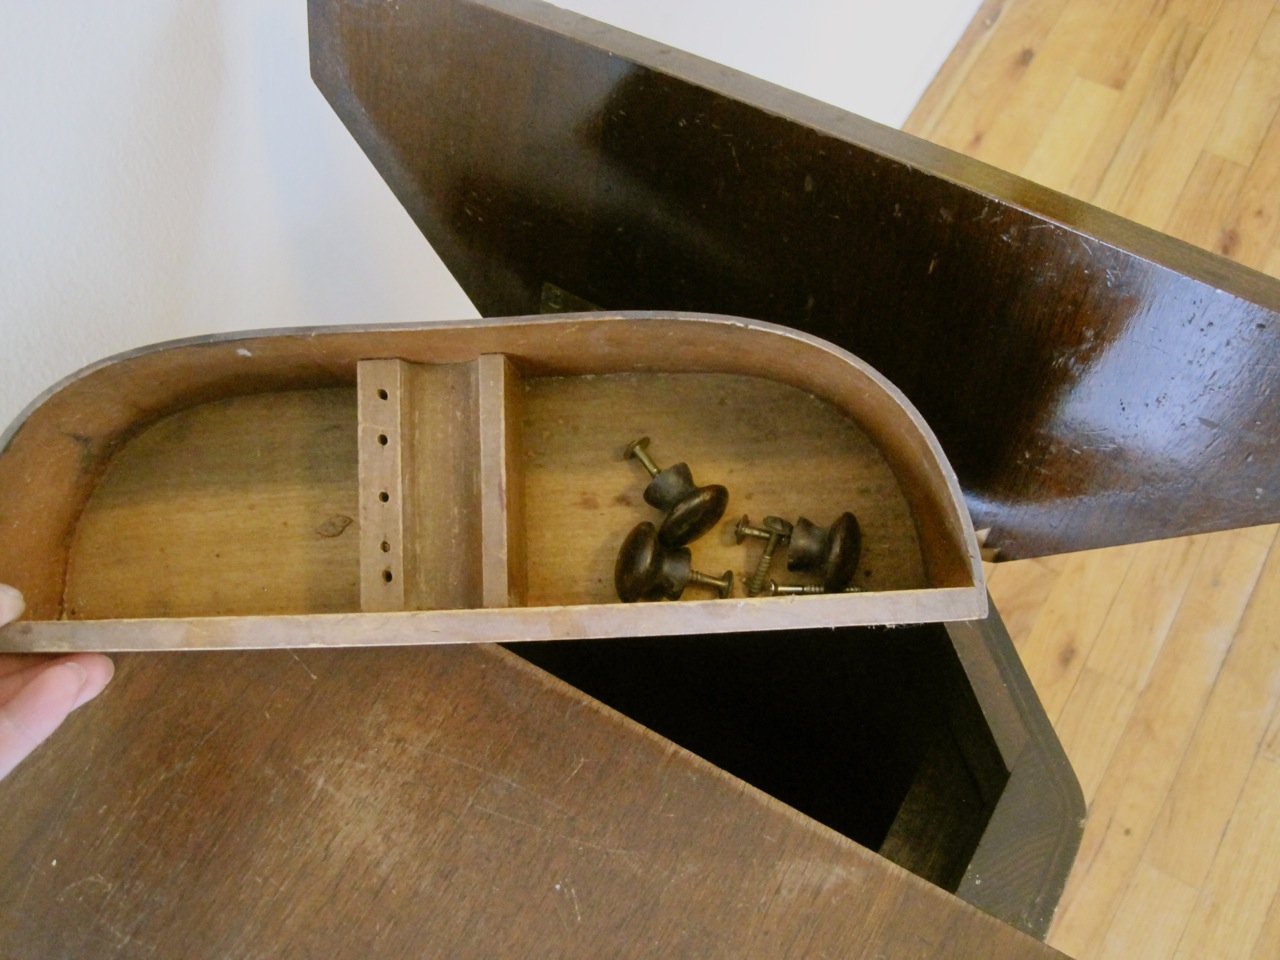
The right side flips up and has a little accessory tray and cubby.

The left cubby lid has an interesting hinge that pushes the lid down when the top is opened.
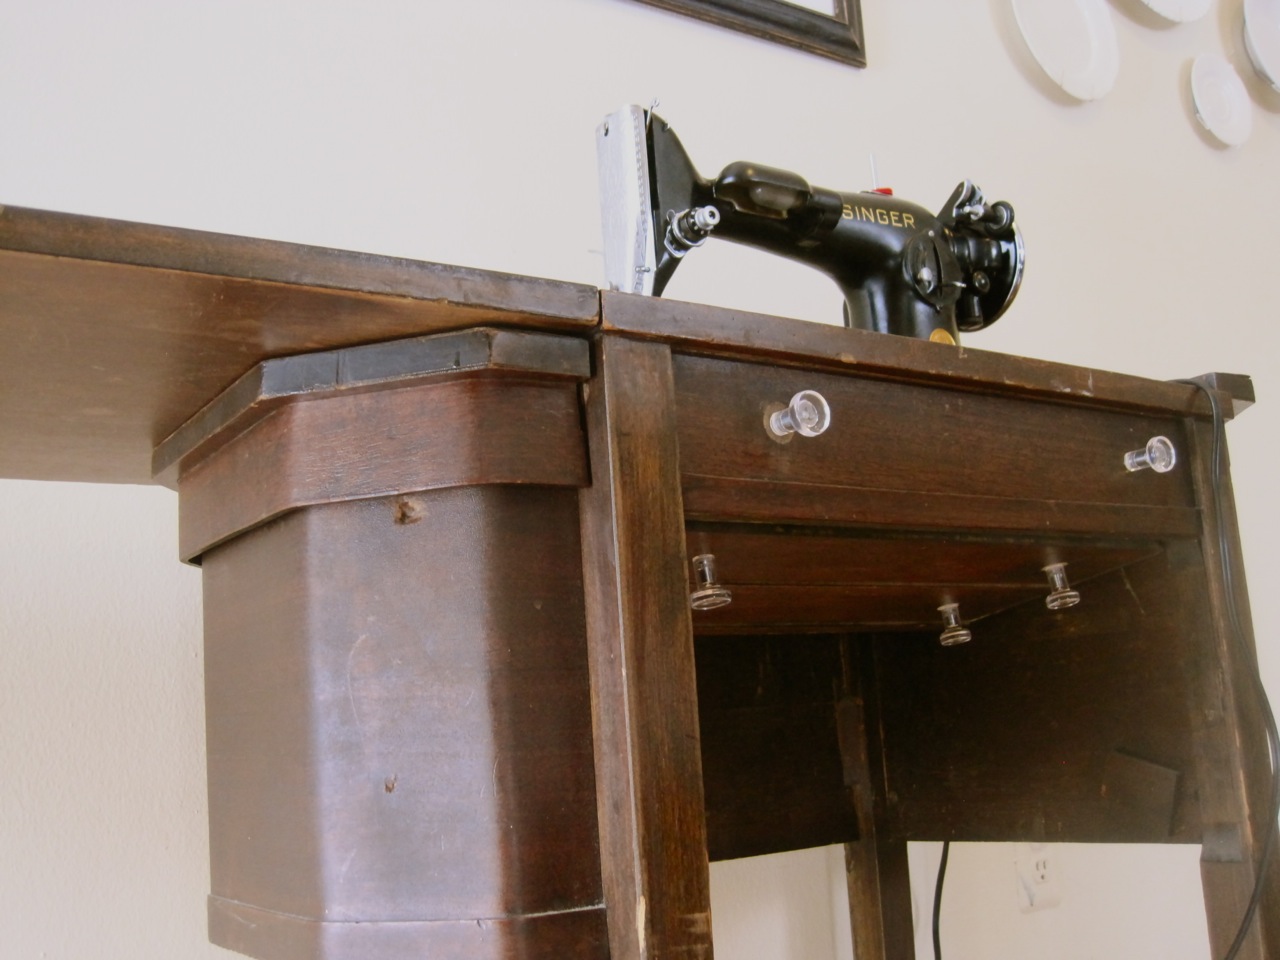
When you open the top the machine automatically pops up and the front folds in to make room for your legs.


I bought the machine for $15 and spent $90 on parts and tools. You really can’t beat $105 for a sewing machine that will last you forever! Now I’m cruising Craigslist for more old Singers to make-over! It was fun!!

34 Comments
So awesome, miss smarty pants! Good job on the rebuild- cute cabinet too, love the glass knobs.
February 28, 2013 at 7:21 amYou are a brave girl. Good luck with the soldering. I am impressed.
February 28, 2013 at 7:21 amOnly you could do something like that. You're amazing Dani!
February 28, 2013 at 7:21 amWow!! You go!! I'm looking for a 201, thank you so much for the great pics. I'm going to refer back here when and if I find my 201,, Amie
March 19, 2014 at 9:49 amAmie, I check Craigslist almost daily and once in a while come across 201's. I try to buy mine for $50 or less because I re-sell them to make a profit. If you're buying one for yourself, paying $200 for a machine in good condition with the box of accessories is a great investment! Even if you have to change the power cords and clean out the motor.. good deal! Changing the power cords are easy.. if you want more info I'm happy to help.
March 19, 2014 at 10:51 amGreat job, photos and explanation of your experience! Can you share where you found the replacement items such as the wicks and wiring? Thank you!
December 5, 2014 at 7:31 pmYes, I sell them on eBay! http://www.ebay.com/itm/321503075089?ssPageName=STRK:MESELX:IT&_trksid=p3984.m1555.l2649
December 5, 2014 at 7:32 pmImpressive! I’ve thoroughly cleaned, oiled and greased all of my 20 some vintage Singers but stay away from wiring and tensioners – they scare me!! You are an inspiration! My 201 is a favorite.
March 10, 2022 at 8:25 pmWhat was the blog you mentioned in the 3rd paragraph about re-building a motor? I have a different singer motor and the wires are broken off right down to the coil.
February 15, 2016 at 1:48 pmHi Rich! It's the "Vintage Singer Sewing Machine Blog".. Just Google it with "re-wire tutorial" and you'll find it!
February 15, 2016 at 1:50 pmI just found your blog. Purchased a Singer 15-91 yesterday and it has the potted motor like this machine. It totally has to be rewired but already having fun cleaning it up. I will refer back to here when i get the nerve to start the rewire. Hehe
February 25, 2016 at 4:24 pmYou'll get hooked fixing machines up after seeing how much better your 15-91 will run – watch out! 🙂 It's nerve wracking doing the re-wire for your first time (mostly cutting off the old wires and soldering the new ones, but in the re-wire kits I sell there's enough wire/solder for you to practice a few times. It really is easier than you'd think! Good luck!!
February 25, 2016 at 4:26 pmWow… what a difference. I have a 201 in need of a redo as well. I've had an electrical friend help me wire the pedal and plugs, but need to do the motor next. Thanks for sharing.
April 18, 2016 at 8:10 amOh..thanks so much for this site. I'm going have to rebuild my 15-91 potter motor and you have given me some confidence in trying it.
May 7, 2016 at 4:24 pmYou're welcome! Feel free to email me with any questions you have during the process! Twirlybirdbaby@gmail.com
May 7, 2016 at 4:25 pmDear Dani, I'm amazed and impressed and motivated to take on my Singer potted motor. You mention you sell re-wire kits. Where can I purchase one? Thank you.
November 7, 2016 at 8:43 pmHi Eileen! I sell the kits on ebay: http://www.ebay.com/itm/Kit-for-re-wiring-motor-on-Singer-15-91-and-201-2-Sewing-Machines-Potted-Motor/322206397296
Let me know if you have any questions during the process!
Thanks!
November 7, 2016 at 8:46 pmDani
I am SO impressed that you did this. I've inherited my Grandma's machine and was going to get a professional to look at it. Now you've inspired me to do it myself. Thank you!
November 19, 2016 at 12:12 amBecky, you'll have a good time doing it.. it's so rewarding! Feel free to send me an email if you have any questions!
November 19, 2016 at 1:13 amDani, you don't have a video of the whole tutorial of rewiring it do you? I've just sent mine to have it rewired and serviced, but the 2nd time using it the foot petal wires came out. I felt that the machine didn't perform as I've read and heard it should. It sounded smooth and had a beautiful stitch, but didn't feel as "strong" as I felt it should. I'd really like to do this myself because I'm a firm believer that if you want something done right then do it yourself. I looked for 5 months for a 201 and found a 201-2 two hours away. I paid them to bring it to me. I wanted it just that bad. lol. Now I could cry a river. 🙁
January 15, 2017 at 10:52 pmHi Cindy! I'm sorry but I don't have a video – I have thought about it though! I'm just not into videos because I don't like to see or hear myself talk, ha!! It is rather an easy process if you follow the steps on the vssmb.blogspot.com (http://vssmb.blogspot.com/2012/01/complete-how-to-re-wire-potted-motor.html). I've done a dozen+ re-wires and it's amazing how easy it is (my first time I was sweating bullets and so anxious I thought I would pass out). It is really easy.. just practice soldering a little with scrap wires and get comfortable with it. Cutting the original wires that lead to the motor is the most stressful part because there's no turning back but once you cut them you simply solder new ones on! 🙂 201's are great machines. I've owned/worked on so many different models and this is the best household model hands down. I'm sorry that you're having a problem with yours! It's true- you'll care more about your machine than anyone else and will do the best job you can. I wonder why the pedal wires came out??… that's very odd. If you're interested, you can take the motor off and ship it to me and I can re-wire/grease it up and it's a pinch to attach it back to your machine and hook the wires onto the terminal. You can also send the pedal too and I can either fix the current wires or add new cords (double-lead) which I add to all my machines' pedals. Feel free to message me at twirlybirdbaby@gmail.com. I do these motor re-wires + pedal re-wires for $150 and that includes me shipping it back to you.
January 15, 2017 at 11:02 pmDani..I have a 201-2 that my husband bought for $50 from a neighbor 10 years ago, it sat in our basement for those 10 years because I thought he had just wasted $50 but about 6 months ago , I drug it out ,cleaned up & it sees like a dream !! UNTIL this weekend, it started making a clicking sound in the motor when I would see, now it won't do anything at all !! Did the motor burn up ?? Do I need to buy a new motor or could this one be rebuilt ? Would really appreciate some advise, I don't want to junk it, I love my 201-2 !! Please advise..Thanks
August 24, 2017 at 10:03 amHi Gloria! I'm so glad you dug out that machine and found how beautiful they are! I can't tell you exactly what the clicking noise would have been. It could very well be the wiring – most likely. These motors are resilant. I've seen some BAD wires and the motor always works after new ones have been soldered on. I would say it's definitely worth a shot. I do mail-in repair if you're interested. You can mail it to me and I can take a look inside. I may be able to tell what the problem is and I'll let you know and give you a quote for how much it would be to fix it. If it's a wiring problem I can go ahead and do that for you! For more information about my mail-in service there's a tab on the top of the page with all the information you need! https://www.theprojectlady.com/p/re-wire-sewing.html
These machines are definitely worth fixing. They're so well built they will outlast any of us (we just need to take care of them) 🙂
Feel free to e-mail me with any other questions at twirlybirdbaby@gmail.com
August 24, 2017 at 10:09 amThank you, Dani. I already have 350 in the machine, so I'm going to have to do it myself or throw it in the garage to collect dust. I know I am crazy for putting that much into it, but from all the reviews I've read I thought I really needed this machine to handle the thicker fabrics and layers.
February 26, 2018 at 8:56 amI did have a look at that website and pictures posted but I cannot see where the 2 wires for the foot petal go.
I think they came out because as I was trying to put the petal in the cabinet to use the lever to sew instead of the petal, it dropped down and hit the floor and therefore pulling on the wires. It looks to me like the guy only rewired the foot petal.
If you ever decide to do a video, I'd greatly appreciate it. You wouldn't have to show your face. Just point the phone/camera at the machine. 🙂
Hi Dani,
June 19, 2020 at 10:10 amI just picked up a 1948 201 a few days ago. My husband will rewire it,and I’m going to clean it up, grease, and oil it. It’s in good shape except the wiring, of course. I’m so excited to get this machine! Back in March I finally got around to cleaning, polishing, and oiling my 1930 Singer 99 that I got in November of 2018 and I love it! It sews beautifully. Had I known that it wouldn’t take that long to get it cleaned up, I would have gotten to it sooner. I’m going to start cleaning my 201 today. I took “before” pictures yesterday. Thanks for the helpful info.
You’re welcome Renita! Best of luck with your restoration!
July 4, 2020 at 9:39 amHow do I buy the rewire kits for my old 201 and 15-91?
July 19, 2020 at 7:18 amI sell them on eBay: https://www.ebay.com/itm/RE-WIRING-MOTOR-KIT-for-Singer-15-91-and-201-2-and-other-Sewing-Machines-/224111095271
September 30, 2020 at 2:08 pmHi Dani;
July 27, 2020 at 8:33 pmI am currently looking for a 201-2 motor and parts. It seems I might not be looking for the right place to purchase parts. I trying to refurbish this sewing machine for my mother. She bought this sewing machine at a yard sale and was told that it worked. She asked me to checked it out and do whatever maintenance it needed to work, since it did not come with a power cord. I found that the motor was burnt in dissembling this sewing machine and looking for a replacement, any assistance you can offer me would be greatly appreciated.
Your best bet is to browse eBay. Good luck!
September 30, 2020 at 2:07 pmDani,
January 28, 2021 at 4:02 pmHow do you clean the old grease out of these vintage Singer sewing machines? By the way, my 11-yr-old grandson cleaned and re-wired a vintage Singer that his mother purchased last January. The machine worked after his repairs and he was one proud “Mr. Fix-it.” He did the repairs by himself; although, he could have asked for help from his dad who is a bonafide rocket scientist. His next project is a player piano that needs new pneumatic tubes. The main issue with that project is that the joints have lead in them. When he figures out how to work safely on the piano, he’ll be off and running on that project.
Hi Kathryn! Sounds like your grandson is a smarty pants, awesome!
To clean the machine (no wires) the best way is to use kerosene. Some people soak that whole machine in kerosene to get all the internal parts really well – I’ve done it and it’s worth it if the machine is really gummed up (use a big bin and wear goggles/gloves when handling). If the machine isn’t terribly bad you can use rubbing alcohol with cottonballs/swabs to wipe off visible areas – I also do this for inside the motor housing.
Hope that helps!
January 29, 2021 at 4:03 pmI’ve been collecting and re-habing (spelling?) vintage Kenmores for a while now and have cleaned a lot of motors, but I’ve never rewired one, so you’re way ahead of me! In addition to my much-loved Kenmores, I have a Singer 301A in mint condition and I would LOVE to have a 201-2 when I find one I can afford. I keep checking Craigs list, Mercari, ebay and Goodwill online. I’ll get one eventually.
November 16, 2021 at 10:35 pmI think you did a FABULOUS job on yours!!
By the way, the table it’s in is a Martha Washington sewing table. Probably a reproduction – I’m not an expert so I wouldn’t know for sure, but it IS a lovely table. I have one also, it was my mother’s, but it’s not set up for a sewing machine. I’ve never before seen one that was; that’s quite a find you have there.
Thank you Suzanne!
January 29, 2022 at 2:39 pm